In this blog, we will learn practically how to use Nmap tool with various Nmap commands also we will see what is Nmap, Nmap download, installation and much more...
Nmap is basically a utility that is used by hackers, security testers, network administrators and other security professionals for monitoring services, finding loopholes, detection of live hosts on a network, port scanning, ping sweeps, OS detection, and software version detection.
It provides various features and usage of this tool depends on the user
- Hacker's mostly uses this tool to find vulnerability so that they can attack particular service to enter into the target system
- Network Administrators use this tool to monitor and upgrade services
- Security professionals (Ethical Hackers) use this tool to found weak services and fix them to improve security.
I have not only discussed Nmap commands but also share a cheat sheet of Nmap commands at the end of this article that you can download. So let's get started...
- What is Nmap?
- Nmap Download
- Nmap Install in Linux
- Nmap Install in Windows
- How to Use Nmap Tool?
- Nmap Commands
- Nmap Cheat Sheet
What is Nmap?
Nmap stands for Network Mapper is an open-source and free tool used for network discovery and security auditing. It is a very useful utility for network administrators for monitoring server, service upgrades scheduling, network exploration, monitoring packets like TCP and UDP etc.
Nmap is also used by hackers and security experts to find vulnerabilities in target. Nmap will provide various information about the host such as the number of hosts or users present in a network, What type of service and their versions the host offers, What kind of OS is the host running, The host's firewall settings and much more.
Nmap is available for all platforms like Linux, Windows, MAC, BSD and mostly used as a command-line utility but it also offers a GUI (Graphical User Interface) version in the form of Zenmap.
Nmap Download
Downloading Nmap is normal like other tools but it varies according to your operating system. As I told you it is available for Windows, Linux, MAC. You can download it directly from the official website by clicking on Nmap download. Check out the below download process according to your OS.
Note: If you are using Kali Linux then you don't need to download and install it because it is pre-loaded. If you don't know about Kali Linux and want to know how to install kali Linux then you can check step by step installation guide by clicking on Kali Linux
For Windows
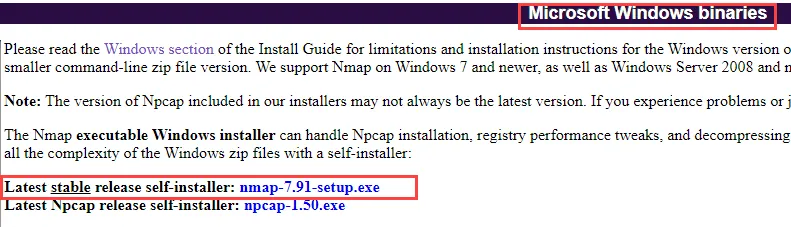
When the website open, scroll down and locate Microsoft Windows Binaries. After that click on the Latest stable release of Nmap. See the below image for the reference
For Linux
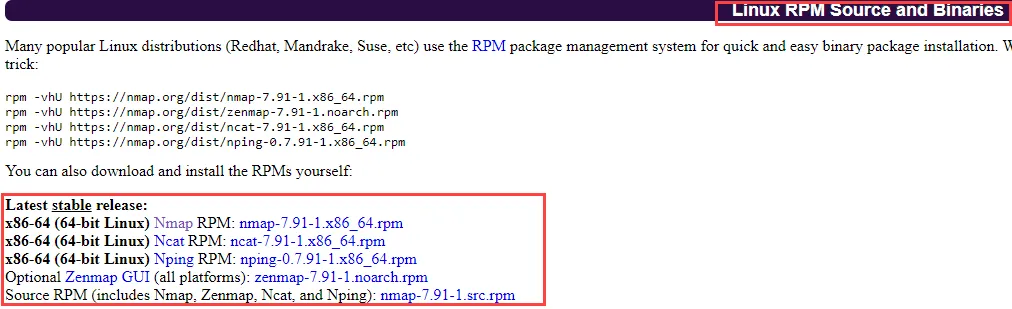
When the website open, scroll down and locate Linux RPM Source and Binaries. After that click on the Latest stable release. See the below image for the reference
For MAC
When the website open, scroll down and locate Mac OS X Binaries. After that click on the Latest stable release. See the below image for the reference

For Other Operating System
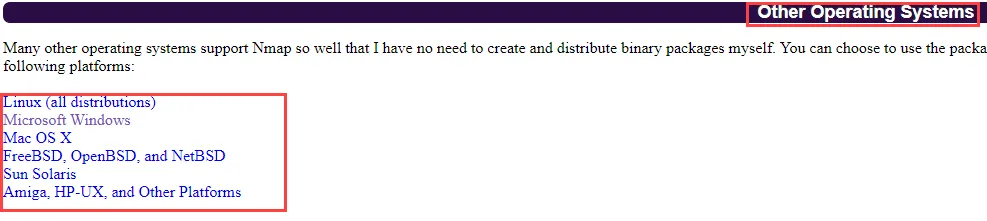
When the website open, scroll down and locate Other Operating Systems. After that click on the Latest stable release. See the below image for the reference
Nmap Install in Linux
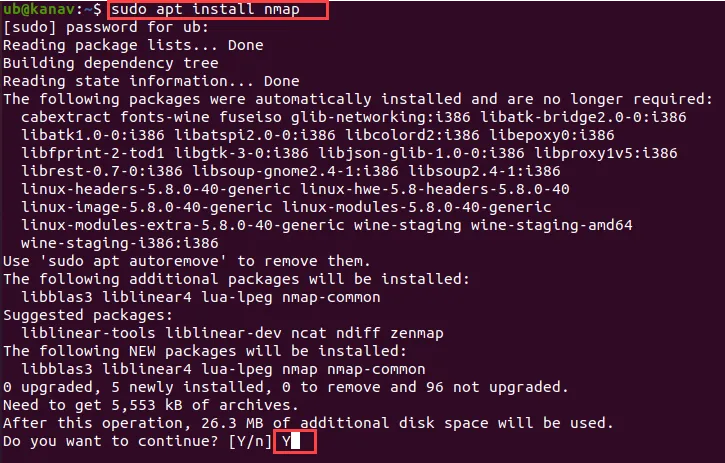
Installing Nmap in Linux is just done by a single command. After executing the below command it will ask you for confirmation, you need to press Y to continue. Check the below image.
sudo apt install nmap
Open your terminal to verify whether Nmap is installed or not and what is the current version by following command.
nmap --version
Nmap Install in Windows
The process for installing Nmap in windows is interactive and just like other software. When you install it, then it will available for you on both GUI and Command-Line on your system.
Step 1: Double click on an installer that you have downloaded from the official website.
![]()
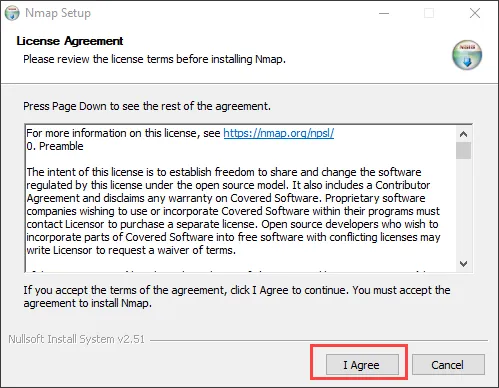
Step 2: Now you will see the setup is appear which asking for a License Agreement so just click on I Agree
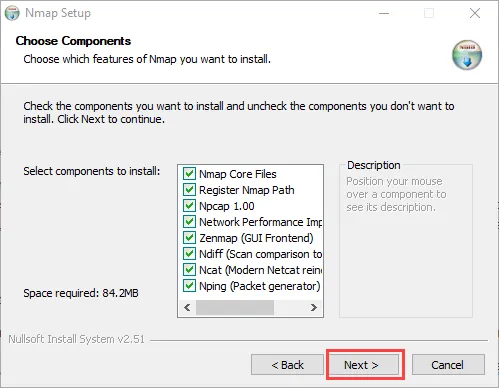
Step 3: Now in the next step, you have to make sure every option is marked and then click on Next
Step 4: Now setup will ask you to specify installation location, you can click on Browse to specify your desired location else you can click on Install to go with the default location.

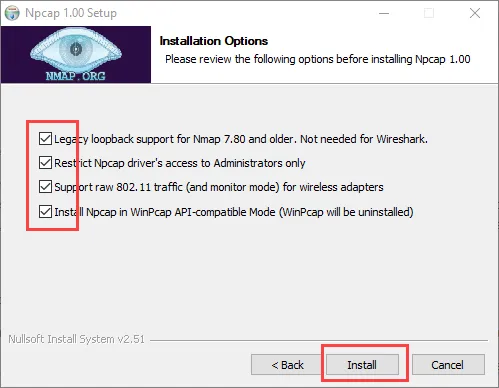
Step 5: In this step, you need to tick mark all options if you want additional packages. then click on Install to continue
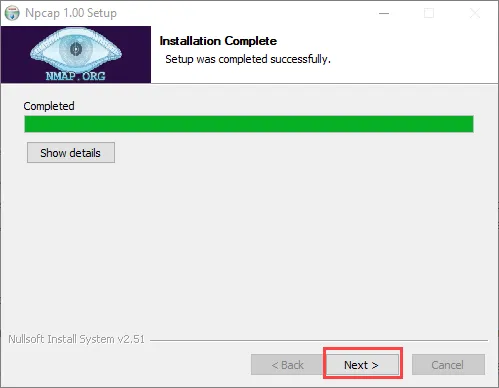
Step 6: After few seconds you will see the same below screen that shows your installtion is completed So click on Next.
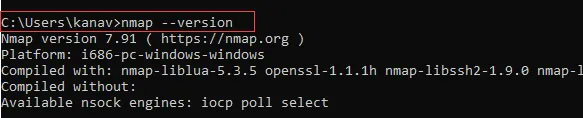
Step 7: Open the command prompt to verify with the below command whether Nmap is installed or not and what is the current version.
nmap --version
How to Use Nmap Tool?
Using Nmap is very straightforward, but when someone uses it the first time then you may feel its output looks complex.
In order to use Nmap, you need to be familiar with some networking terms, but don't worry I have explained each thing in an easy way so that it will be simple to understand, if you want to cover some basics of networks then you can check my blog on a computer network by clicking on Networking
Instead of networking Nmap have some basic terminologies that always occurs when you use that and it is important to understand them before using them.
During scan Nmap shows services with its states that tell you about the target system is vulnerable or not. Nmap port has six states:
- Open: It means that an application on the target machine is active and listening for connections on that port
- Close: Closed ports are not in listening states i.e, you can not make connections with them.
- Filtered: It means the target port is protected with a firewall that restricts you to reveal its state, hence Nmap unable to tell whether the port is open or closed
- Unfiltered: Ports are considered as unfiltered if they are responsive to Nmap's probes, but still it cannot be determined whether ports are open or closed
- Open|Filtered: This state occurs when Nmap unable to search whether a port is open or filtered. It mostly appears when open ports give no response. So Nmap can't give you assurity about whether the port is open or being filtered.
- Close|Filtered: This state occurs during IP ID idle scan and used when it is unable to evaluate whether a port is closed or filtered.
Before starting implementing Nmap commands. I want to tell you few things that I have used during execution:
- I have used three systems Kali Linux (Attacker Machine), Ubuntu and Windows as a target machine.
- The local IP address of the Ubuntu machine is 192.168.1.7 and the IP of the Windows machine is 192.168.1.10
- I have used the scanme.nmap.org website to perform live practicals because Nmap officially allowed to perform scans on that domain.
- Don't scan any website without the owner's permission.
if you don't have any basic knowledge of Linux Commands and eager to learn commands for free with practical then you can check my blog by clicking on Linux Commands
Nmap Commands
Nmap has lots of commands and every command is useful and powerful according to scenarios but still, there are some important commands that you should know before using Nmap. So Let's see some basic and mostly used commands in the Nmap tool for scanning targets.
Note: Don't scan any other website without the owner's permission, Techofide will not responsible for any illegal activity performed by you. This blog is just for an educational purpose and we only promote ethical activities (legal).
1) Nmap Port Scan Basic Commands
Targets can be scanned in Nmap using a website address or IP address.
A) Now first we will run a basic command to scan the target, just follow the below command (You can use any other website also but make sure you have permission to scan that website, if you don't have any permission then you can avoid it and use the same website that I used in below example)
nmap scanme.nmap.org
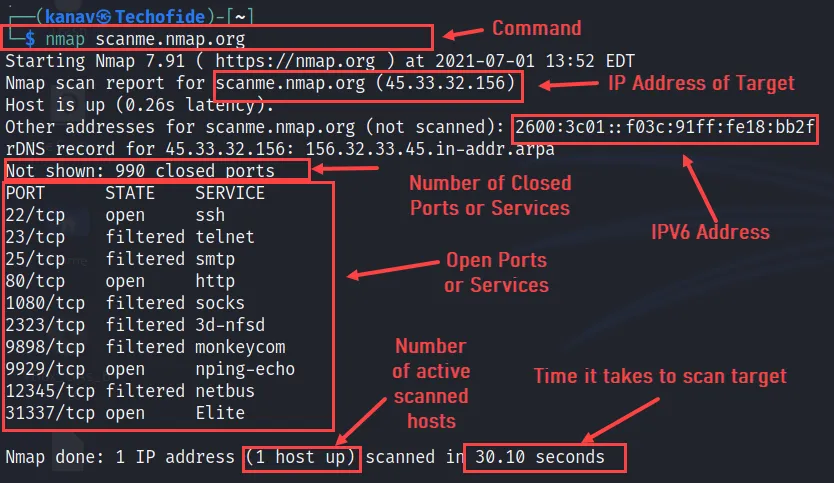
This command will scan a targeted website and shows us open services with their states as a report. Check the above well-labelled picture to know each and every field of the output.
B) Now if you performed the above command on your system and noticed that it takes time to scan, but you can reduce that time and make it fast by using the -F option with the Nmap command. It will perform a quick scan and shows you important open services.
nmap -F scanme.nmao.org
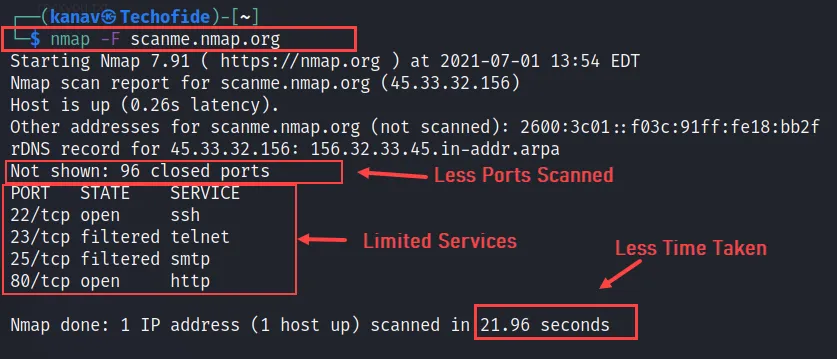
You can compare its output with the previous command. Without -F option command takes 30.10 seconds to complete scanning of all ports and with the -F option it takes 21.96 seconds to scan important ports only.
C) You can also scan your target by using an IP Address only. So just simply type IP Address instead of the domain name.
nmap 192.168.1.7
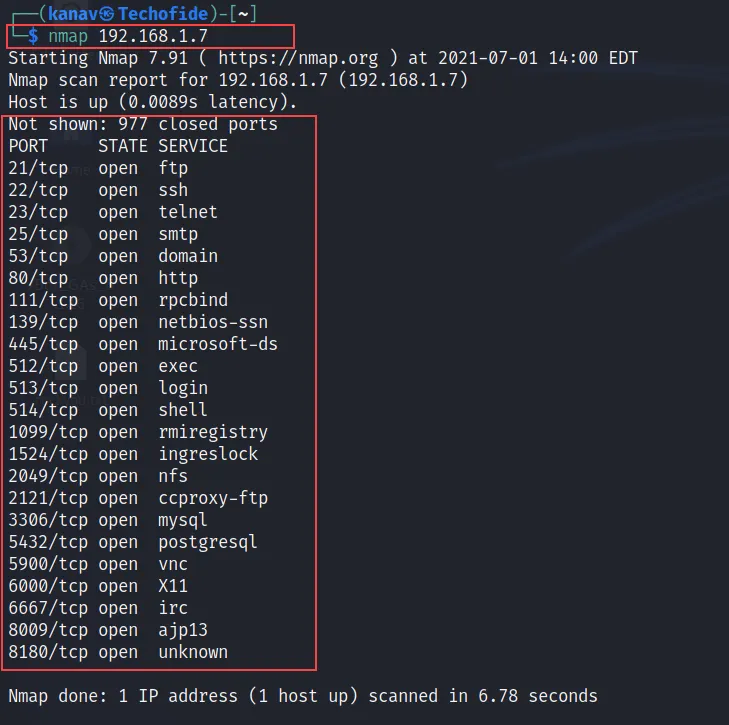
In the above screenshot, you can see I have scanned 192.168.1.7 which is my localhost machine. This command will show you the open ports or services of the targeted host.
D) We can also scan targets through a file. follow the below command to do the same.
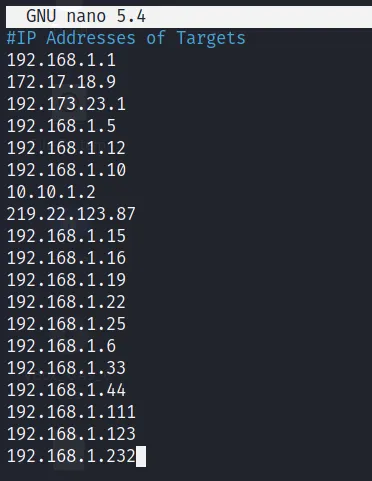
In the above image, I have shown you a file of txt format i.e, target.txt that have a list of target IP. You can also create your own file to perform the scan from the file.
nmap -iL target.txt
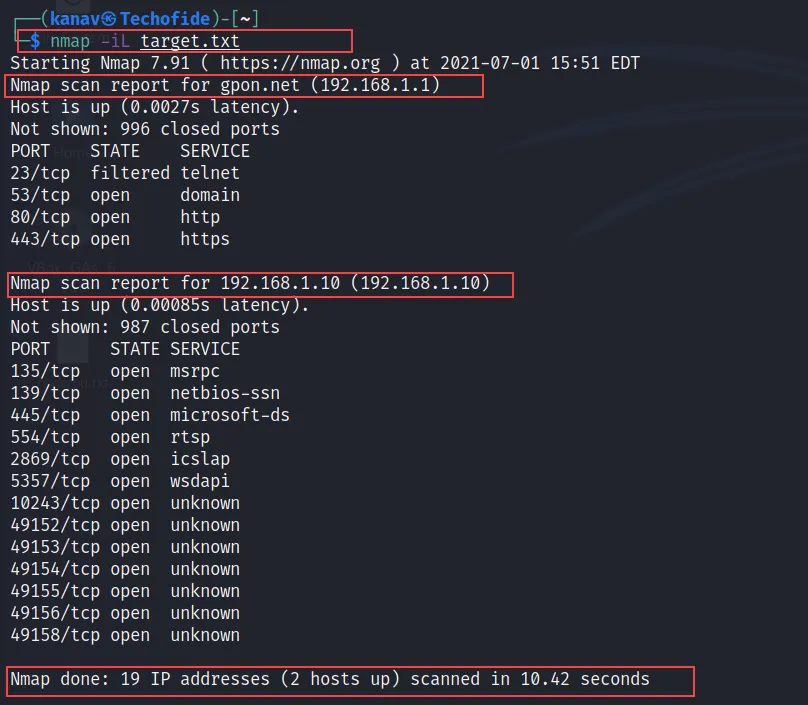
Now we just run the command with the -iL option to scan a list of hosts from our file. In the above screenshot, you can check the output where it scans two different hosts 192.168.1.1 and 192.168.1.10
E) If you want to store the output of the scan in a separate file then you can use the -oN option. see the below command.
nmap -oN result.txt 192.168.1.7
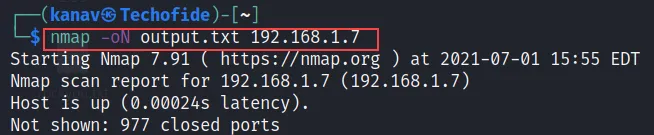
After running the above command it will scan the given host and store the output in the output.txt file of your current location. (You can give any name to the file In my case it is output.txt)
2) Scanning Multiple Hosts Basic Nmap Commands
You can scan multiple locations with Nmap at once rather than scanning a single host at a time. There are various methods to scan numerous locations at once and one of them we already seen above with an external file.
A) Let's see other ways to scan multiple hosts. In the below command I have scanned two different hosts 192.168.1.7 and 192.168.1.10.
nmap 192.168.1.7,10
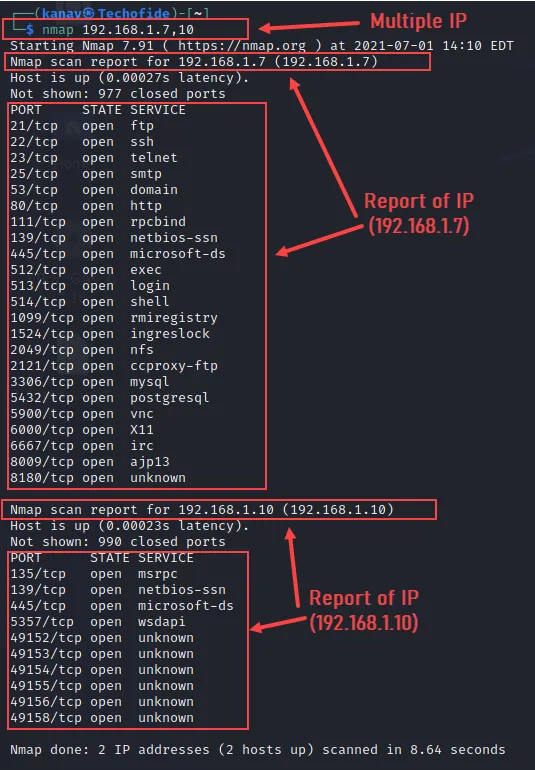
Multiple IP 192.168.1.7, 192.168.1.8, 192.168.1.10 can be written in short as 192.168.1.7,8,10 Same I have done in the above command. Check the above picture where it scans multiple hosts.
B) You can scan the entire network by using the wild card (*) that will scan all IP addresses from 192.168.1.1 to 192.168.1.254
nmap 192.168.1.*
C) You can also adjust the range if you don't want to scan the full network by using the below command.
nmap 192.168.1.1-4
So the above command will scan four IP Addresses 192.168.1.1, 192.168.1.2, 192.168.1.3 and 192.168.1.4
Like that, you can follow any way you want to scan multiple hosts
3) Excluding Hosts from Scan in Nmap
Nmap can scan the whole network, specific target, entire subnet and anything depend on your scenario, you can also scan the whole network and exclude specific IP addresses that you don't want to be scan during entire subnet scans.
A) To exclude an IP from the entire network scan you can go with the below command.
nmap 192.168.1.* --exclude 192.168.1.7
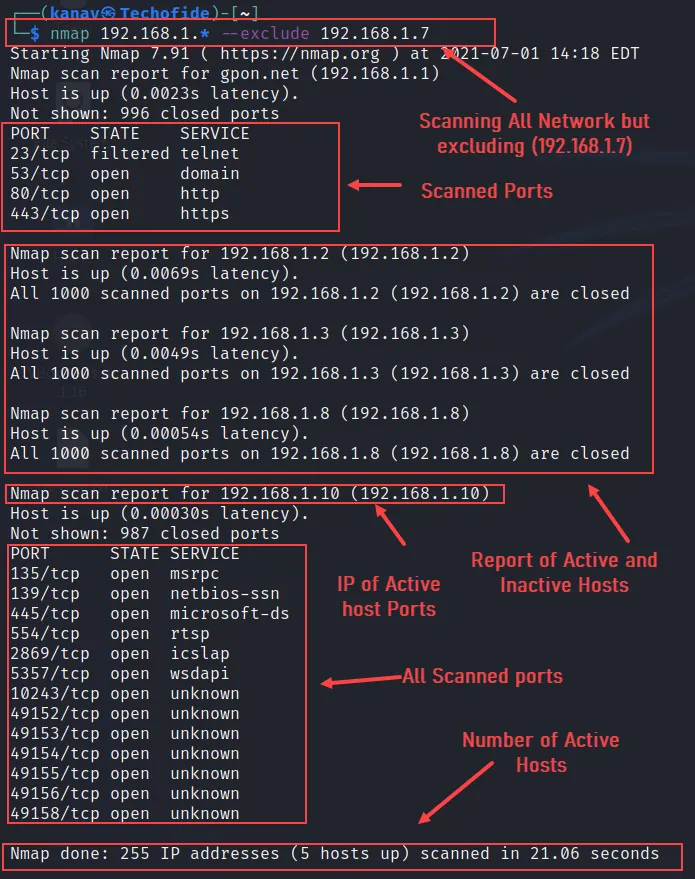
You can exclude specific hosts from your network range by using the --exclude option. In the above screenshot, you can observe it scans all IP addresses except 192.168.1.7
B) If you are using files to scan and want to exclude a specific file, you can use the --excludefile option. follow the below command
nmap 192.168.1.* --excludefile /file.txt
4) Find OS Information with Nmap Commands
Nmap not only provides service or port information it also provides the operating system information like model, os version, type etc. Nmap is a very important and best tool for OS detection.
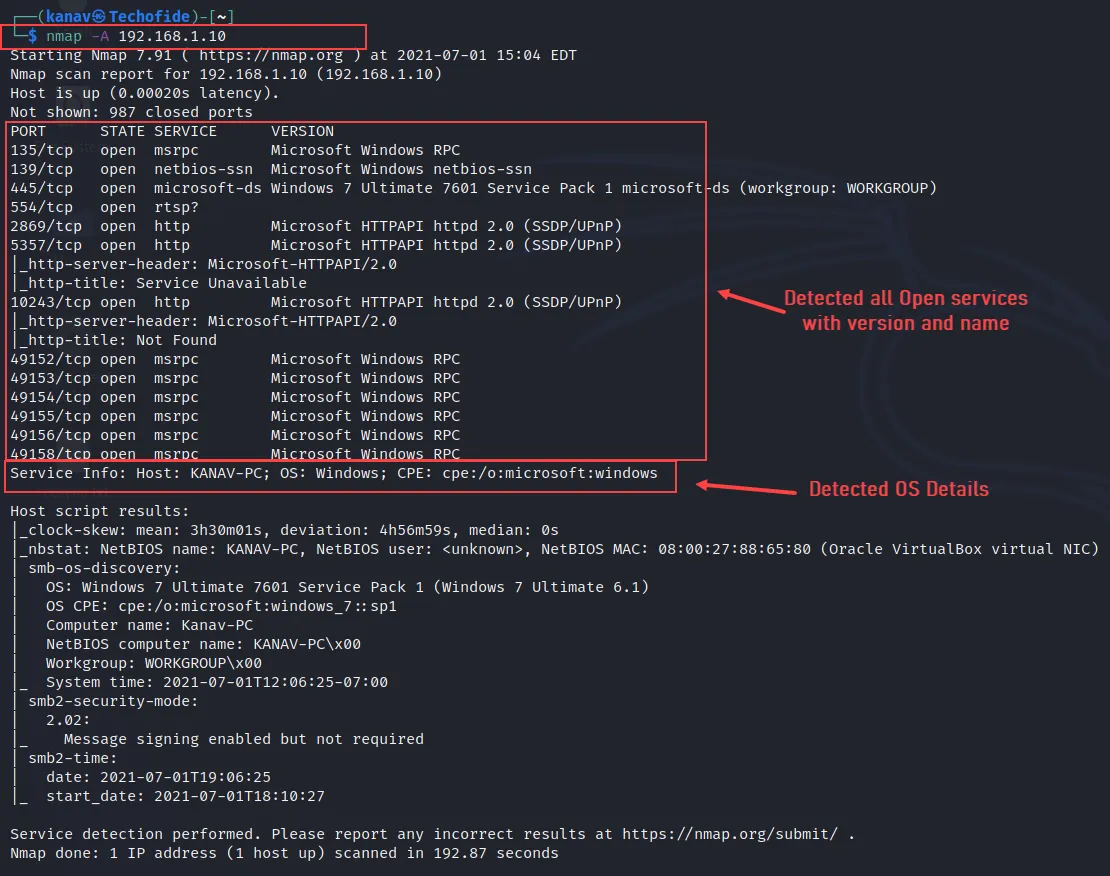
A) The below command will tell you about the host's OS and Services information with their states, versions and ports. -A flag is used to get all information about OS and Services.
nmap -A 192.168.1.10
B) This command is the same as the above command but it will only show you Operating System details with few associated services.
nmap -O 192.168.1.10
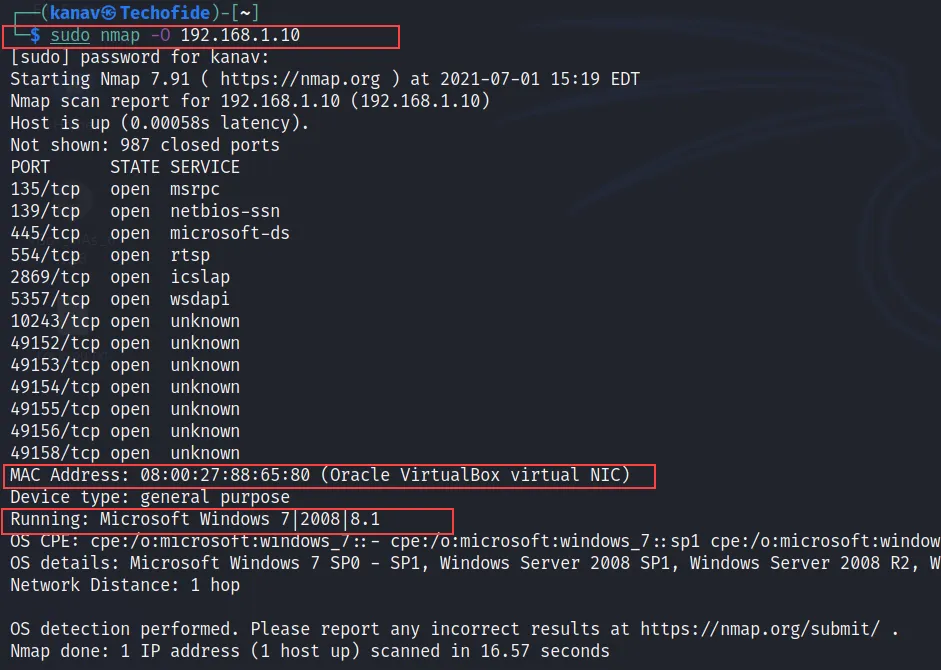
The -O flag will lists further operating system information of the associated host that enables OS detection with additional tags like –osscan-limit and -osscan-guess. where -osscan-limit works normally and -osscan-guess is used to scan the same OS details but aggressively.
5) Detect Firewall Settings with Nmap Commands
During scanning, it is very useful to detect firewalls on the target system to do safe and smooth scanning without any detection and Nmap offers various ways to do with its commands.
A) Let's see a very common command that is used to detect firewall settings.
nmap -sA 192.168.1.10
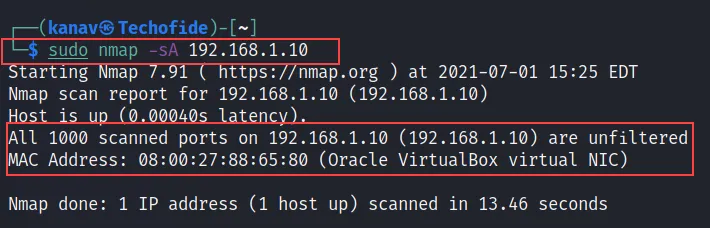
The -sA flag with the Nmap command will show you whether the firewall is active or not on the host. ACK scan is used by Nmap in the backend to provide you with that information.
6) Find Service Versions with Nmap Commands
This is a useful command for troubleshooting and scanning vulnerabilities or finding services that need an upgrade.
nmap -sV 192.168.1.10
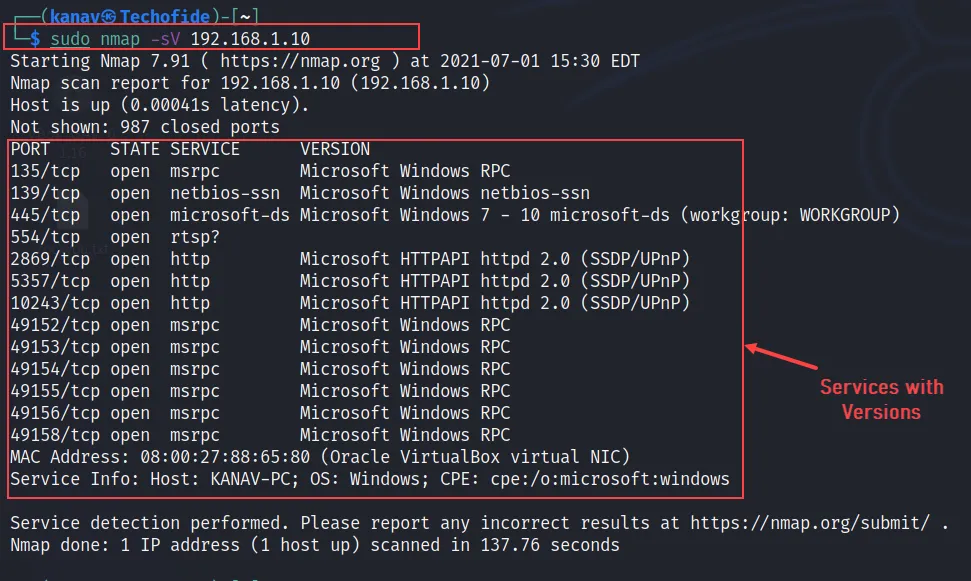
The -sV flag will tell you versions of all open services of the target machine.
7) Nmap Scan All Ports
As we are doing scanning we noticed various services with their port number came during a full scan of the host. But when hackers or security experts do scanning they mostly target some specific services
A) Scanning ports is the most basic tool of Nmap, We can use the -p flag to define a specific port for scanning. Check the below example.
nmap -p 80,443 192.168.1.10
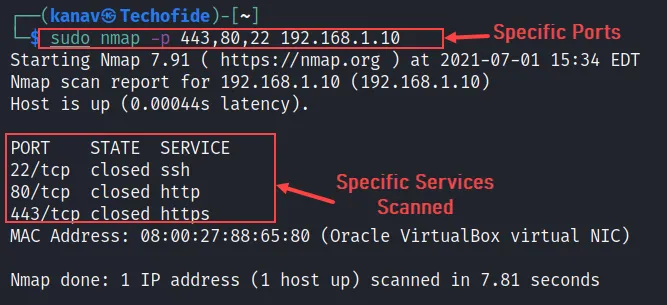
In the above picture, you can see I have scanned 443, 80, 22 ports of HTTPS, HTTP, SSH respectively.
B) You can also set the range of ports that you want to target for the scan just like the below command
nmap -p 80-443 192.168.1.10
The -p option can also be used to specify the range of ports, you just need to set a range like this 80--443 this will scan port in order that starts from 80 to 443, you can also scan randomly by just adding -r flag with the above command.
C) If you want to scan all available ports on the target system the -p- will be the best option for you.
nmap -p- 192.168.1.10
8) Stealth Mode Scan
A) If you want a stealthy scan then you can do it with Nmap by Using the -sS flag that will start a stealth scan with TCP SYN.
nmap -sS 192.168.1.10
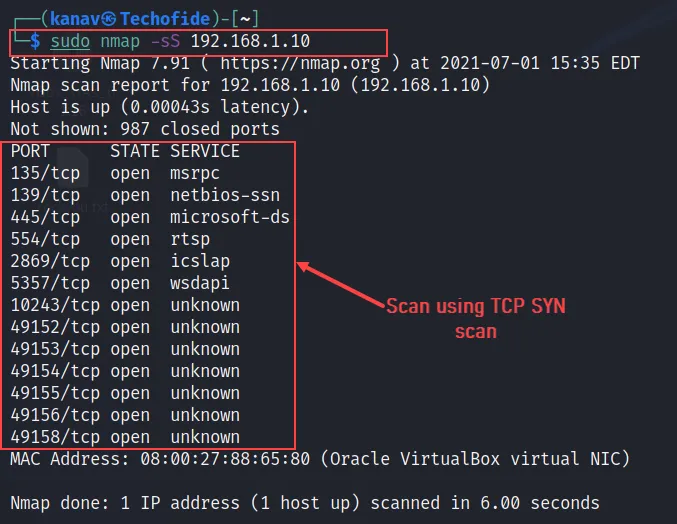
SYN scan is the most popular and default scan of Nmap because it rapidly scans thousands of ports in a second on a fast network and not captured by firewalls.
B) In Nmap there are lots of options that help to perform a single task in different methods, like that there are several ways to perform host discovery through Nmap. The most common one is by using the -sL flag. See the below example.
nmap -sL 192.168.0.1
The -sL will help you to find the hostname and completes DNS Query for each.
9) Use of Verbose with Nmap Commands
The -v flag i.,e Verbose works like a mode that enables you to read the information about the executed commands. for example, if you run any command with the -v flag you will able to see the stats of particular command check the below image.
nmap -v 192.168.1.10
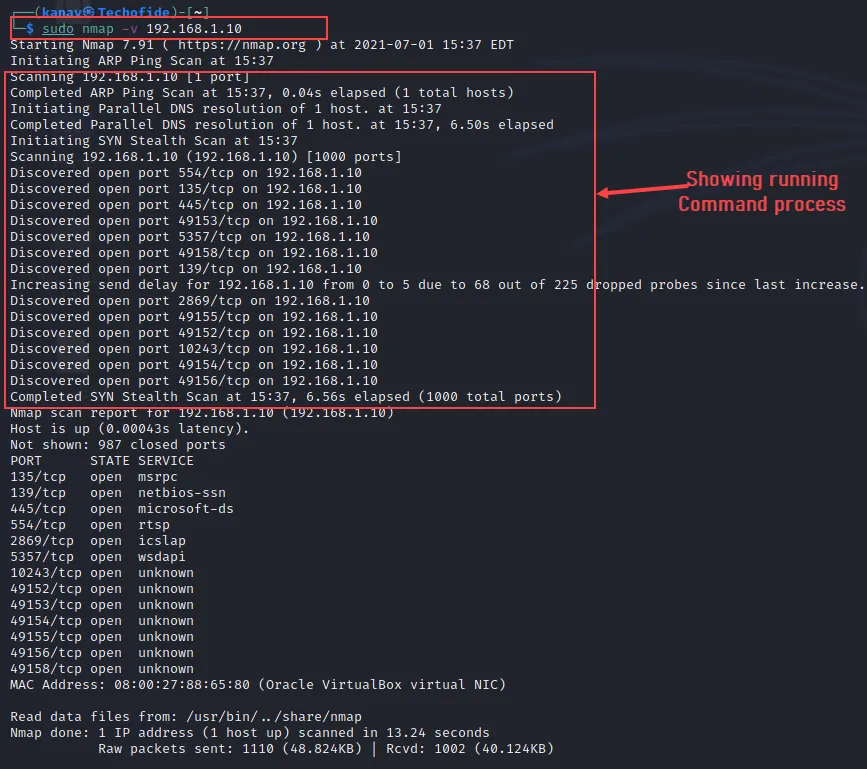
The -v flag will show you additional information about running commands like progress, percentage, tracks, stats etc.
10) Check Active Hosts
This is my one of the most useful command in Nmap that allows me to ping multiple machines with a single command to check which one is up and which one is down. Check out the below command.
nmap -sP 192.168.1.0/24
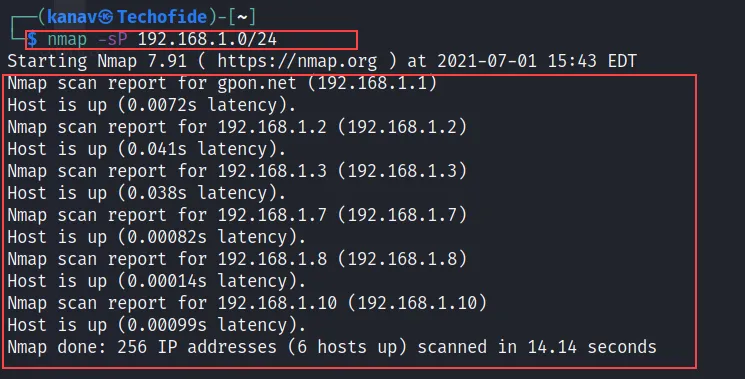
The -sP flag is used to list the active and available machines and ensure that machines are responding, or determine unexpected machines across a network.
11) Aggressive Scan with Nmap
An aggressive scan used when you want to run a quick and fast scan. The speed and the depth of the scan are controlled by timing and that timing mechanism can be manipulated with few flags. see the below example.
nmap -T5 192.168.1.7
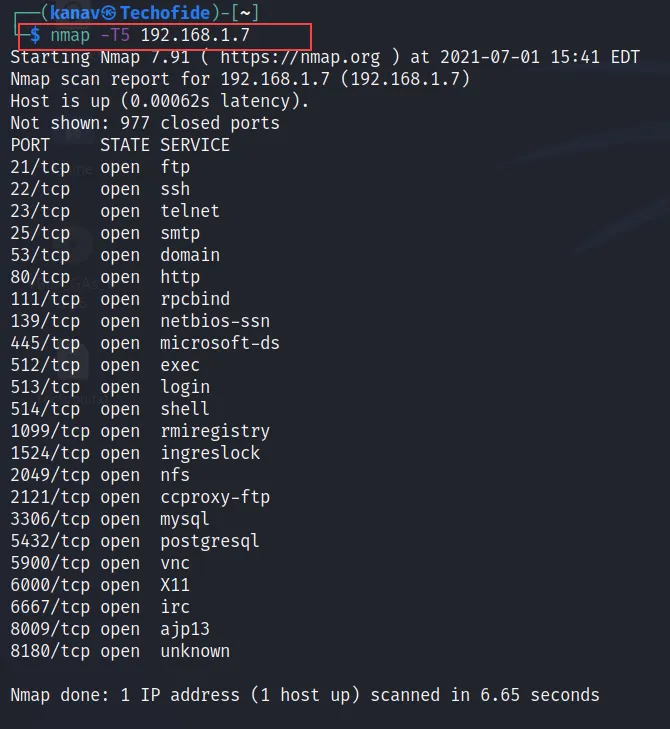
Aggressive scans are faster, but it also sometimes inaccurate. In the above command, I have used the T5 option to control timing. There are other options like T1, T2, T3, and T4. Mainly T3 and T4 are used in most scans.
12) Nmap Help Command
There are lots of Nmap commands and it is difficult to cover them all in a single article but you can use the help command to know about all available commands that you can run in Nmap. use the below command.
nmap -h
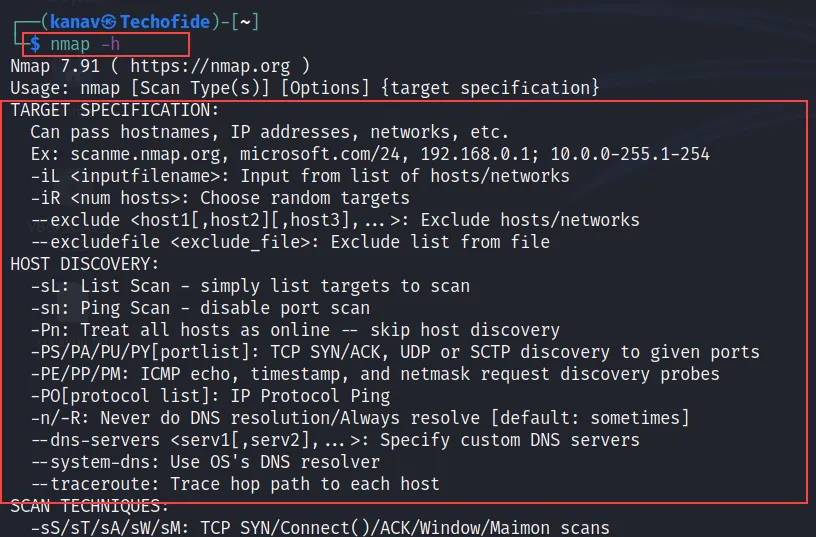
The -h tag will show you all Nmap commands with their options, summary and usage.
Nmap Cheat Sheet
Now we have seen few important commands that frequently used in Nmap but Nmap have lots of commands which is difficult to cover in one blog. I have made a detailed sheet of the remaining commands including Advanced Nmap options, Nmap commands and Nmap examples.
You can directly download this Nmap Cheat Sheet By clicking on the below download button

Conclusion
Now we understand that how to use the Nmap tool with Nmap commands from basic to advance. You can first run the commands and explore that tool after that you can read the other Nmap commands from the Nmap cheat sheet.
I have tried to explain practically almost all about Nmap utility. I hope this blog will be helpful for you.
Thanks for reading this article, if you have any query you can leave a comment below.
Want to be an Ethical Hacker but don't know where to start? Don't worry here is the step by step process that you have to follow So click on How to become an Ethical Hacker
Related Blogs
- How to Install Kali Linux Step By Step Guide
- Linux Commands | Linux Commands Cheat Sheet
- How to Become an Ethical Hacker | Techofide
- What is Metasploit Framework | What is Penetration Testing | How to use Metasploit
- How to Install Metasploit on Windows and Linux | [Step by Step Guide]
- What is Computer Network | Basics of Networking [With Practical Examples]