Hi, Techies if you are trying to understand Wireshark and still confused about where to start then you are just landed at the right place.
I have made this blog very easy and practical so if you don't even know about Wireshark you can still understand it easily. After reading this article I can assure you that you will perfectly use Wireshark and you don't need to open any other blog.
This blog will start with basics like what is Wireshark, why do we use it and how to download and install Wireshark on your system then I have further discussed its basic applications and demonstrate the overview of the Wireshark interface after that we will see how to use Wireshark with its basic filters, color coding and see how to capture real-time network traffic using Wireshark.
I have explained each and everything with screenshots by doing practicals so you don't get confused. So let's get started
- What is Wireshark?
- Why do we Use Wireshark?
- Wireshark Download
- How to Install Wireshark on Windows?
- How to Install Wireshark on Linux?
- Basic Features of Wireshark
- Overview of Wireshark Interface
- Understanding Color Coding
- Capture Packets Using Wireshark
- Analyzing Network Packets
- Working with Wireshark Filters
- Wireshark Filter by Port Number
- Wireshark Filter by Port Name
- Filtering TCP Packets
- Filtering UDP Packets
- Wireshark Filter by IP
- Wireshark Cheat Sheet
- Commonly Asked Questions
What is Wireshark?
Wireshark is a tool that is often used as a packet sniffer, it is a network protocol analyzer that is used to capture packets from the network. The network can be your home, office, agency etc. Wireshark can do various things like other packet sniffing tools. Packet capture, Filtering, Analyzing and Visualization are the most useful features of Wireshark.
Example: If you want to know what kind of packets are exchanged between you and the internet while you are browsing, you can easily use Wireshark to monitor and analyze that packets.
Note: The term packet refers to a very small unit of data in a network
Why do we Use Wireshark?
Wireshark is an open-source, free and safest tool that is also used by networkers, cyber security researchers, government agencies, educational institutions, businesses and beginners to learn network troubleshooting to resolve issues and traffic analysis.
It is the best tool that will really give you a visualization of network traffic analysis i.e, you can easily observe how packets are travel from source to destination and vice-versa.
Example: A networker is facing a communication issue between two systems, then he can easily find out what exactly interrupting the connection by monitoring network packets on Wireshark.
Wireshark Download
You can use Wireshark on all platforms such as Windows, Linux and Mac. So Let's see one by one how to download Wireshark.
Wireshark Download on Windows
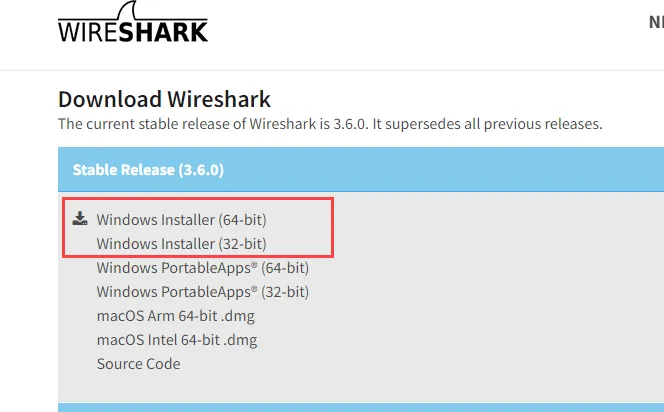
Downloading Wireshark on Windows operating system is very easy just like other Softwares. So just go to the official website by clicking on Wireshark Download on Windows and then clicking on either Windows installer 32-bit or Windows installer 62-bit depending on our system. See the below picture for more reference.
Note: On the same below image you can also see the dmg file for the Mac system. So you can use that if you are installing on Mac OS
How to Install Wireshark on Windows?
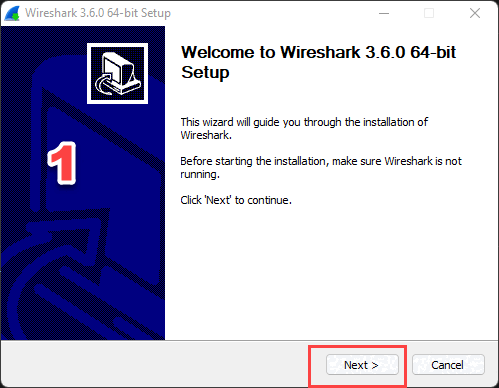
Installing Wireshark on Windows is the same as we install other software, So just go to your downloads folder and run the Wireshark installer with administrator rights. For your more help I have created a small visualization that will show you each and every step that you will see on installation.
View the below animation for more reference
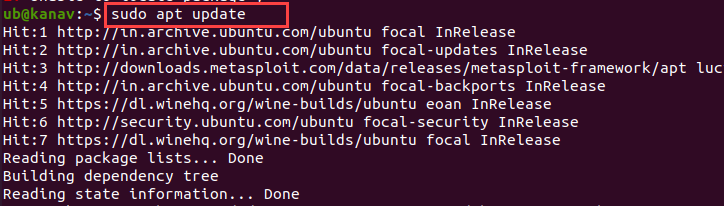
How to Install Wireshark on Linux?
To download and install Wireshark on Linux you need to run the below commands
Step 1: First, we will update our list by entering the below command our terminal
sudo apt update
Step 2: Now we will install Wireshark by using the below command
sudo apt install wireshark -y
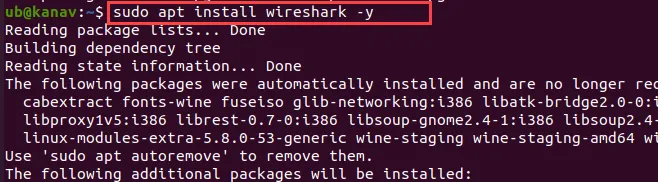
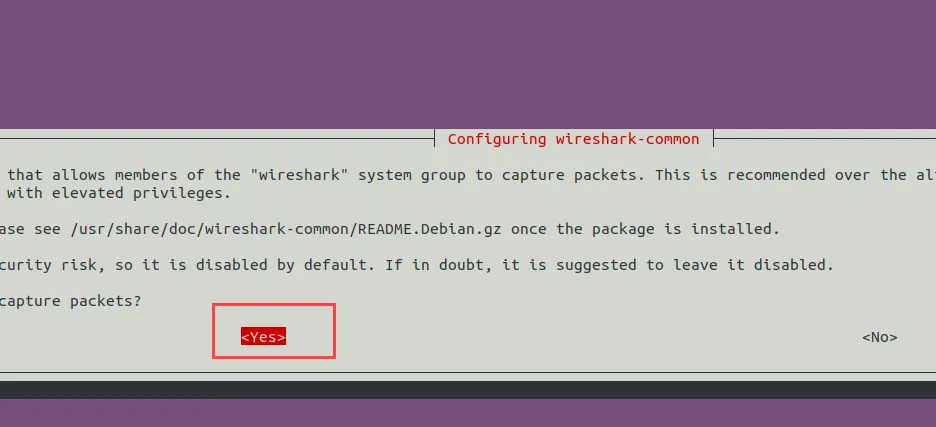
Step 3: Now a dialogue box will pop up in the middle of installation, so just choose Yes
After that entire process is complete yo will see Wireshark is installed.
Basic Features of Wireshark
As we have seen the download and installation of Wireshark on both Linux and Windows operating systems, now we can see what are other things that Wireshark is able to perform.
- It captures live packets from the network interface
- You can check packets data with very detailed information as well as protocol information.
- We can filter data packets using various available methods
- You can export all capture packets in a file and it offers multiple file-format
- It allows to search packets using various methods, you can search by protocol name also
- We can create a number of statistics
- We can import packets from text files
- You can also save data packets
- Troubleshoot network
The above are just the basic features, Wireshark can do a lot more as it has lots of functionalities.
Overview of Wireshark Interface
Now let's see how Wireshark looks and what are options that we can see when we open it the first time.
Note: Always run Wireshark using the Administrators permission
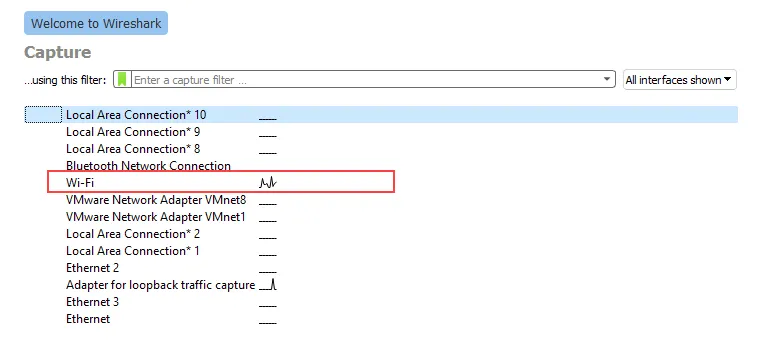
So before the understanding main menu of Wireshark, you need to select your network interface.
Whenever you open your Wireshark it will first open the window where it shows you available interfaces on your system, so you first have to choose which interface you want to capture
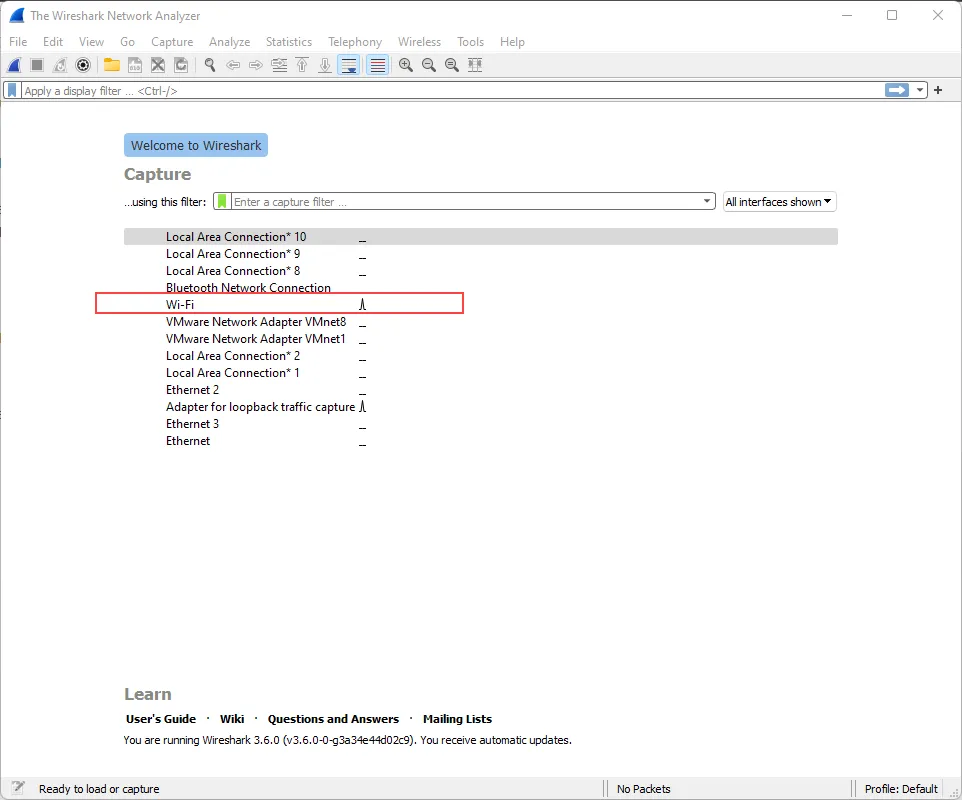
On the above screenshot, you can see I have chosen the WiFi interface
After selecting the interface you will see the main window of Wireshark, where we can see various options. See the below-labelled pictures and description to understand each and every option.
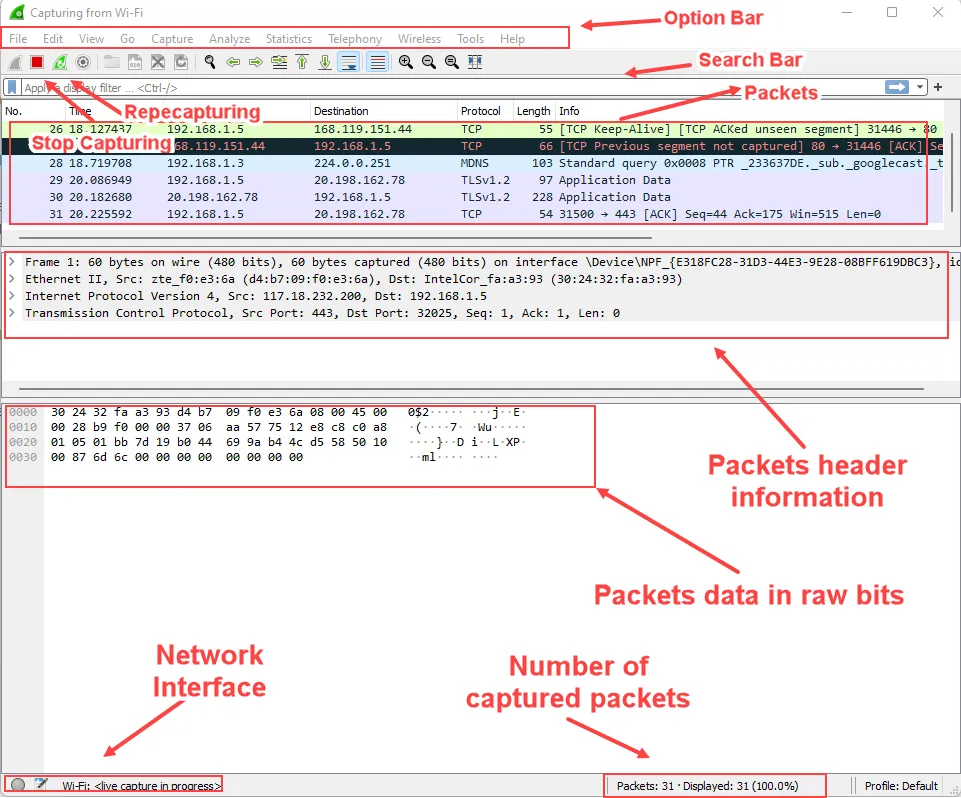
Option Bar
On the options bar there are 11 options that are described one by one below:
- File: With this file menu you can open, marge, close and save the file of captured data packets, also we can print, export and import the dumps.
- Edit: With the edit menu you can copy, search, find, mark and ignore the data packets
- View: The view option allows you to change the visualization according to your preference, you can zoom in zoom out, resize the font, collapse, expand and change colouring rules.
- Go: With this option, you can browse the specific packet using the go-to packet option you can also move forward, backward, to the first packet and to the last packet.
- Capture: This option will allow you to start, stop and restart the packets capturing and you can also refresh interfaces.
- Analyze: This option will allow you to apply various different packet capturing filters according to your preferences. It also comes with protocols, plugins and expert information
- Statistics: This option will show you information about the captured file. It will display a hierarchical tree of protocol statistics, endpoints, conversations, user-specified graphs, items between request and response and much more
- Telephony: This option will show you telephony related stats like VoIP calls, ANSI, GSM, LTE, MTP3, Osmux, SCTP etc.
- Wireless: This wireless option will tell you all interfaces that are based on Bluetooth or follow 802.11 standards like Bluetooth, Wi-Fi, WLAN etc
- Tools: In this option, you can find very useful tools like Firewall ACL Rules, Credentials and Lua
- Help: Help as its name will provide you helpful insights like a manual of its other options, FAQ, contents and other materials that will help you to understand and use Wireshark
Toolbar
Below the options bar, you can see there is a toolbar that contains different icons. So, basically, those icons are just quick options that will allow you to start, stop, restart capturing packets and save, reload, open, view the captured files
Filter Toolbar
Below the toolbar, you can see the filter search toolbar also known as the filter toolbar. This toolbar will allow you to filter the capture packets and search the packets on the basis of protocols, names, IP etc.
Packet List Pane
Below the filter toolbar, we can see a packet list pane also known as packets window that will show you all the live captured packets.
Packet Details Pane
After that, you can see a white box showing various dropdowns so that is header information of selected packets.
Status Bar
At the bottom, you can see a pane that shows you the network interface name that you are currently using and the number of captured packets.
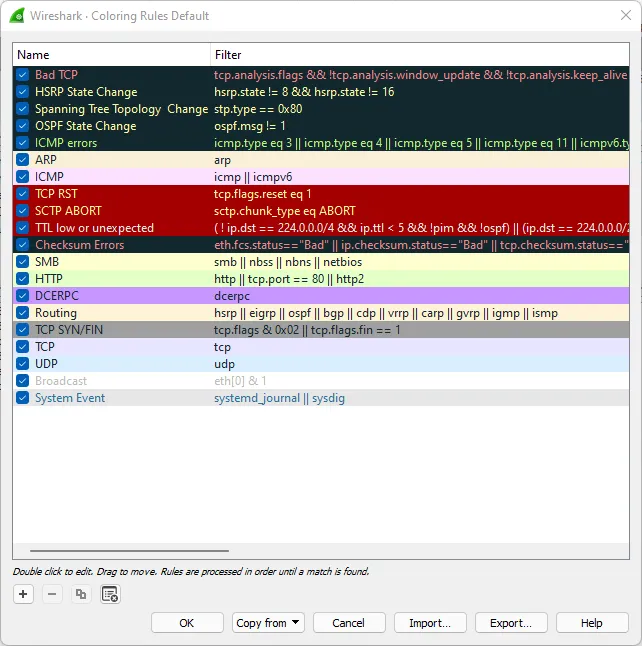
Understanding Color Coding
Colour coding is another best and useful feature in Wireshark. To make your work fast and effective, understanding color coding is the key. You can colourize your packets in the way you want so that you can focus on only those.
- Light Purple: It will show you TCP traffic
- Light Blue: It will show you UDP based traffic
- Black: It will show you the packets are an error state
You can open the colour-coding rules by going to the Options bar and then clicking on View > Coloring Rules, after that you can see the same window as displayed below
Capture Packets Using Wireshark
Now we know the basic stuff of Wireshark, this is the time where we will see how to use the powerful feature of Wireshark i.e, capturing packets.
Whenever you open Wireshark on your system, first it will open a page where you have to choose a network which simply means what network you want to monitor or capture.
In the below screenshot you can see the various networks and I have chosen the WiFi network, you can choose any you want.
After selecting the network you will instantly see live packets that are captured by Wireshark. For more understanding, I have presented a demo on the below screenshot. Where I have pinged my IP to show you how packets are captured on Wireshark.
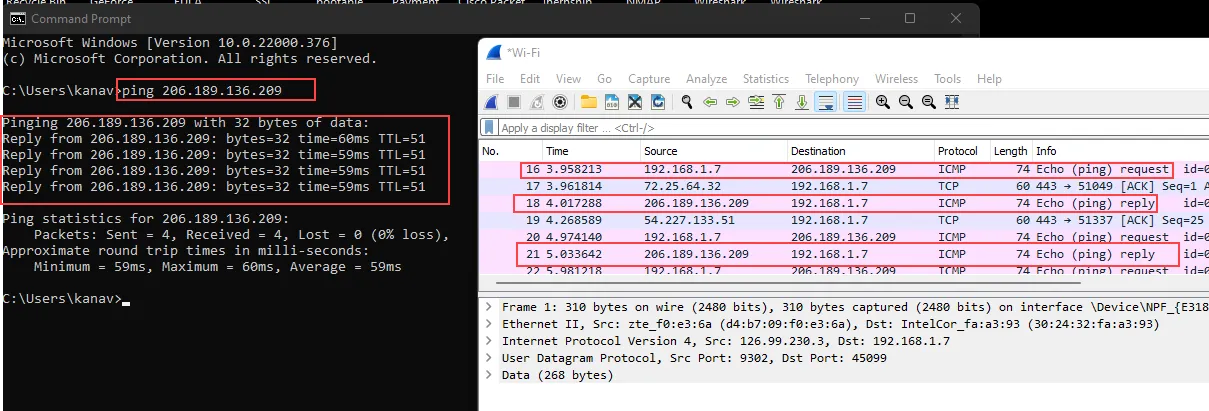
On the above picture, you can see from the command prompt I have pinged my IP and Wireshark is capturing all the packets that are exchanging on my network. Observe the marked content on the above picture for proper clarity.
Analyzing Network Packets
We know how to capture packets, but only capturing doesn't make sense. Analyzing network packets is the next step after capturing packets.
In the below picture you can see the same packets that we previously captured but this time we will understand and inspect what are these packets or how to read them.
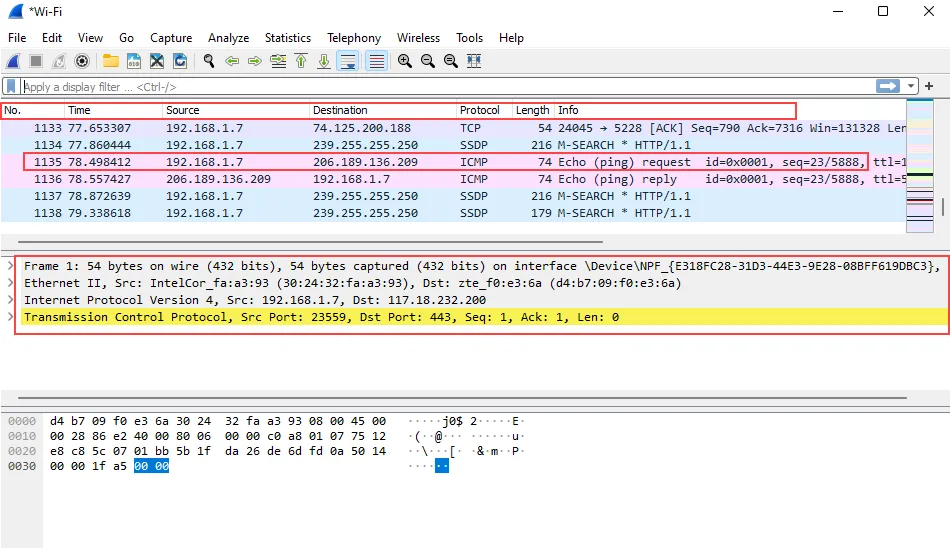
The above picture shows you a column where you can see various options that I have described below:
- No: It simply means the serial number or a number that is assigned to the particular data packet
- Time: This column will show the exact time when actually you captured the particular packet.
- Source: It shows the source address i.,e the system that sent you this packet.
- Destination: This shows the destination address of the packet where packets actually go.
- Protocol: It justifies the packet type like TCP, UDP, ICMP etc.
- Length: You can see the length of data packets in bytes.
- Info: It will show you more information about the selected packet
We just discussed the overview of packets above when analyzing but a single packet consists of various information that we can see from the second panel which is just below the packets.
This pane will show you what insides that packet. In technical language, we can say the headers of the packet.
In the below picture you can see 4 grey columns that can further expand to read the data of the packet. I have expanded one to show you what kind of data this packet consists of.
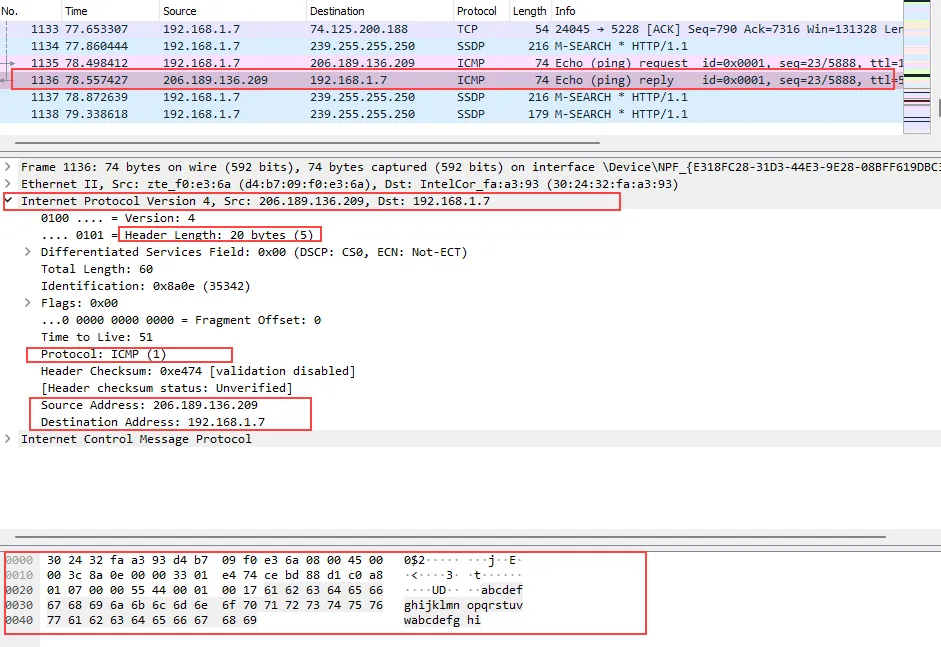
Referring to the above picture where you can see it showing IP version, Header length in bytes, protocol, source address, a destination address, sequence number etc...
The last pane shows data in hexadecimal and in bits.
Working with Wireshark Filters
Now we will see a very useful and basic feature of Wireshark that is a display filter. It is just a search bar that you view in Wireshark but this search bar is not only a search but can also apply filters according to expressions.
The below screenshot displays you where is actually display filter located

This search bar works very smartly. Whenever you type anything there it will list suggestions to you so that you can put the right expression and if entered expression remains invalid it changes the color of the bar to red

.The above screenshot shows that we are using the wrong syntax so color changes to red and it also shows a few suggestions to make things right.
If you enter the right expression with correct syntax then the filter will work and the bar will turn green. See the same on the below screenshot.

Sometimes we enter such expressions that look correct but do not work so at that time it turns colour to yellow

Wireshark Filter by Port Number
Now we understand the basic working of display filters so let's move forward to know how to apply filters. To search or sort your captured packets by port number then you can follow the below expression
tcp.port == 443
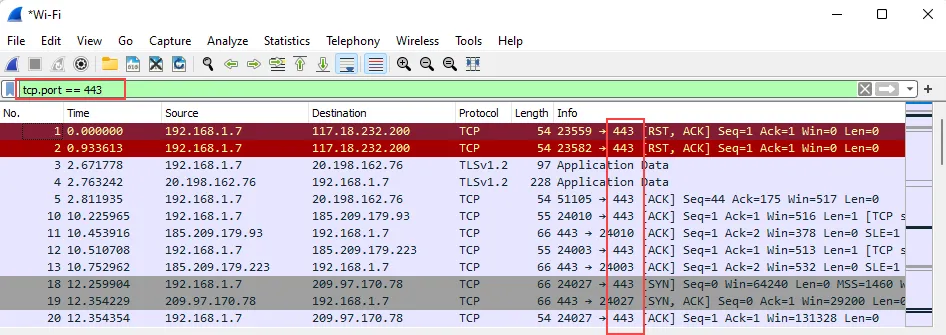
The above expression will search all TCP packets having 443 port numbers. You can modify expression according to your port number
Wireshark Filter by Port Name
The below expression will show all HTTP packets, you can search any packet you want like FTP, HTTPS, ICMP etc...
http

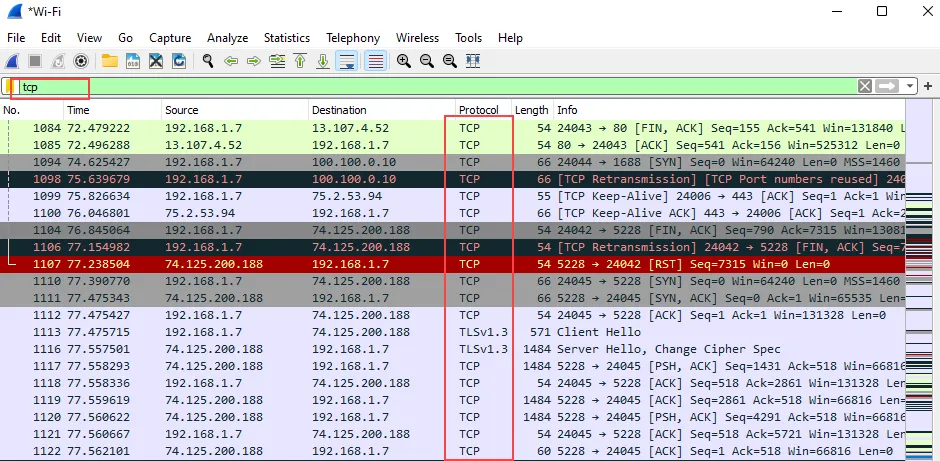
Filtering TCP Packets
Filtering TCP packets is the same as we previously did on the filter by port name
tcp
Filtering UDP Packets
Same you can search for UDP to filter all the UDP packets on your network
udp

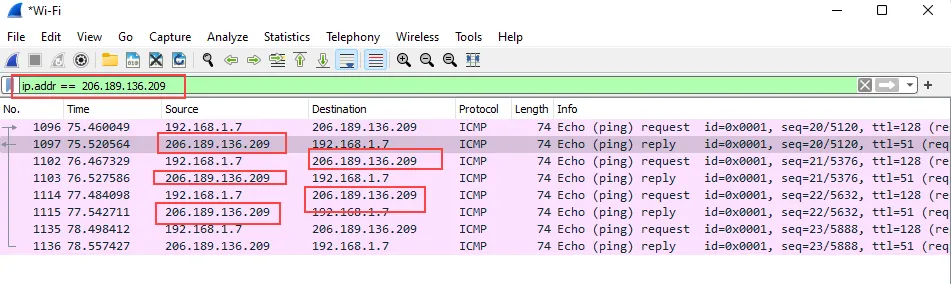
Wireshark Filter by IP
You can also filter packets by adding a specific IP address. Below I have entered an IP on display filter that will show all packets that are linked with specified IP
ip.addr == 206.189.136.209
Wireshark Cheat Sheet
There are various things that you can do with Wireshark like monitoring network performance, Viewing Network Statistics, Visualization of Network Packets Using IO Graphs etc... These things I will also discuss on my next Wireshark blog will take us to an advanced level.
In this blog, I have demonstrated various options, features, expressions and filters but it is not possible to cover all of them in a single blog so I have shared a quick Wireshark cheat sheet that will show you various other things that you can learn and try by your self.
You can download it by clicking on Wireshark Cheat Sheet
Conclusion
This blog covers almost all important basic stuff that is required to know how to use Wireshark. I hope you have understood everything that I have explained. Wireshark is a tool that offers various features that varies according to its usage.
If you still have queries you can post a comment below I will respond to them and same you can also try to find below commonly asked questions. I have answered the most common questions
Commonly Asked Questions
Is Wireshark illegal?
Wireshaek is an open-source tool that is not only used for ntworking but can also sed by hackers. This tool is used to analyze network tarffic and it s a legal tool but some attackers use this tool to monitor traffic of unauthorized network that makes their activity to ilegal
Do hackers use Wireshark?
Yes, Hackers use Wireshark as it is a powerful tool to analyze or identify and monitor network tarffic hackers can easil capture packets to sniff data. Man in the middle attack, Evasdropping are the examples
Is Wireshark easy to learn?
Wirehark is very simple tool but if you are totally new then you should be aware f some network terminologies. If you don't no networking you can read my blog on Basics of Networking after reading this blog you can easily learn Wireshark
How much does Wireshark cost?
Wireshark is a free software that is available for all operating system like Windows, Linux and MAC
Can I use Wireshark to sniff passwords?
Yes, apart from networking field this kind of sniffing mostly performed by Cyber Security professionals and Hackers.
How do I capture a port in Wireshark?
Above I have shown practically everything like capturing port, applying filter by IP, Poart name, Port number etc.. Click on capture a port in Wireshark to know more
Related Blogs
- How to install parrot OS [Step by Step Guide]
- How to use Aircrack-ng | Aircrack-ng tutorial [Practical demonstration]
- What is OSINT? | OSINT Framework | Tools for OSINT | Best OSINT Techniques
- OSINT Framework | OSINT for Bug Hunters [Practical Demo] Part 1
- How to Become an Ethical Hacker | Techofide
- How To Install Arch Linux 2023 [Installation Guide] | Techofide
- How to Install Kali Linux [Step by Step Installation Guide]
- What is Computer Network | Basics of Networking [With Practical Examples]