This is the detailed installation guide of Kali Linux where we will learn the basic and important topics like What is Linux, What is Kali Linux, How to install Kali Linux, New updates of the latest Kali Linux 2021.2, How to install Kali Linux in Virtual box and much more...
I have covered everything from basic so if you don't even know what is Linux, still you will be able to install and understand what actually you have to do to install Kali Linux on your system.
So Let's get started.
- What is Linux?
- What is Kali Linux?
- Why Kali Linux is Popular?
- Kali Linux Download
- Is My Computer 32 or 64 bit?
- How to Create Bootable USB?
- Kali Linux System Requirements
- How to Boot Kali Linux?
- How to Install Kali Linux?
- Kali Linux Default Password
- What's new in Kali Linux 2021.2 Version
- How to Install Virtual Box?
- How to Install Kali Linux on VirtualBox?
What is Linux?
Linux is just an open-source (free and customizable) operating system like other platforms such as Windows, Mac, Android, IOS etc. An operating system is just software that is responsible for the communication between computer hardware and software.
Linux is not a new operating system its existence is from the '90s and it mostly used by developers, organizations and other computer users. So Linux came with various flavours like you might have listened to some basic Linux distribution names such as Kali Linux, Ubuntu, Fedora, Redhat, CentOS etc.
Do you know your smartphone whether it is Android or Ios both are also using Linux?
What is Kali Linux?
Now we understand what is Linux so it is easy to guess what is Kali Linux. So, Yes Kali Linux is also just a Debian based operating system that mainly used by Hackers and Security Experts for hacking and securing devices.
You can use any operating system to perform hacking and security practices, but Kali Linux offers various pre-loaded powerful hacking tools that make it easier to do attacks, hacks, cracks, tests and secure the system for Ethical Hackers, Penetration Testers, Security Experts, Cyber Service etc...
Why Kali Linux is Popular?
So, let's see why Kali Linux is the first preference compared to other Linux distributions such as Parrot Security, Backbox, Blackarch:
- Kali Linux is very popular among Security Experts and Hackers because it makes their work easy by providing more than 600 penetration testing tools from multiple fields of cybersecurity and forensics,
- As it is open source so it gives full control to the user to customize their system according to their needs i.e if you are not comfortable with the existing features of Kali Linux, you can easily customize Kali Linux as you want.
- This is free software that came with lots of advanced hacking tools.
- Kali Linux came from offensive security that always provides fast updates, easy to use interface and new tools that attract security experts and hackers. Hence it is always the first preference among the security experts and hackers
Kali Linux Download
Now we have done with basics that you should know before installation Kali Linux.
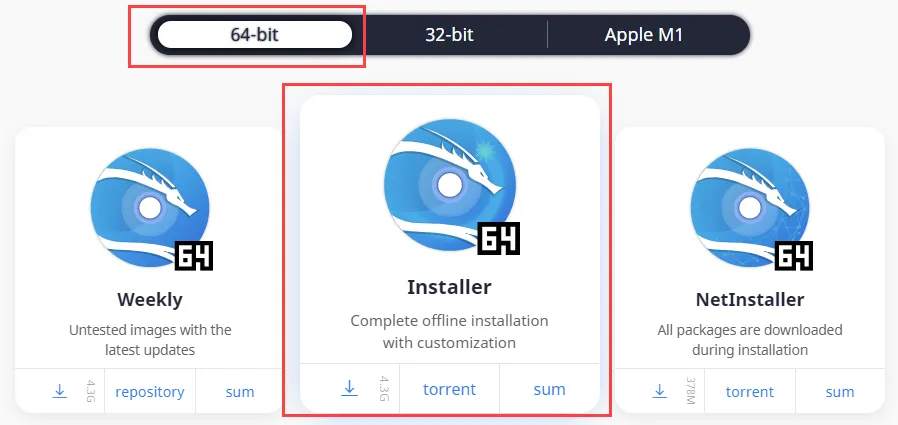
You need to download the Kali Linux iso to start the installation. To download it from the official website just click on Kali Linux iso download and then just select the version of Kali according to your system. In my case, it is 64 bit, check out the below screenshot for reference.
Is My Computer 32 or 64 bit?
If you don't know what is your system architecture 32 or 64 bit then you can proceed with the below mention steps:
For Windows
Step 1: Search for the System and then Launch it.
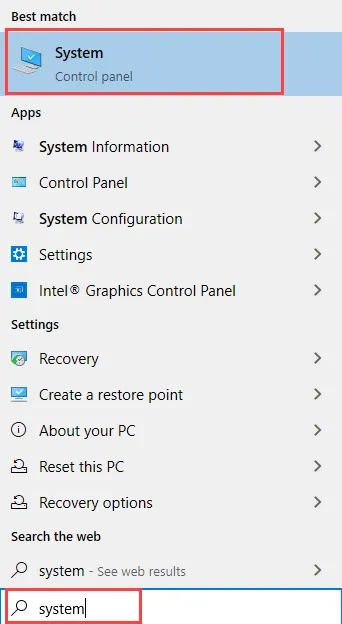
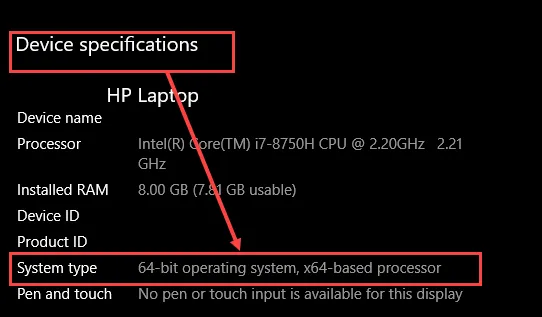
Step 2: Now you will be able to see what is your System Architecture type under Device Specifications. Check the below screenshot for more clarity.
For Linux
Step 1: Open your Terminal and type the below-mentioned command.
uname -m
Check the output where it will display you only the machine hardware name. If it shows (i686 or i386) it means your system is 32-bit or if you see (x86_64) then it is 64-bit.
Check the below image where I have used two different systems to run the above command to show you both outputs of 32 and 64 bit.
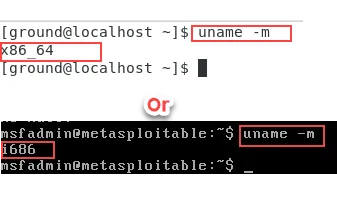
This is how you can check which one supports your system
Kali Linux System Requirements
Here are the minimum system requirements to install Kali Linux
- Minimum 20 GB of disk space is required to install Kali Linux.
- You can run Kali Linux with 1GB of RAM but I highly recommend going with at least 2GB of RAM for better performance.
- You need at least 8GB of USB or Pendrive to make it Kali Linux Bootable.
How to Create Bootable USB?
After downloading the Kali Linux iso image we need to install it by using a USB flash drive. There are various methods you can use like CD/DVD, Network and USB, but here we will see the easiest and reliable method i.e, USB Drive.
If you don't know how to make a bootable USB then you can check step by step procedure by clicking on how to make a bootable USB
How to Boot Kali Linux?
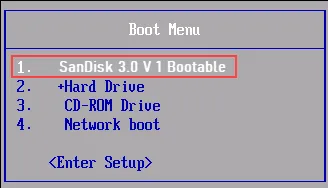
Now after making Kali Linux bootable USB drive, insert it into your system's USB port and power on your machine. Now at the same time, you have to press the function keys like F2, F10, OR F12 key depending on your laptop brand from the keyboard to open the boot menu setup
Note: To access your system boot order you can check the list of boot menu option keys by clicking on Boot Menu Option Keys For All Computers and Laptops to know which one is for your laptop or computer.
This is how Boot Menu looks:
How to Install Kali Linux?
So we are now ready to install Kali Linux, Let's see step by step complete installation of Kali in our system.
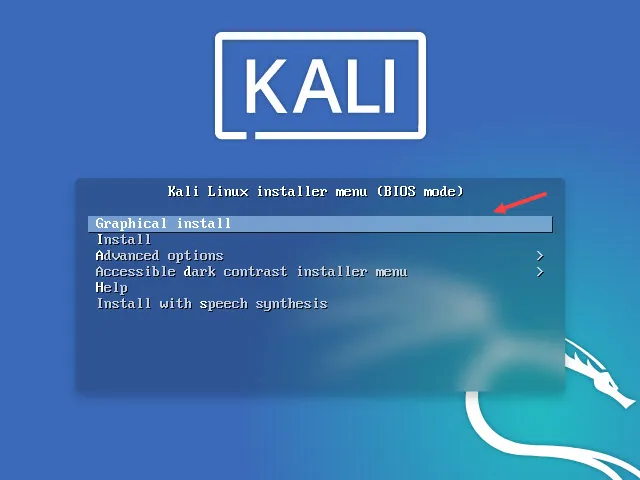
Step 1: Once you select bootable medium from the Boot menu as you can see the selection of Sandisk USB above, your screen will change and you will be prompted to the Kali Linux Installer screen where you have to choose Graphical Install.
Step 2: Now after few seconds the new screen will appear that asks you to choose the default language which you want to use during installation. So Simple choose the language you prefer and click on continue

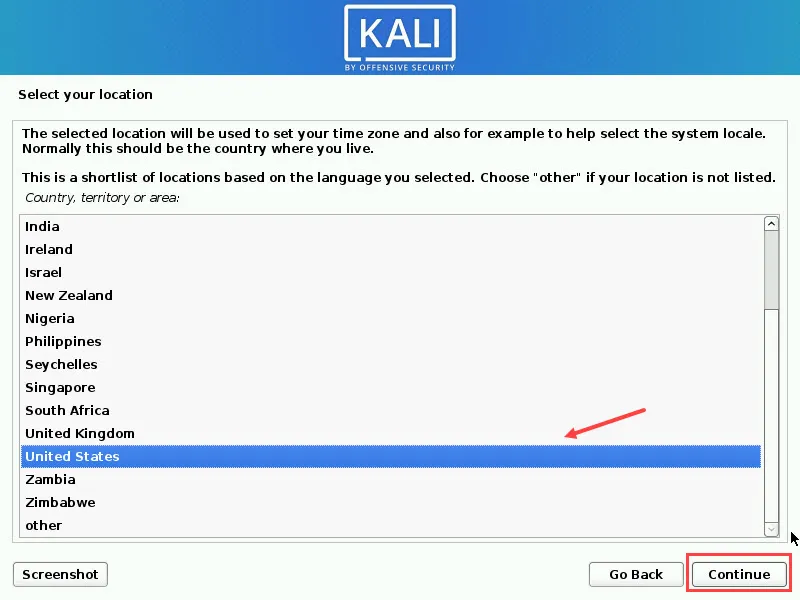
Step 3: In the next step, we will select our location that will help to set your time zone.
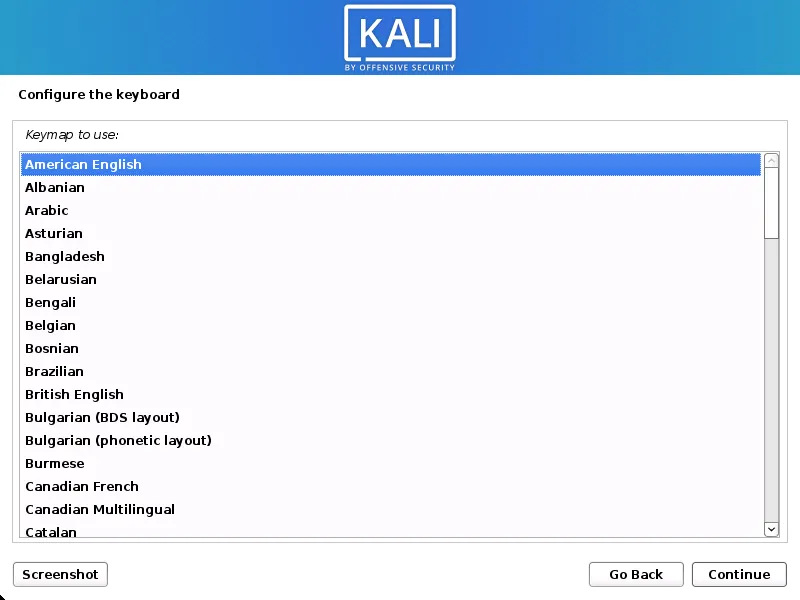
Step 4: Now it will ask you to choose a keyboard layout, so you can simply select it according to your preferred language and click on continue to proceed to the next step.
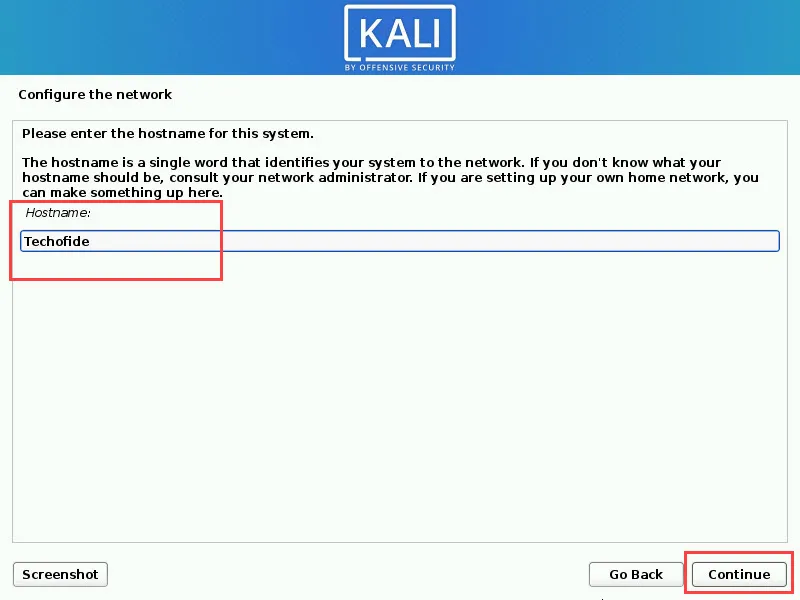
Step 5: Here we will set Hostname i.,e computer or machine name that you can give anything you need. I have given Techofide, Proceed to the next stage by clicking the continue button.
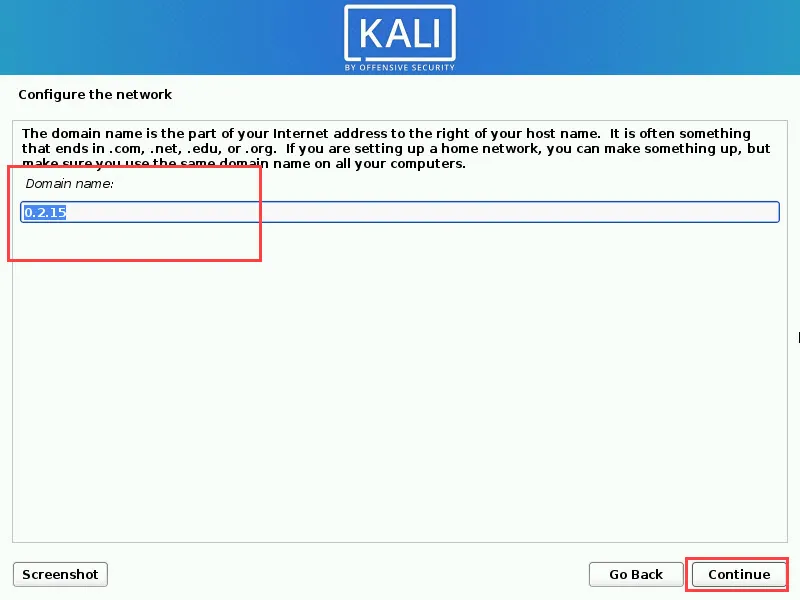
Step 6: This step will look for the DHCP service where we need to enter the domain name to configure the network for Kali Linux, you can give anything to it for the default installation. In my case, I just move with the default entry that was number but you can also give it a name but make sure it would end with ( .com, .in, .net, .edu or.org)
For example, if you want to set the domain name techofide so you have to write techofide.com
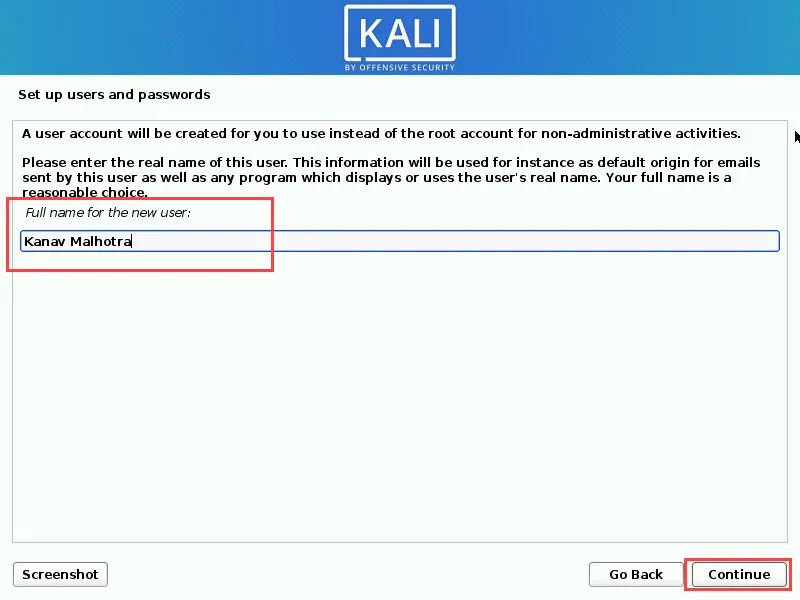
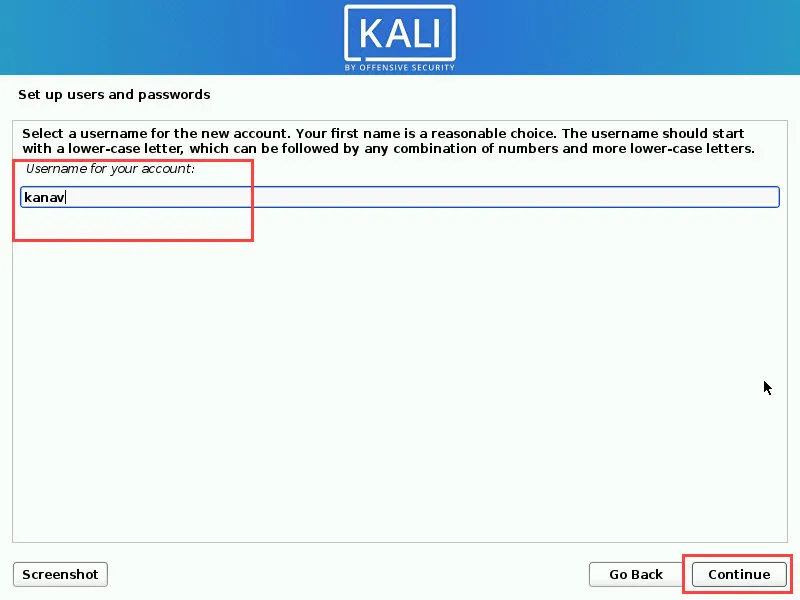
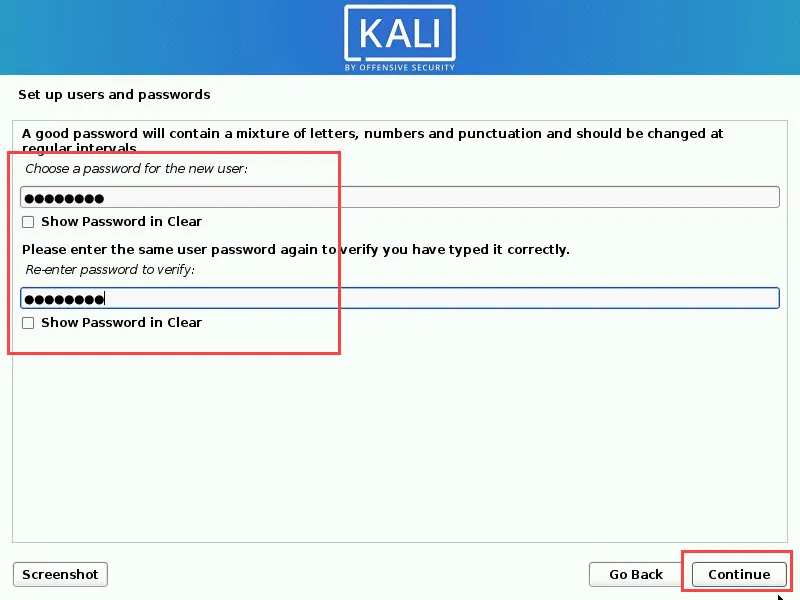
Step 7: In this step, we will build our first user account for Kali Linux, So you need to set the credentials of the user i.e, username and password. So first give your name as a new user and click on Continue. Take a look at the below pictures for more reference.
Now enter the name that you want to use as a Username.
After entering the username we will set a strong password for our new user account and then proceed with continue
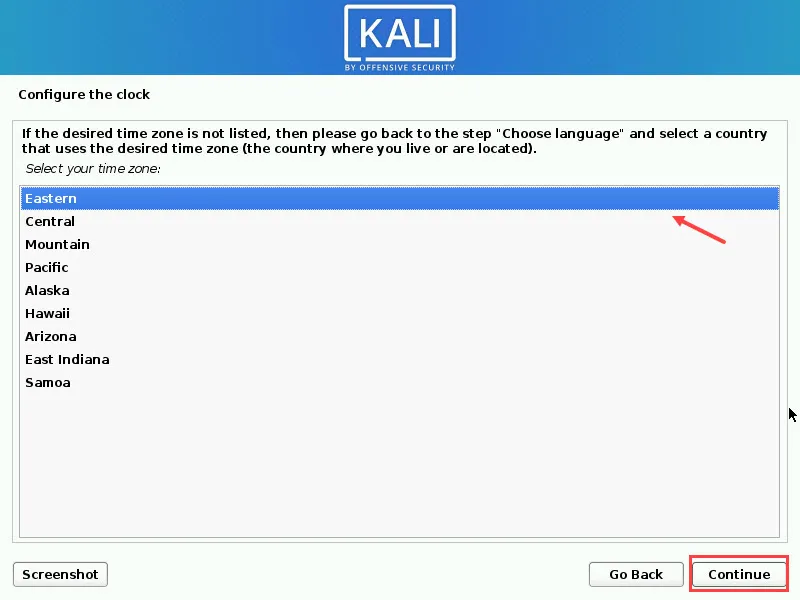
Step 8: Once you are done with user creation it will ask you to set the clock according to your time zone. Simply select the region according to your country and click on continue.
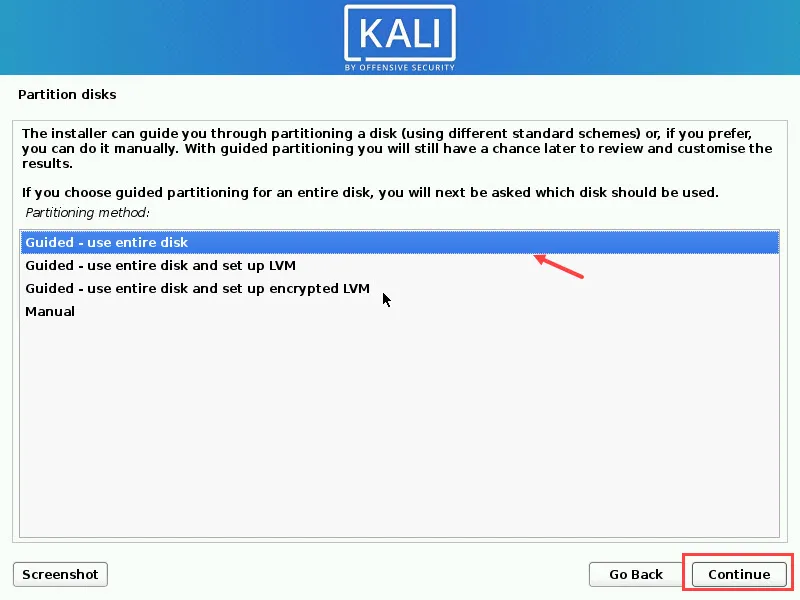
Step 9: This is the important step where we will install our Kali Linux on disk. As you can see the below image lists four options whose explanations are following:
- Guided - use entire disk: If you don't have any data in your current disk where you are installing Kali Linux then you can choose this option that will wipe your entire disk and then start the installation.
- Guided - use entire disk and set up LVM: If you are a user who wants to make use of their storage disk as a Logical Volume so that it can be dynamically scaled so you can go with this option (Don't go with this option if you are beginner and not familiar with Linux)
- Guided - use entire disk and set up encrypted LVM: This option is mostly used by experienced user and professionals to make their disk encrypted so if they enable this option then whenever they start up their system it will prompt the password screen every time.
- Manual: If you know how to do disk partitioning then you can go with this option to create custom or different partitions with directories such as /home/, /root, /swap etc...
- Guided - use the largest continuous free space: This is the option that can appear to those users only who already have an operating system on that disk and want to install another on the same disk i.e, dual booting.
I am installing it in the fresh disk, I will go with Guided - use the entire disk option.
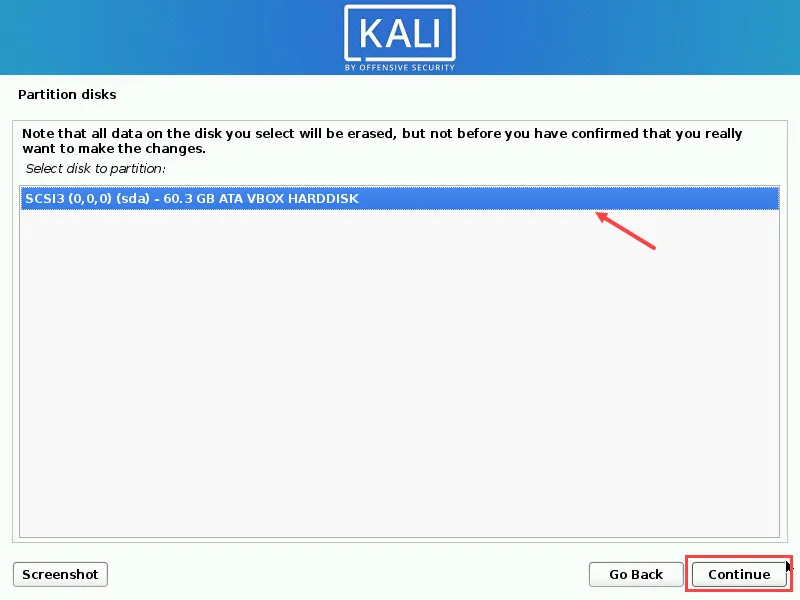
Step 10: In this screen, you just need to choose the disk to be partitioned and click on continue
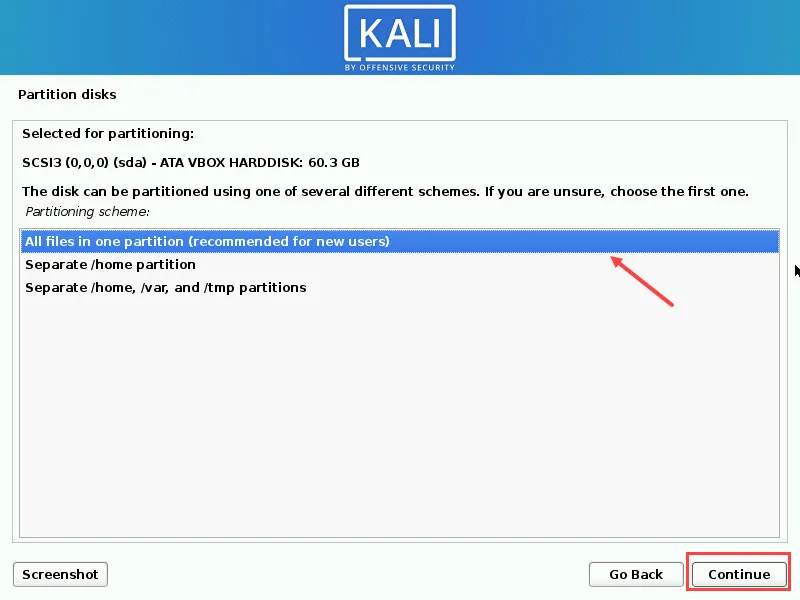
Step 11: The selections in this step will depend on your data storage location i.e, How do you want to save your data? You can save your data (images, files, videos, media etc.) in a single partition, you can save it in a separate partition like /home and you can save your data in other directories such as /var and /tmp.
Choose the option according to your need, as I am using a fresh disk and I don't have any data therefore I am going with the recommended option i.e, All files in one partition
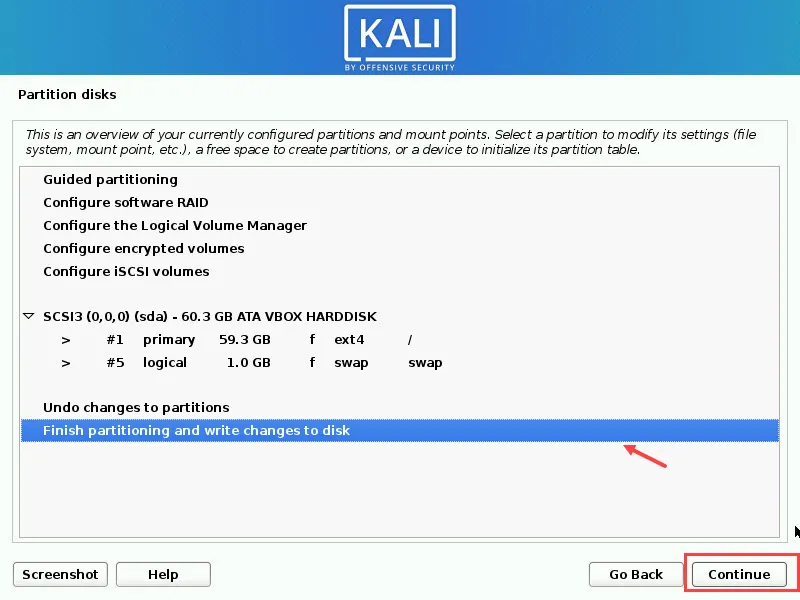
Step 12: After pressing the continue button you will be prompted to the next step where it will show you an overview of your currently configured partitions and mount points. Normally you can select Finish partitioning and write changes to disk option if you are satisfied with the configuration.
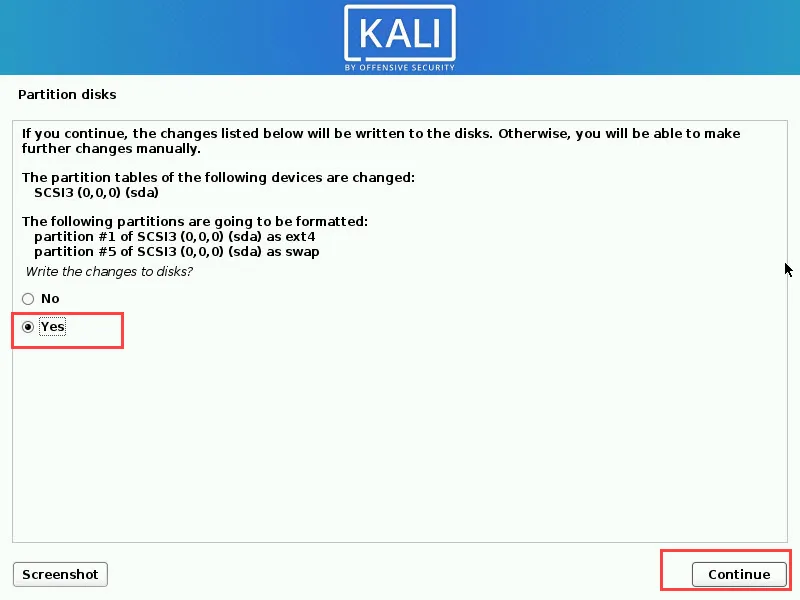
Step 13: This is the last time setup will ask you for confirmation about the disk partition before installing Kali on that disk. So if you want to still review you can choose No else you can select Yes and proceed with the installation.
Note: This step is irreversible after pressing continue. so make sure you have followed all steps properly.
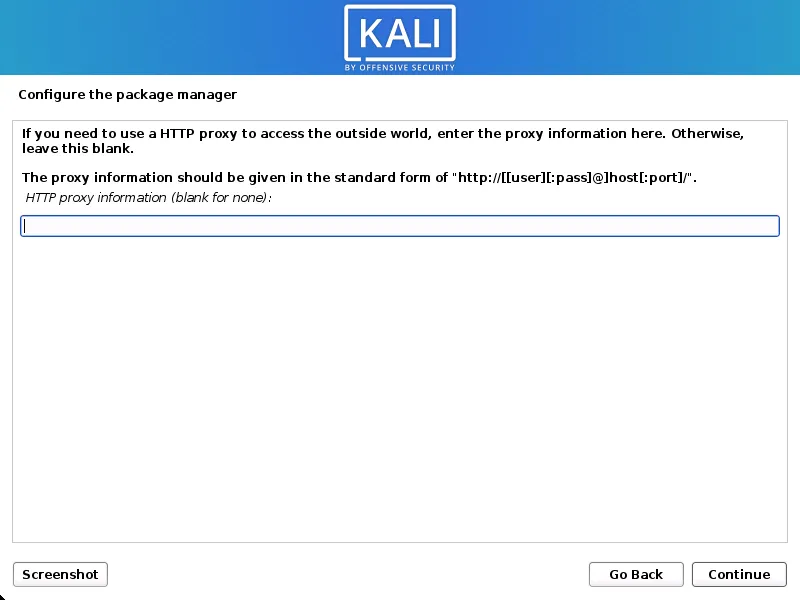
Step 14: This step will ask you to configure the package manager by entering proxy information i.e If your system is running behind the proxy Servers then provide the proxy server IP address, user name and password else leave it blank.
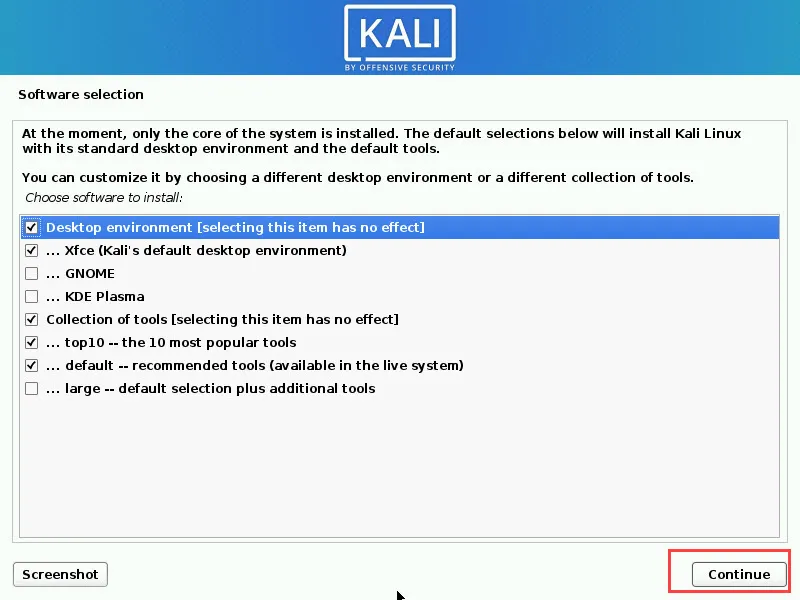
Step 15: After installing the core of the system, Kali Linux will provide you customization feature so that you can select your software, tools and graphical environment according to your needs.
If you are a new user then you can just go with default selections by clicking on continue else you can do selections according to your requirements.
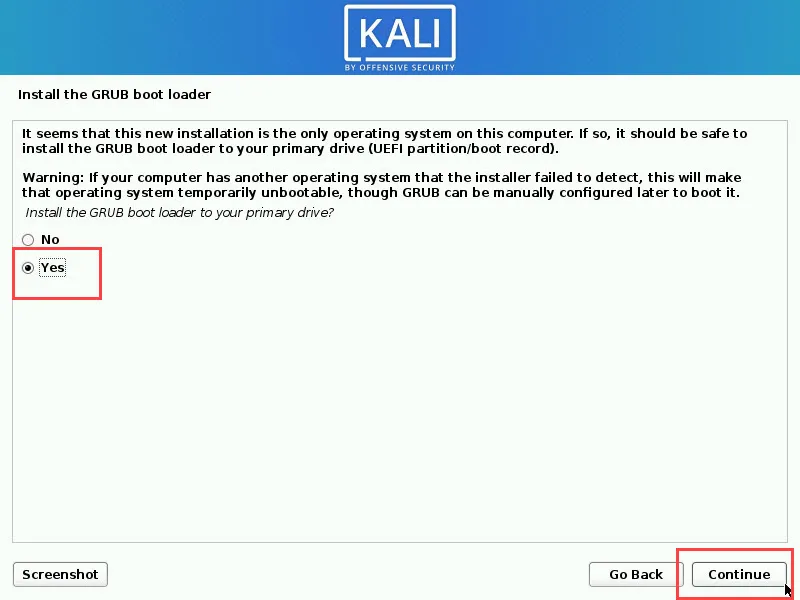
Step 16: Now in this step you have to confirm with Yes to install GRUB boot loader in your system so during your system startup a screen will appear that asks you to choose the Kali Linux operating system to boot.
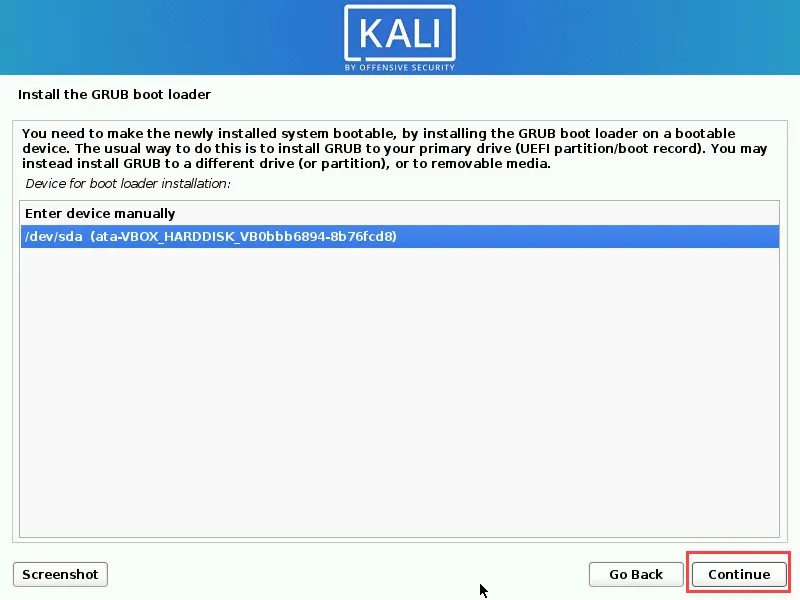
Step 17: Here you need to select the disk where you want to install the GRUB bootloader, Simply select the default option and proceed with continue
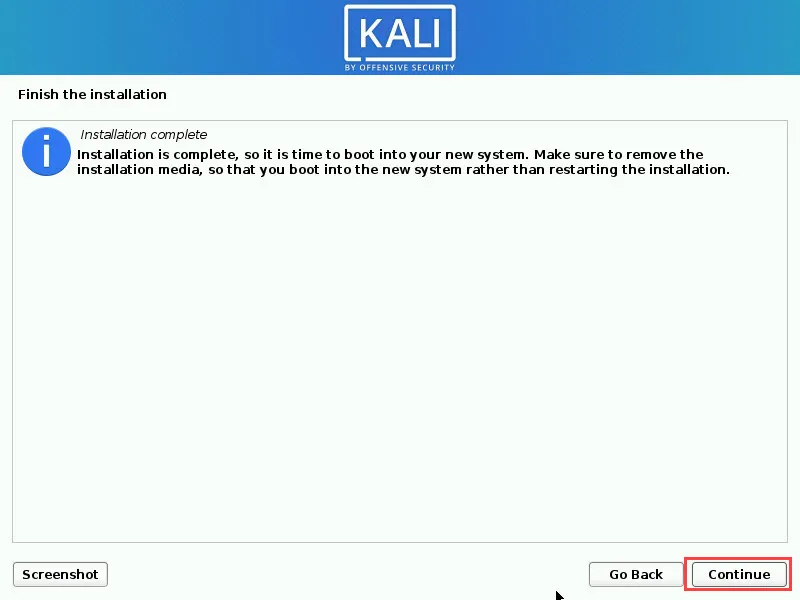
Step 18: Finally just click on Continue to reboot your system and complete the installation.
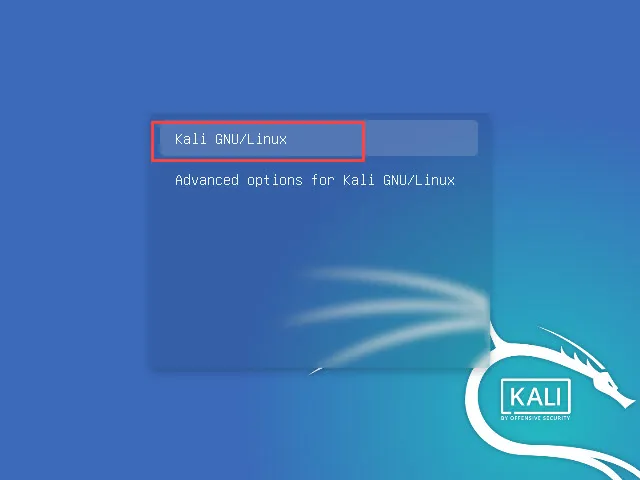
Step 19: After that, your system will be restarted and you will be able to see a screen that will ask you to choose Kali GNU/Linux to boot. This is the GRUB Bootloader that we have installed in our previous step
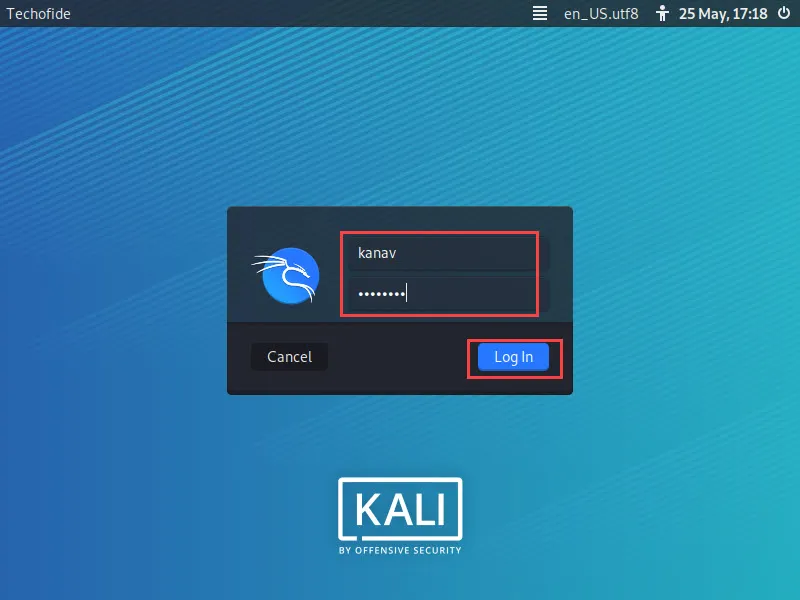
Step 20: In a few seconds it will take you to the login screen where you have to enter your username and password that we created during installation to login into your Kali Linux.
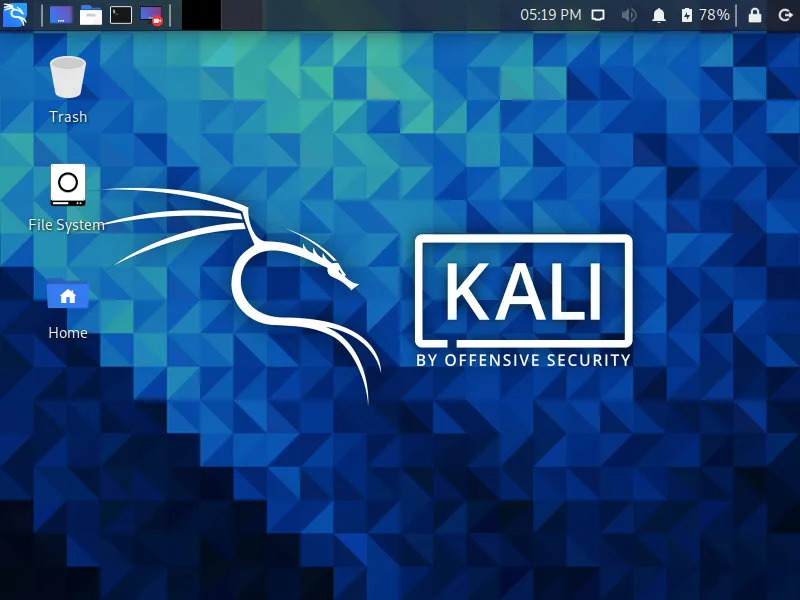
Step 21: Now you can see we have successfully login into the Kali Linux desktop.
Kali Linux Default Password
If you are using the Live version of Kali Linux or Kali as a persistence then you might have a face when your screen turns off or log out it will ask you for username and password. So To log in to your session, you can use the below-mentioned default Kali Linux credentials.
Username: root
Password: toor
After installation, you can open your command shell to upgrade and update common packages. follow the below commands to do the same
sudo apt update //Update Kali Linux
sudo apt upgrade //Upgrade Kali Linux
If become a certified ethical hacker is your dream and you want to clear certification then you can read How to Become an Ethical Hacker that will show you the whole process.
What's new in Kali Linux 2021.2 Version
Kali Linux 2021.2 release is currently the latest version and it offers various newly and upgraded features from which some of the major are:
- Ka-Boxer: Now you can easily create a standalone package and run it on Kali Linux by using the Kali Linux Application boxer. It is just like a docker container where you can install all required packages required to run your application and not affect other packages.
- Kali-Tweaks: A new CLI tool that helps you to configure and install additional dependency and packages and tools. If during installation you skipped packages then now you can easily install that with Kali- Tweaks.
- Refreshed bleeding-edge branch: This is an old feature but now again restructured by the Kali Linux Team. So with this, the default optional packages that are outdated can automatically update with their upstream repositories.
- Disabled Previllaged ports: This update increases the Kali Linux security. Now 1024 number of requiring privilege permission ports are came disabled by default i.e, The TCP, UDP port that comes under 0 to 1023 port number have disabled listener state by default.
- Kali Linux New Tools: New tools come with that update which can directly install from Kali Linux Repository. The new tools are CloudBrute, Dirsearch, FeroxBuster, Ghidra, Pacu, Peirates, Quark-Engine and VS code
- Root Terminal: Now it offers a separate terminal application with other applications that directly launches Root Terminal so that you don't have to run sudo command repeatedly.
- Other Updates: There are lots of other changes like new Kali Linux Wallpapers, New designed Login Screen, Android 11 support on Kali Nethunter, a new toolset and much more...
To know all other new releases features you can click on Kali Linux Latest 2021.2 Update
How to Install Virtual Box?
In the above step by step installation guide, we see how to install kali Linux for pc, but if you are a beginner or just want to try Kali Linux then you may not want to delete your current operating system and install it. In this case, you can simply install Virtual Box or VMware in your system and then Install Kali Linux inside that virtual environment so that it will not affect your current use of Windows or Linux operating system. You can also use Kali Linux easily and do virtualization with Virtual Box.
Now Virtual Box is my favourite because it's free. To know how to install Virtual Box, you can follow my quick step by step video guide by clicking on Install Virtual Box
Here is a link to download Virtual Box for Both Windows and Linux
How to Install Kali Linux in VirtualBox?
Now after knowing the benefit of Virtual Box you also wanted to know How to install Kali Linux on Virtual Box. Follow the below steps to install Kali in Virtual Box with respective screenshots:
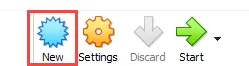
Step 1: Open Virtual Box and click on the New button to start the creation of the Kali Linux Virtual Box.
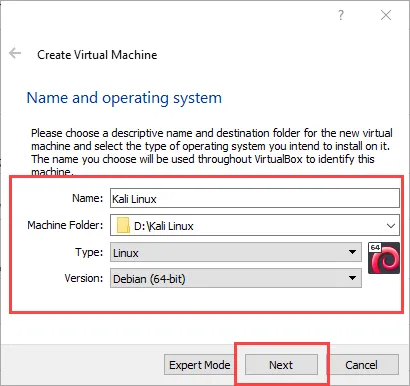
Step 2: Now you will see a small window where you have to enter below details:
- Name: Here you can enter any name you want to give to your machine. Below I have given Kali Linux
- Machine Folder: Here you need to define the location where you want to save your virtual machine, you can give any location as you want.
- Type: Type we need to define Linux
- Version: Here you need to choose Debian 32 or 64 bit depending on your supported system.
After entering all fields just click on Next
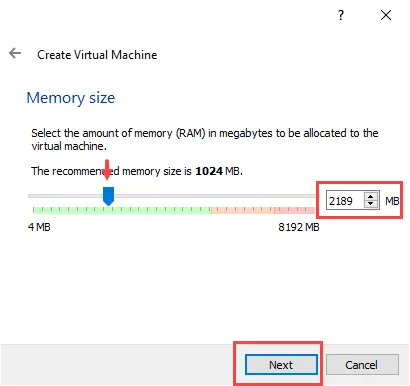
Step 3: This is the step where we will allocate RAM for our Kali Linux. I recommend allocating at least 2GB of RAM i.e, 2048 MB. Use slider to adjust the RAM and then click on Next
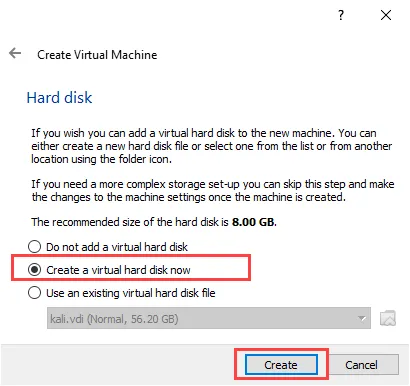
Step 4: Now we will create a Virtual Hard Disk for our Kali Linux. So choose Create a virtual hard disk now and click on create
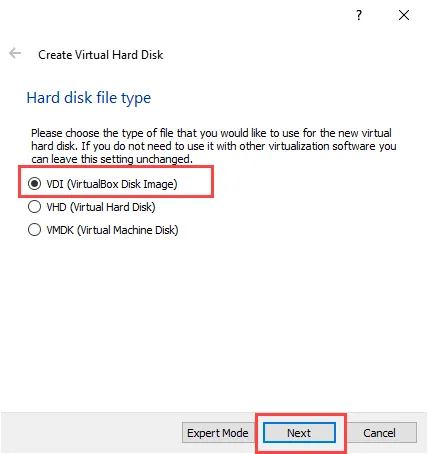
Step 5:Now you need to create a VDI image by selecting VDI (VirtualBox Disk Image).
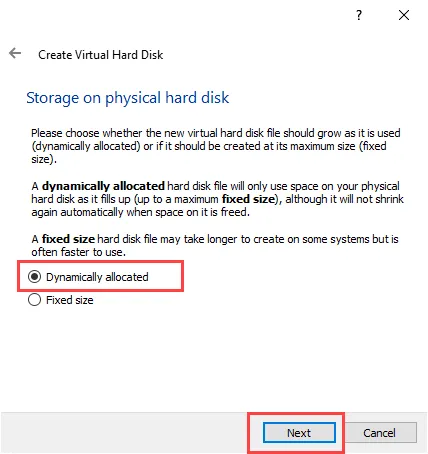
Step 6: This step will create your disk dynamic so that you can scale your disk according to your usage, Choose Dynamically allocated and click on Next
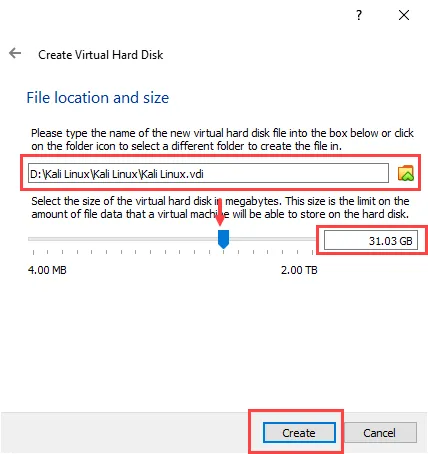
Step 7: We are almost done with virtual disk creation so now just give the size according to your need. I recommend you to give at least 25GB by using the slider and then click on Create.
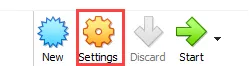
Step 8: We have successfully created virtual hardware for our Kali Linux machine. Now we will click on Settings to do few changes before start.
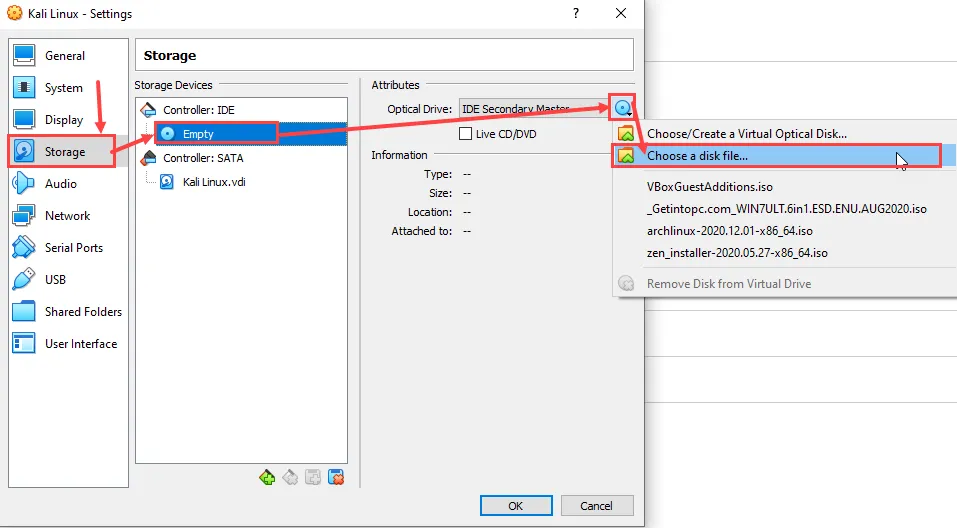
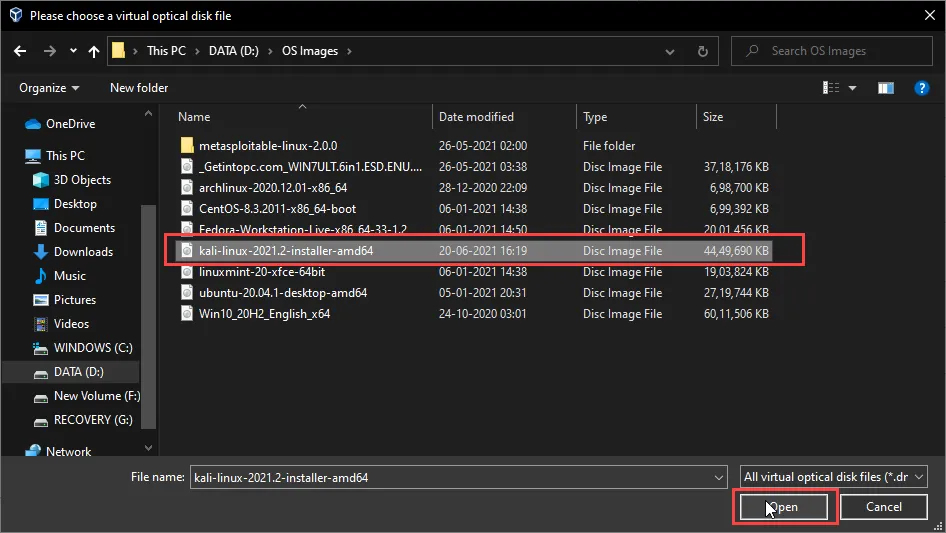
Step 9: In this step, we will add the Kali Linux iso image to boot. So click on Storage and select Empty then click on the cd icon to choose a disk file. Then a drop-down will open where you need to click on Choose a disk file. Check the below image for reference.
Step 10: Browse the downloaded Kali iso image and then click on open
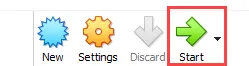
Step 11: Now we are all done and can manually start our virtual machine to install Kali Linux. So just click on Start
Step 12: So you can see again the same Kali Linux installer open from where the same installation procedure will begin that we discuss step by step above. Click on How to install Kali Linux step by step installation guide to check

Conclusion
Installing Kali Linux will be very generic for you. If you follow the above steps properly then you can smoothly install without any errors. I recommend all the new users to first install Kali Linux in Virtual Box and practice. When you feel familiar then make it primary by flashing it to your system. So now we know how to install Kali Linux if you like that blog then please hit the Like button and leave a comment below.
I have also an article on the Kali Linux Metasploit tool that you can use after your installation to start your learning journey in ethical hacking. Click on Metasploit Framework to check out how to use it.
Thanks for reading this blog.
Related Blogs
- How to make Bootable USB Flash Drive
- How to Become an Ethical Hacker | Techofide
- What is Metasploit Framework | What is Penetration Testing | How to use Metasploit
- How to Install Metasploit on Windows and Linux | [Step by Step Guide]
- What is Computer Network | Basics of Networking [With Practical Examples]