Hello Cyber Learners,
If you're interested in learning about Intrusion Detection Systems (IDS) and how to use Snort, then you're in the right place. In a previous blog post What is Intrusion Detection System | What is Intrusion Prevention System | IDS vs IPS, I covered the theoretical aspects of IDS and how they work. Now, in this blog post, I will provide you with a practical guide on how to install and use Snort, a popular open-source IDS tool. Snort is a powerful tool that can help you detect and prevent network intrusions, and this guide will show you how to set it up and use it effectively.
So, let's get started and learn how to use Snort to enhance your network security!
What is Snort?
Snort is a powerful tool used in computer security that stands for Simple Network Intrusion Detection System. It is a type of software that helps detect and prevent intrusions on a computer network. This is done by analyzing the network traffic and looking for patterns that match known attack signatures. Snort is particularly useful for intrusion detection and prevention systems (IDPS) because it can quickly identify threats and take action to block them.
![]()
With Snort, security professionals can monitor their networks in real-time and respond quickly to potential threats. It is an effective tool that helps keep networks secure and protected from malicious attacks.
Why should you buy or use Snort?
If you're interested in using Snort, you have a few different options. First, you can download and configure it on your computer or network. Once you have Snort up and running, you'll need to install the rules that tell it what to look for when monitoring network traffic. There are two main sets of rules available: the "Community Ruleset" and the "Snort Subscriber Ruleset." The Subscriber Ruleset is developed and tested by Cisco Talos, and is only available to subscribers. Subscribers receive the rules in real-time as they're released to Cisco customers. On the other hand, the Community Ruleset is freely available to all users, and is developed by the Snort community and reviewed by Cisco Talos. You can download these rules from the website, and deploy them in your network.
Install and Configure Snort
Snort is a free and open-source network intrusion detection and prevention system. It can be installed on Linux, Windows, and macOS operating systems. In this article, we will see installation on a Linux system.
I am using Kali Linux, you can use any Linux. If you want to know how to install Kali Linux then check my step-by-step guide on how to install Kali Linux
Method 1:
If this method gives you any dependency or version error, you can try the method 2.
Step 1: Install Dependencies
Before we begin the installation process, we need to make sure that all the necessary dependencies are installed. Run the following command to install the dependencies:
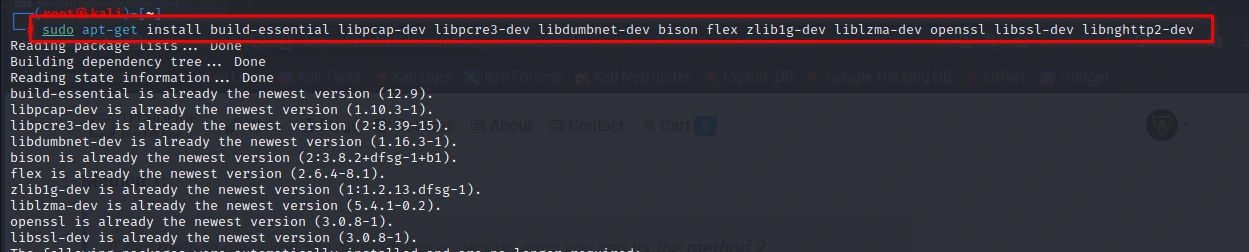
sudo apt-get install build-essential libpcap-dev libpcre3-dev libdumbnet-dev bison flex zlib1g-dev liblzma-dev openssl libssl-dev libnghttp2-dev
Step 2: Download and Extract Snort
Download the latest version of Snort from the official website. At the time of writing this tutorial, the latest version is Snort 2.9.20. You can download it by running the following command:

wget https://www.snort.org/downloads/snort/snort-2.9.20.tar.gz
Once the download is complete, extract the downloaded archive using the following command:

tar -xzf snort-2.9.20.tar.gz
Step 3: Configure and Install Snort
After extracting the Snort archive, navigate to the extracted directory using the following command:
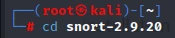
cd snort-2.9.20
Run the following command to configure the installation:
![]()
./configure --enable-sourcefire --disable-open-appid --prefix=/usr --enable-ipv6 --enable-perfprofiling --with-libpcap-includes=/usr/include/pcap --with-libpcap-libraries=/usr/lib/x86_64-linux-gnu
This command will configure the installation with the necessary options. Now we can proceed to the installation by running the following commands:
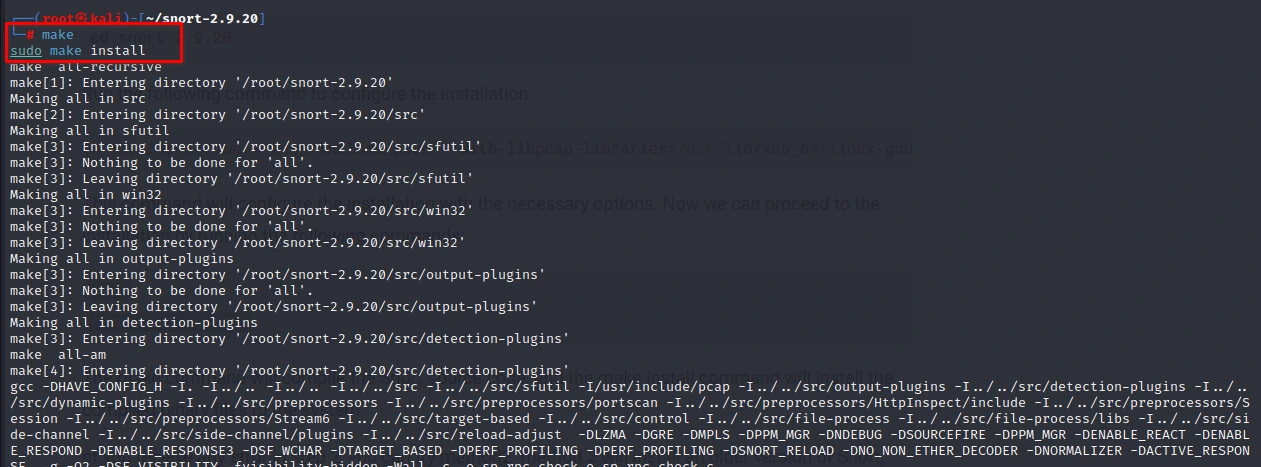
make
sudo make install
The make command will compile the Snort source code, and the make install command will install the compiled binary files to the system.
If you receive any error in step 2, you can try method 2 which will install an older version of Snort, which may not have all the latest features, but having some level of protection is still better than having none at all.
Method 2
In this method, we are going to install Snort using a Suricata repository.
The only disadvantage of this method is, it will not install the latest version of Snort. this method will install the little old and stable version of Snort. at the time of writing this blog, this method will install 2.9.7.0 version of Snort.
Step 1: For that, we will use the command below to add the Suricata repository to our system.

sudo add-apt-repository ppa:oisf/suricata-stable
Step 2: Now, update your system's package repository by running the following command in the terminal:

sudo apt-get update
This will ensure that you have access to the latest version of Snort in the repository.
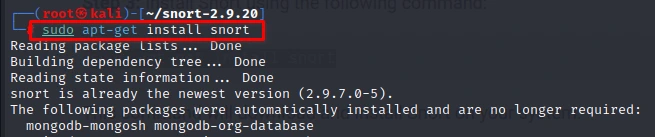
Step 3: Install Snort using the following command:
sudo apt-get install snort
This command will download and install Snort on your system.
After Installing Snort, let's configure it.
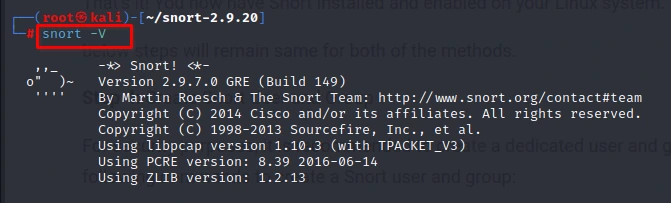
Step 4: Once the installation is complete, you can check the version of Snort installed on your system by running the following command:
snort -V
This will display the version information of Snort.
Step 5: By default, Snort will not start automatically when you boot up your system.
You can enable Snort to start automatically on system boot by running the following command:

sudo systemctl enable snort.service
This will enable Snort to start automatically every time you boot up your system.
That's it! You now have Snort installed and enabled on your Linux system.
below steps will remain same for both of the methods.
Step 4: Create Snort User and Group
For security purposes, it is recommended to create a dedicated user and group for Snort. Run the following commands to create a Snort user and group:

sudo groupadd snort
sudo useradd snort -r -s /sbin/nologin -c SNORT_IDS -g snort
Step 5: Create Directories for Snort
Create the necessary directories for Snort by running the following commands:
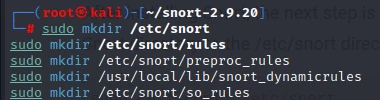
sudo mkdir /etc/snort
sudo mkdir /etc/snort/rules
sudo mkdir /etc/snort/preproc_rules
sudo mkdir /usr/local/lib/snort_dynamicrules
sudo mkdir /etc/snort/so_rules
Step 6: Configure Snort
After installing Snort, the next step is to configure it. We need to copy the configuration files from the Snort directory to the /etc/snort directory. To do this, run the following command:

sudo cp *.conf* /etc/snort
This command will copy all configuration files with .conf extension to the /etc/snort directory.
Now, we need to edit the snort.conf file located in the /etc/snort directory. This file contains the configuration options for Snort. You can use any text editor to edit this file.
The snort.conf file contains many options, and it can be overwhelming for beginners. However, you only need to modify a few options to get started. Here's an example configuration:
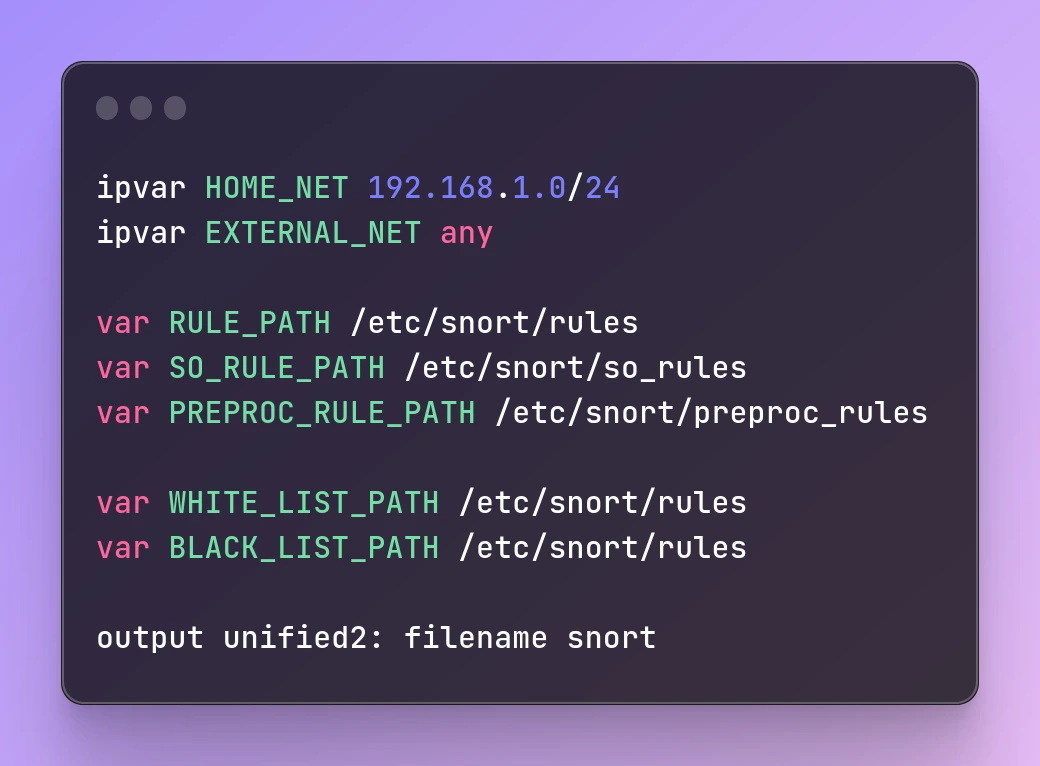
ipvar HOME_NET 192.168.1.0/24
ipvar EXTERNAL_NET any

var RULE_PATH /etc/snort/rules
var SO_RULE_PATH /etc/snort/so_rules
var PREPROC_RULE_PATH /etc/snort/preproc_rules

var WHITE_LIST_PATH /etc/snort/rules
var BLACK_LIST_PATH /etc/snort/rules

output unified2: filename snort
In the above configuration, we have defined
The HOME_NET as 192.168.1.0/24, which is the network we want to protect.
The EXTERNAL_NET is set to any, which means any external network.
The RULE_PATH, SO_RULE_PATH, and PREPROC_RULE_PATH variables specify the paths for the rule files. By default, Snort looks for the rule files in these directories.
The WHITE_LIST_PATH and BLACK_LIST_PATH variables specify the paths for the white and blacklists.
Finally, we have specified the output format as unified2 and the filename as a snort. This will generate alerts in the unified2 format and store them in the snort file.
You can modify these options according to your requirements. Once you have edited the snort.conf file, save it and exit the editor.
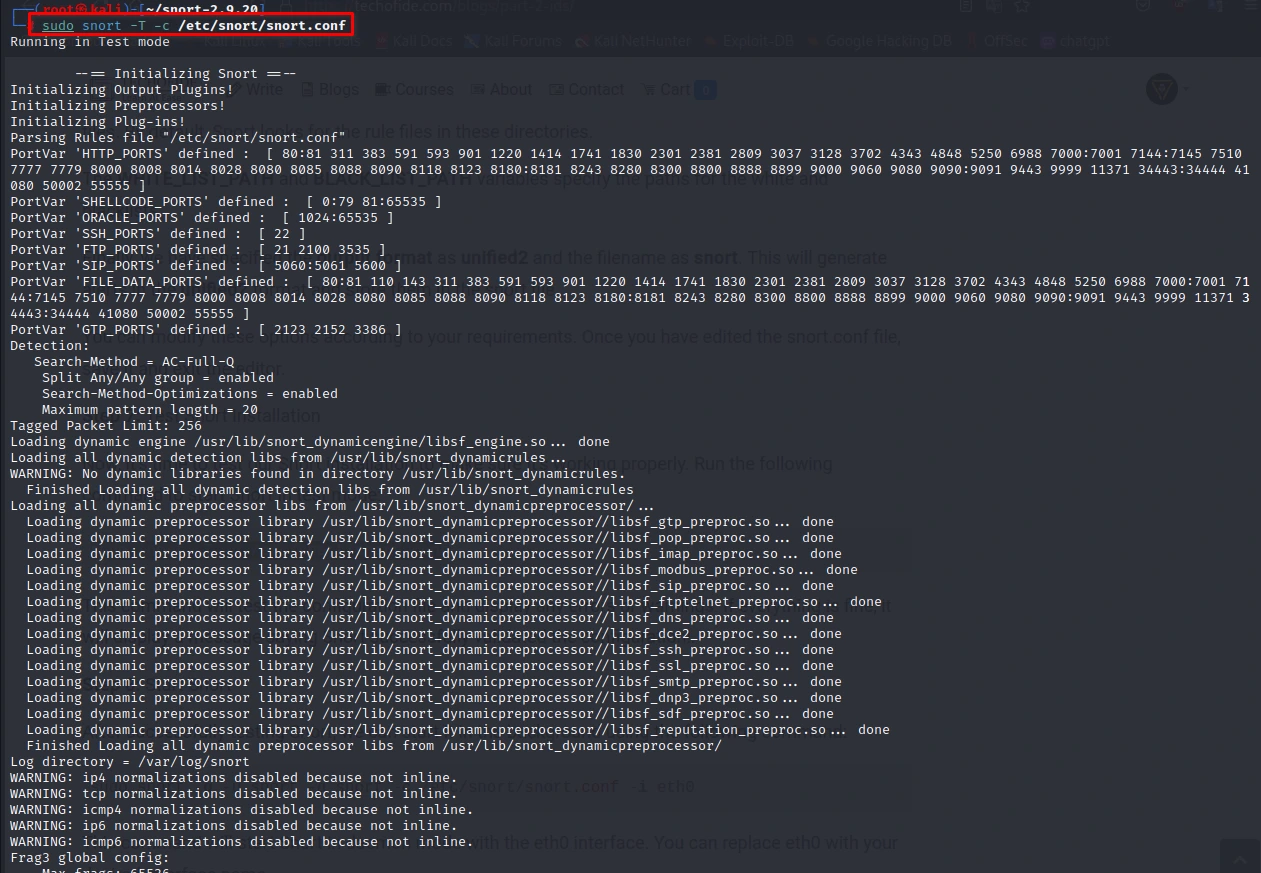
Step 7: Test Snort Installation
Now, it's time to test our Snort installation to make sure it's working properly. Run the following command to start Snort in test mode:
sudo snort -T -c /etc/snort/snort.conf
This command will test the configuration file and display any errors or warnings. If everything is fine, it will display a message saying Snort successfully validated the configuration!.
Step 8: Start Snort
After successfully testing Snort, we can start it in the background using the following command:

sudo snort -q -u snort -g snort -c /etc/snort/snort.conf -i eth0
This command will start Snort in daemon mode with the eth0 interface. You can replace eth0 with your desired interface name.
Congratulations! You have successfully installed Snort on your Linux system. You can now start monitoring your network traffic for any potential security threats.
How to use Snort as IDS
To use Snort as an IDS, download and install it on your network, set up rules to monitor traffic, and configure alerts for potential threats. Use pre-configured rules or create your own. Snort analyzes incoming traffic and alerts you of any suspicious activity, allowing you to take action to prevent intrusion. Regular updates and monitoring can help keep your network secure.
How to use Snort as IPS
To use Snort as an IPS (Intrusion Prevention System), you'll need to follow similar steps to using it as an IDS. However, in addition to monitoring traffic and detecting potential threats, Snort as an IPS can actively block and prevent intrusions. To use Snort as an IPS, you'll need to configure it to block or drop packets that match the rules you've set up. This can help prevent malicious traffic from reaching your network or devices. Keep in mind that using Snort as an IPS can potentially block legitimate traffic, so it's important to carefully configure the rules and monitor for false positives.
Why Snort is better than other IDPS?
There are several reasons why Snort stands out among other IDPS (Intrusion Detection and Prevention Systems) on the market.
-
Open-Source: Snort is open-source software that is freely available to users, making it an attractive option for organizations looking to minimize costs.
-
Large and Active Community: Snort has a large and active community that continuously develops and updates the rulesets, making it an effective tool for detecting and preventing network intrusions. This community support also provides users with access to a wealth of resources and expertise.
-
Versatility and Flexibility: Snort supports a wide range of operating systems, hardware, and protocols, making it highly customizable and adaptable to different network environments. It can be tailored to meet specific security requirements and integrate with other security tools.
-
Low Resource Requirements: Snort is known for its low resource requirements, allowing it to run effectively on even low-powered hardware. This makes it an ideal option for organizations with limited resources.
-
Reputation and Effectiveness: Snort has been in use for over two decades and has established a strong reputation for its effectiveness in detecting and preventing network intrusions. It is also regularly updated to stay ahead of new and emerging threats.
Conclusion
That's it for this practical guide on Intrusion Detection with Snort. We hope this guide has provided you with a better understanding of how Snort works and how to use it to enhance your network security. If you have any questions or feedback, please feel free to leave a comment below. Stay tuned for the next blog in this series, where we will dive deeper into Advanced Threat Detection with Snort. Thanks for reading, and happy learning!
Commonly Asked Questions
Q1. How do I update Snort's rules?
Ans. Snort's detection capabilities depend on its rules, which define what traffic to monitor and how to respond to suspicious behavior. Snort rules are updated regularly to stay up-to-date with the latest threats and vulnerabilities. You can update Snort's rules manually by downloading the latest rule file from the Snort website or using an automatic rule update tool like Oinkmaster.
Q2. How do I view Snort's alerts and logs?
Ans. Snort generates alerts and logs whenever it detects suspicious behavior or potential security threats. You can view Snort's alerts and logs using the command-line interface or a graphical user interface like Snorby. Snort's alerts and logs can provide valuable information for security analysts and help organizations identify and respond to potential security breaches.
Q3. How can I optimize Snort's performance?
Ans. To optimize Snort's performance, you can fine-tune its configuration settings, such as increasing the memory buffer size, adjusting the number of threads used, and enabling certain performance-enhancing options like fast pattern matching. You can also use a more powerful hardware configuration or distribute Snort across multiple systems.
Related Blogs
- What is Intrusion Detection System | What is Intrusion Prevention System | IDS vs IPS
- Snort - Intrusion Detection System & Prevention System | Installation & Use in Windows
- SQL Injection Attack (SQLi) | SQL Injection Prevention | SQL Injection Cheat Sheet [Practical Demo]
- Advanced SQL Injection Attack (SQLi) | Blind SQL Injection And PreventionAdvanced SQL Injection Attack (SQLi) | Blind SQL Injection And Prevention [Practical Demo] part 2
- What is Website Hacking | Web Application Penetration Testing | Lab Setup
- What is OSINT? | OSINT Framework | Tools for OSINT | Best OSINT Techniques
- What is Smurf Attack? | What is the Denial of Service Attack? | Practical DDoS Attack Step-By-Step Guide
- What is Packet Sniffing? | How to Perform Packet Sniffing | Practical Demo on Wireshark
- What is Metasploit Framework | What is Penetration Testing | How to use Metasploit
- How to Use Metasploit | Metasploit Commands | Metasploit Tutorial