Hello cyber learners,
I am thrilled to present the third part of my OSINT tools for bug hunting series. In our previous blogs, we explored various techniques to find valuable information about our targets, but we know you all have been eagerly waiting for more.
So, we're back with three more powerful tools Shodan, GitHub Dorks, and LinkedIn. that will take your bug-hunting game to the next level. These tools will help you to uncover potential vulnerabilities, gather deeper insights, and outsmart the competition. These tools are game-changers in their own right and will help you take your bug-hunting game to new heights. So, get ready to learn about these incredible tools!
- Shodan
- Filters for Shodan
- Best Shodan Dorks
- Github Dorks
- Real Life Case Studies
- Conclusion
- Commonly Asked Questions
Shodan
Shodan is a search engine for Internet-connected devices and a powerful tool for bug hunters. It provides a wealth of information about a target's systems, networks, and online presence, making it an invaluable resource for conducting initial reconnaissance and identifying potential attack surfaces.

This tool allows bug hunters to search for Internet-connected devices, including web servers, routers, and other types of systems. it also provides detailed information about a target's systems, including the operating system, web server software, and programming language. This information can be used to identify potential attack surfaces and to determine the target's security posture.
Here are a few practical ways that bug hunters adapt while using it:
- Find devices by IP address: It allows you to search for specific IP addresses, which can be useful if you already have a target in mind. For example, you can search for "192.168.1.1" to see if any internet-connected devices use that IP address.
- Find devices by keywords: It also allows you to search for devices based on keywords, such as specific manufacturers, operating systems, or protocols. For example, you can search for "webcam" to find all internet-connected cameras or "IoT" to find all internet-connected devices.
- Filter your results: It provides a number of filters that allow you to refine your search results, including location, operating system, and the web server. For example, you can use the "city" filter to search for devices in a specific city or the "os" filter to search for devices running a specific operating system.
- View device details: It provides detailed information about each device, including the IP address, hostname, operating system, and open ports. This information can be useful for identifying potential attack surfaces and determining the type of device you're dealing with.
- Use the API: It provides an API that allows you to automate your searches and access the information in a programmatic manner. This can be useful if you want to integrate results into your bug-hunting workflow or if you need to search for a large number of devices.
In practice, these tips can be combined to effectively use Shodan for internet-connected device reconnaissance in bug hunting.
For example, you could use this tool to find all internet-connected cameras in a specific city and then view the device details to determine the type of camera and whether it is vulnerable to known exploits.
first, go to shodan
To find all cameras in the US, you have to use this dork:
webcamxp country:US
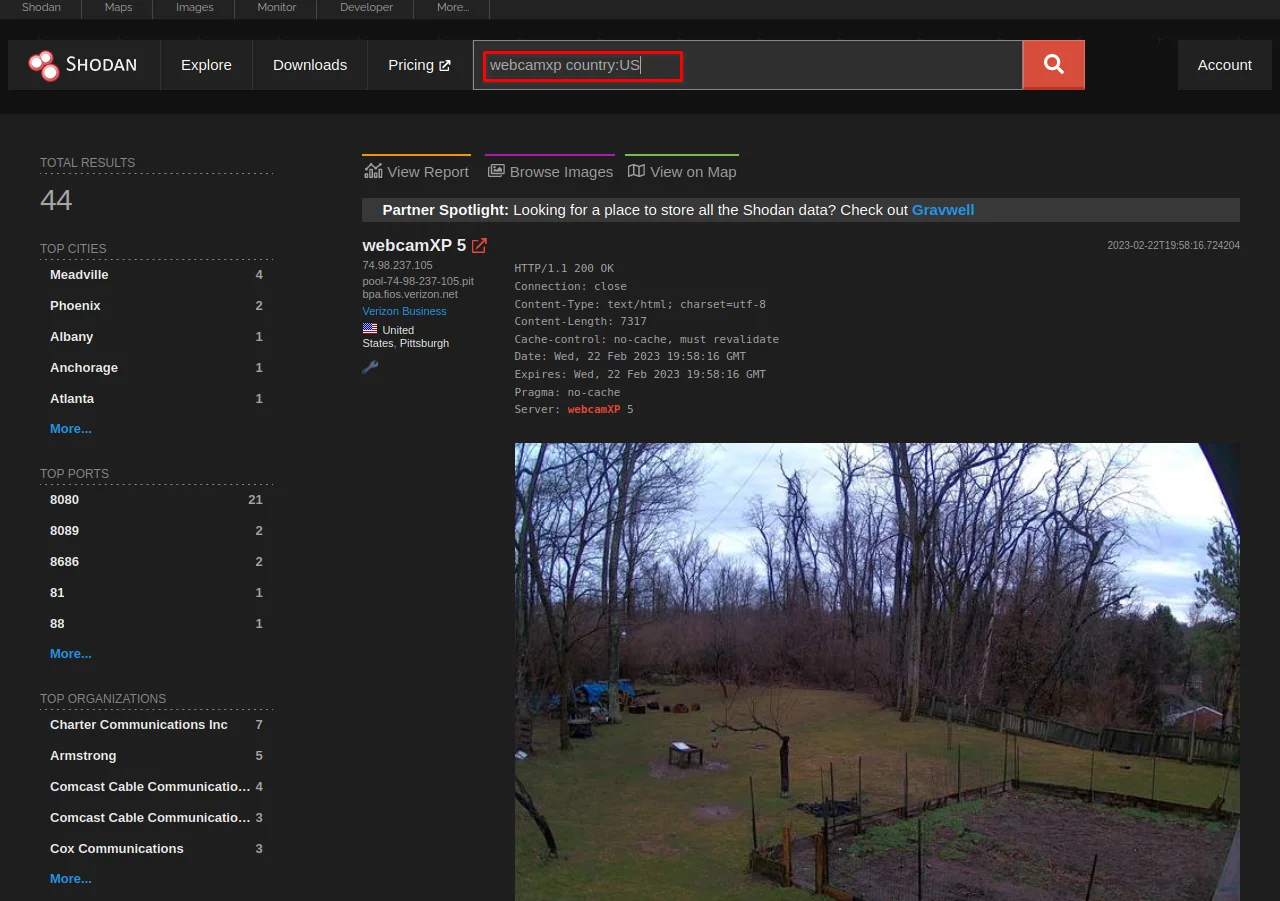
As you can see the results of all available cameras on the above screenshot.
Now, let's try to search for open FTP servers.
for that you have to use this dork:
"220" "230 Login successful." port:21 (FTP servers)

As you can see the results of all available FTP servers are in the above screenshot.
Now, let's try to find the servers of tesla.com.
For that, you need to find all devices with the hostname "tesla.com" that have port 80 or 443 open. These are typically the ports used for HTTP and HTTPS traffic, so this could be a good starting point for a web application assessment.
for that you can use this dork:
port:80,443 hostname:tesla.com
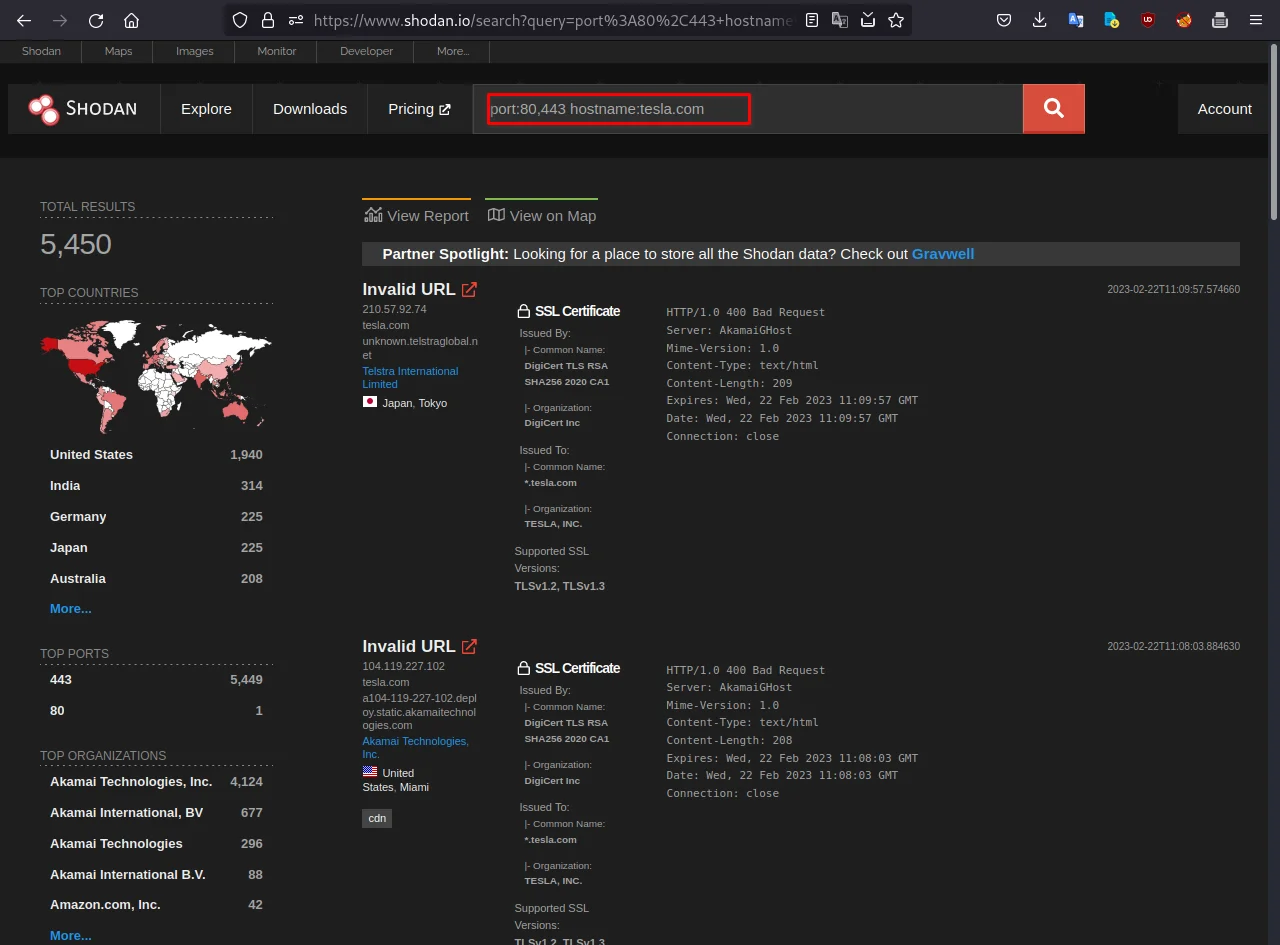
We can see the results in the above screenshot.
Let's find all FTP servers associated with the hostname "tesla.com". This could help identify potential FTP vulnerabilities on the target network.
for that you can use this dork:
hostname:tesla.com port:21
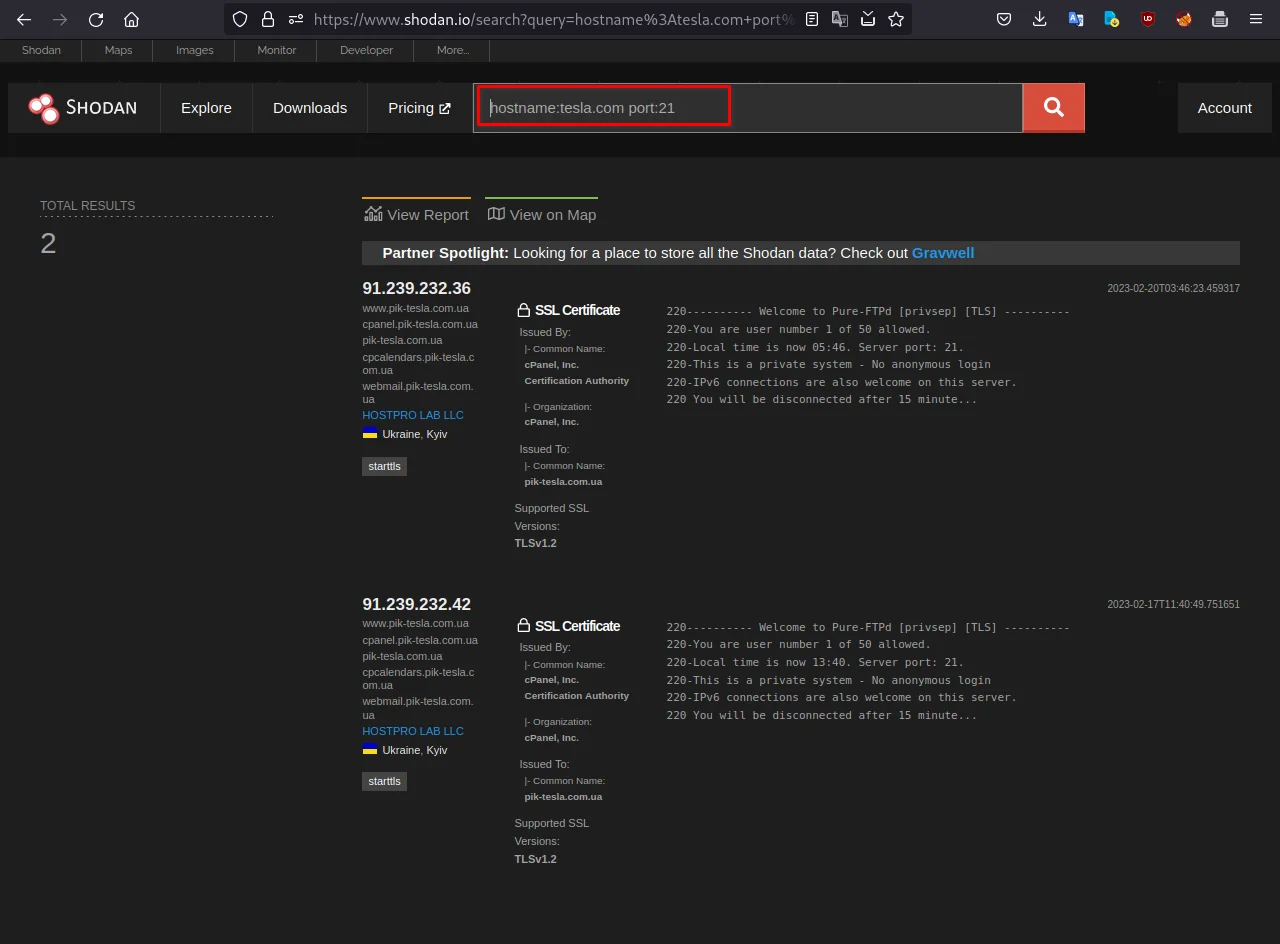
Observe the results in the above screenshot.
After recon now let's try to find all Windows 7 machines with Remote Desktop Protocol (RDP) enabled that have a screenshot available. This could be useful for identifying systems that are exposed to the internet and may be vulnerable to RDP attacks.
for that you can use this dork:
port:3389 OS:"Windows 7" has_screenshot:true
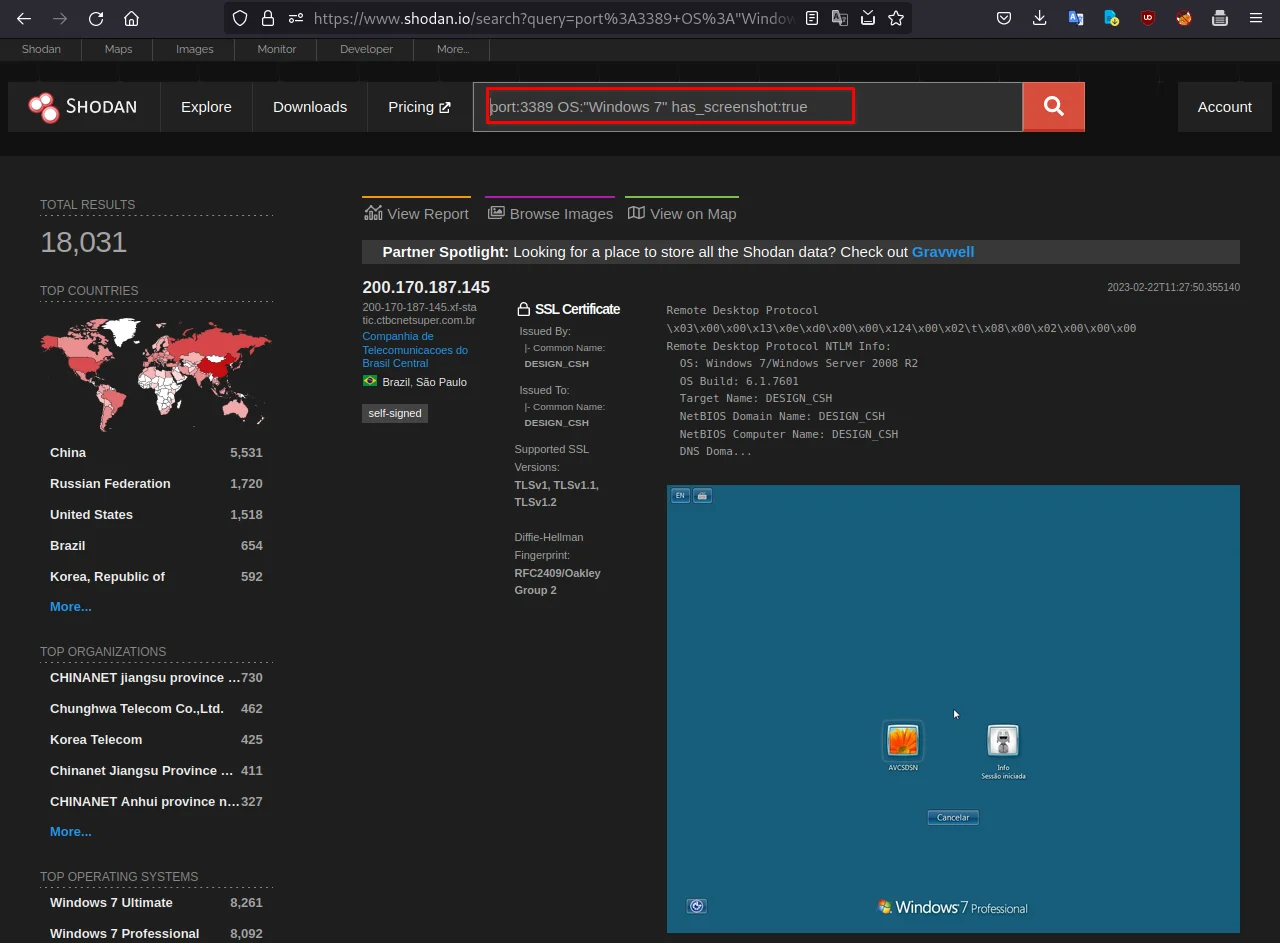
Wow, look at the above screenshot that is showing screenshots of publically exposed systems.
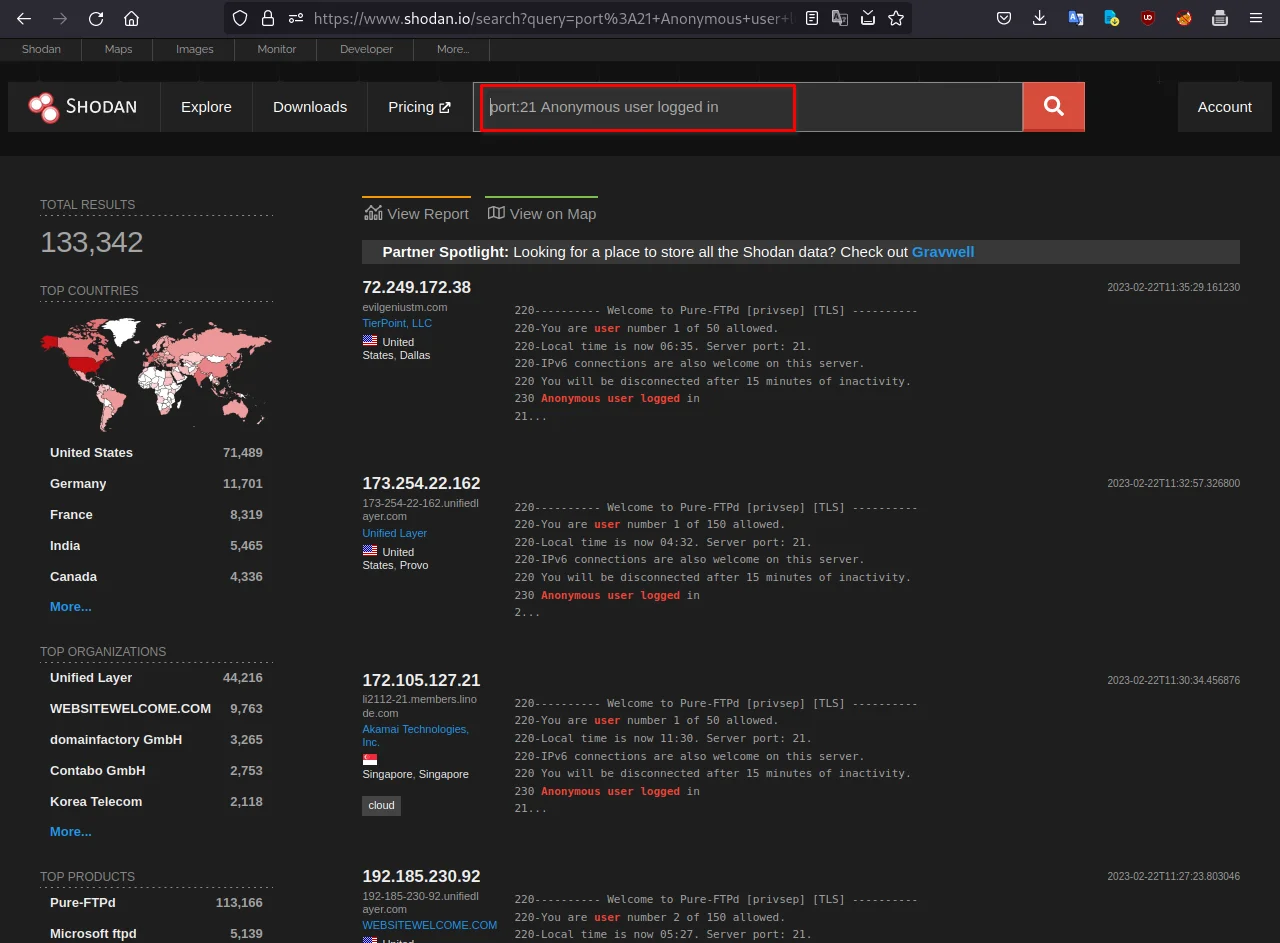
Let me take you deeper this time.
The below dork will return all FTP servers that allow anonymous users to log in. This could be useful for identifying servers that may have weak security configurations
port:21 Anonymous user logged in
Filters for Shodan
You can use the below dorks or filters, and also make your own dorks in this format:
"port: 80 country:US" - This dork will find all the devices in the United States that have port 80 open, which is typically used for HTTP traffic.
"port: 22 product: OpenSSH" - This dork will find all the devices that have port 22 open and are running OpenSSH.
"hostname: example.com" - This dork will find all devices that are associated with the domain "example.com".
"net: 203.0.113.0/24" - This dork will find all the devices within a specific network range, in this case, the IP range of 203.0.113.0/24.
"title: Login" - This dork will find all devices with a web page that has "Login" in the title.
"ssl:/C=US/ST=California/L=Los Angeles/O=Example/OU=Example/CN=example.com" - This dork will find all devices that have a SSL certificate matching the specified criteria.
"http.component: WordPress" - This dork will find all devices running WordPress.
"http.favicon.hash:-335242539" - This dork will find all devices with the same favicon hash, which can be useful in identifying related or duplicate sites.
"os: Windows" - This dork will find all devices running a Windows operating system.
"http.html: password" - This dork will find all devices with the word "password" in their HTML.
Best Shodan Dorks
Below you can see my personal favourite dorks that I mostly used in my bug-hunting process. As per my experience, these are the best dorks for reconnaissance:
"220" "230 Login successful." port:21 (FTP servers)
"OpenSSH" port:22 (OpenSSH servers)
"X-Jenkins" "Set-Cookie: JSESSIONID" http.title:"Dashboard" (Jenkins servers)
port:8291 os:"MikroTik RouterOS 6.45.9" (MikroTik RouterOS 6.45.9 devices)
"Server: Apache" port:80 (Apache HTTP servers)
"Server: Microsoft-IIS" port:80 (Microsoft IIS servers)
"Server: Nginx" port:80 (Nginx servers)
"Server: Apache" "mod_ssl/2.4.7" port:443 (Apache servers with mod_ssl installed)
"Server: Apache-Coyote" port:8080 (Apache Coyote servers)
"Server: OpenSSH" port:22 (OpenSSH servers)
"Server: Apache-Coyote/1.1" port:8080 (Apache Coyote servers)
"Server: Apache-Coyote/1.1" "Accept-Ranges: bytes" port:8080 (Apache Coyote servers with "Accept-Ranges: bytes" header)
"Server: nginx" "Vary: Accept-Encoding" port:443 (Nginx servers with "Vary: Accept-Encoding" header)
"Server: Apache-Coyote/1.1" "Accept-Ranges: bytes" port:80 (Apache Coyote servers with "Accept-Ranges: bytes" header)
"Server: Apache/2.2.22" "X-Powered-By: PHP/5.3.10-1ubuntu3.26" port:80 (Apache servers with PHP 5.3.10-1ubuntu3.26)
"Server: Apache-Coyote/1.1" "Content-Encoding: gzip" port:80 (Apache Coyote servers with "Content-Encoding: gzip" header)
"Server: Microsoft-IIS/6.0" port:80 (Microsoft IIS 6.0 servers)
"Server: Microsoft-HTTPAPI/2.0" port:80 (Microsoft HTTP API 2.0 servers)
"Server: Apache-Coyote/1.1" "Accept-Ranges: bytes" "Content-Length" port:80 (Apache Coyote servers with "Accept-Ranges: bytes" and "Content-Length" headers)
"Server: Apache/2.4.7" "X-Powered-By: PHP/5.5.9" port:80 (Apache 2.4.7 servers with PHP 5.5.9)
It's important to note that while this tool can be a powerful tool for reconnaissance, it's just one part of a larger bug hunting investigation. To increase your chances of finding and reporting bugs, it's important to also use other reconnaissance tools and techniques, such as passive DNS analysis and vulnerability scanning. Additionally, it's important to act ethically and responsibly when using this tool and to avoid any actions that could be considered malicious or illegal.
Github Dorks
As a bug bounty hunter or a security professional, GitHub can be a powerful tool for discovering software vulnerabilities. By using GitHub OSINT, we can identify source code repositories that may contain vulnerabilities, which can be used to gain unauthorized access, execute arbitrary code, or steal sensitive data.

Here are some practical steps that you can follow to gain insights through Github for OSINT:
Identify the target application and programming language
The first step in using GitHub dorks is to identify the target application and the programming language used to build it. This information can be obtained through various sources, including the application's documentation, source code, or other publicly available information.
Identify relevant GitHub dorks
GitHub dorks are search queries that allow you to find specific types of repositories based on their content. Some common GitHub dorks for finding vulnerabilities include:
filename:password
filename:config
extension:sql
filename:.env
filename:.htpasswd
extension:log
filename:.gitconfig
These dorks can help you find repositories that may contain sensitive information, such as passwords or configuration files, or code that may be vulnerable to attack.
Refine the search
After identifying the relevant GitHub dorks, you can refine the search by adding additional keywords or file extensions. For example, you can add the programming language used to build the application, such as "language:php", to the search query to narrow down the search results to repositories containing code written in that language.
Analyze the source code for vulnerabilities
Once you have identified a repository that may contain vulnerabilities, you can begin analyzing the source code for security issues. This can include looking for common vulnerabilities, such as SQL injection, cross-site scripting (XSS), and authentication issues. You can also use automated tools, such as static analysis tools or linters, to identify potential vulnerabilities and code quality issues.
Report vulnerabilities to the appropriate parties
If you identify a vulnerability in a repository, it's important to report it to the appropriate parties as soon as possible. This can include the application's developers, the maintainers of the repository, or the organization responsible for the application. GitHub has a built-in vulnerability reporting feature that allows you to report issues directly to the repository maintainers.
For example, let's try to find information on tesla.com
this dork will find all the repositories of tesla, which are containing config.py files.
filename:config.py tesla.com

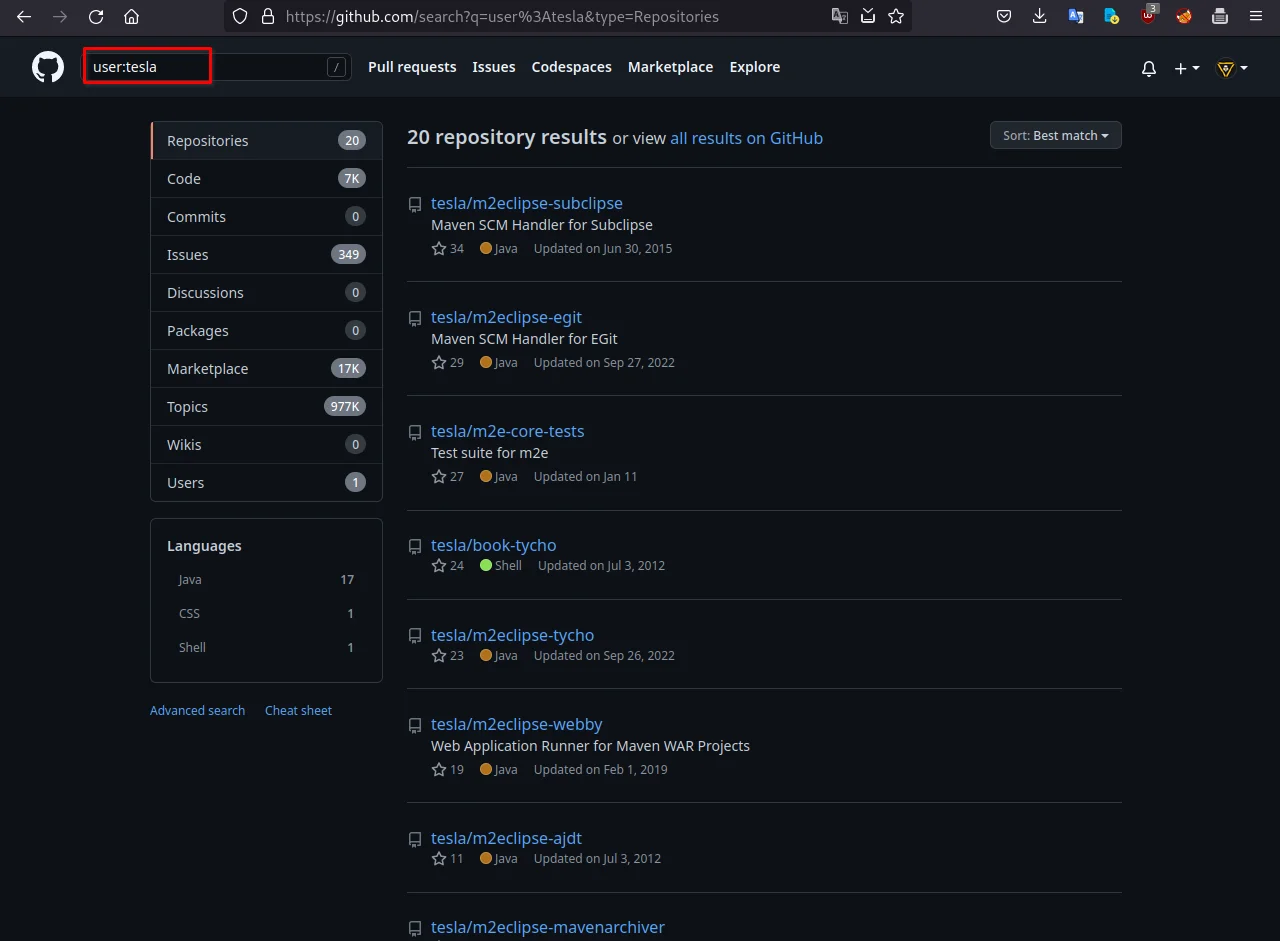
now, let's search for employees of tesla.
this dork will list all users, which contain "tesla" in the username:
user:tesla
We can also combine GitHub and google dorks, for more useful information.
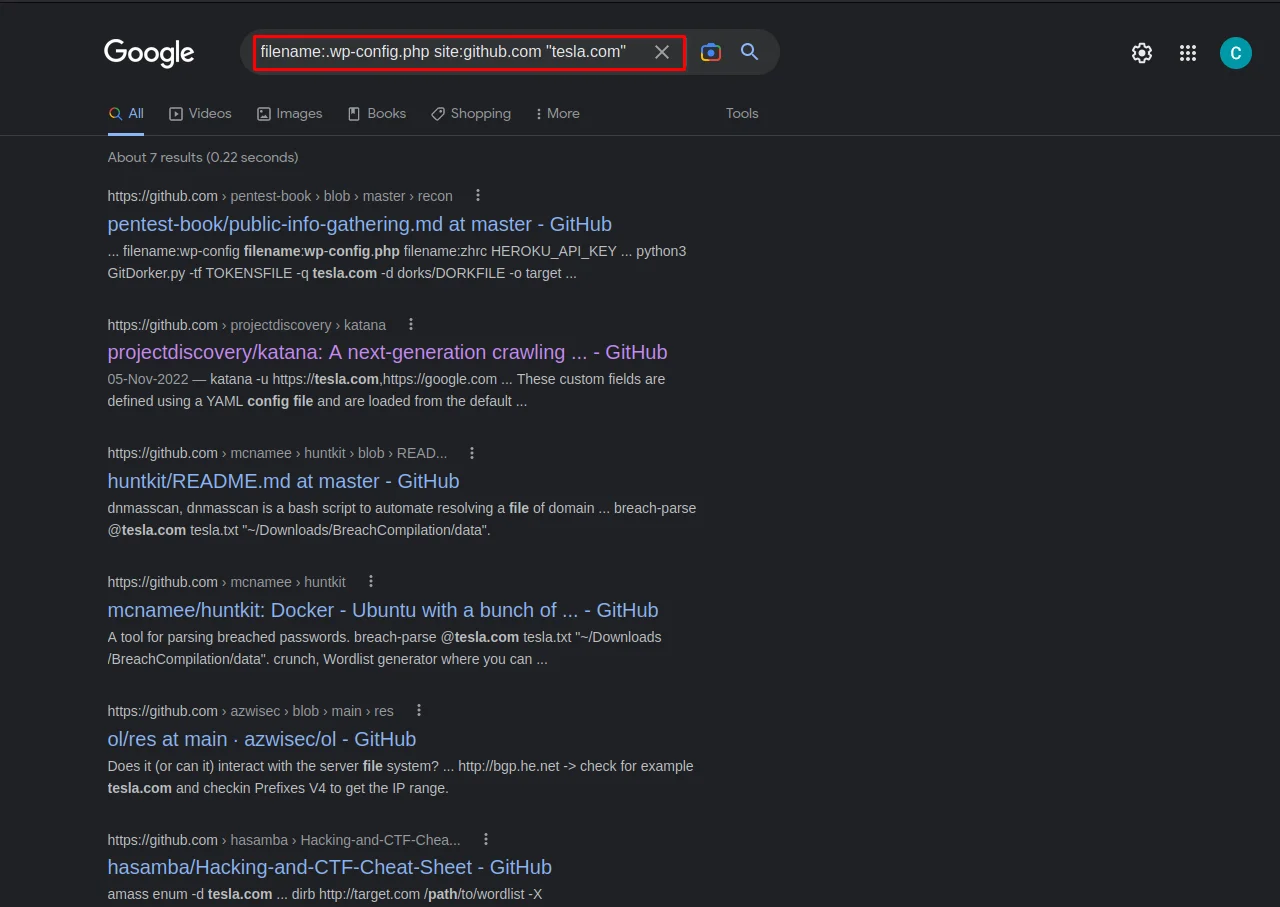
Here, let's try to search for wp-config files of tesla.com.
for that use this simple dork:
filename:.wp-config.php site:github.com "tesla.com"
Question: What is wp-config.php?
Ans: The wp-config.php file contains information required by WordPress to connect to the database, such as the database name, database host, username and password, authentication keys and salts, and the database table prefix. This configuration file can also be used to activate DEBUG mode, which can useful in troubleshooting.
These dorks can help you find repositories that may contain sensitive information or code that may be vulnerable to attack. It's important to remember to always follow responsible disclosure practices and report vulnerabilities to the appropriate parties.
"filename:.npmrc _auth"
"filename:composer.json auth"
"filename:secrets.yml password"
"filename:.env DB_PASSWORD"
"filename:wp-config.php"
"filename:.htpasswd"
"filename:.dockercfg"
"filename:.gitconfig"
"filename:.bash_history"
"filename:.bashrc"
"filename:.ssh/id_rsa"
"filename:.aws/config"
"filename:.aws/credentials"
"filename:google-credentials"
"filename:google-api-key"
"filename:slack-api-token"
"filename:docker-compose.yml"
"extension:pem private"
"extension:ppk private"
"extension:sql dump"
We can also combine google dorks with GitHub dorks, for better results, below are some of them
Note: if you don't know what is Google dork, or how to use and make google dorks, you can read my previous blog: OSINT Framework | OSINT for Bug Hunters [Practical Demo] Part 1
    "site:github.com target.com"
    "filename:config.py site:github.com target.com"
    "filename:database.yml site:github.com target.com"
    "filename:.env site:github.com target.com"
    "filename:.env.production site:github.com target.com"
    "filename:.env.staging site:github.com target.com"
    "filename:.htpasswd site:github.com target.com"
    "filename:.npmrc site:github.com target.com"
    "filename:.wp-config.php site:github.com target.com"
    "filename:docker-compose.yml site:github.com target.com"
    "filename:docker-compose.yaml site:github.com target.com"
    "filename:docker-compose.override.yml site:github.com target.com"
    "filename:docker-compose.override.yaml site:github.com target.com"
    "filename:docker-compose.prod.yml site:github.com target.com"
    "filename:docker-compose.prod.yaml site:github.com target.com"
    "filename:prod.env site:github.com target.com"
    "filename:staging.env site:github.com target.com"
    "filename:config.yml site:github.com target.com"
    "filename:config.toml site:github.com target.com"
    "filename:config.json site:github.com target.com"
Here are some more github dorks, which are helpful to find sensitive information only based on the target's domain scope. you can also make your own dorks by following the pattern I described earlier.
    target.com
    filename:config.py target.com
    filename:database.yml target.com
    filename:.env target.com
    filename:.env.production target.com
    filename:.env.staging target.com
    filename:.htpasswd target.com
    filename:.npmrc target.com
    filename:.wp-config.php target.com
    filename:docker-compose.yml target.com
    filename:docker-compose.yaml target.com
    filename:docker-compose.override.yml target.com
    filename:docker-compose.override.yaml target.com
    filename:docker-compose.prod.yml target.com
    filename:docker-compose.prod.yaml target.com
    filename:prod.env target.com
    filename:staging.env target.com
    filename:config.yml target.com
    filename:config.toml target.com
    filename:config.json target.com
    org:target
    user:target
    filename:.npmrc _auth
    filename:database.yml password
    filename:config.json password
    filename:.htpasswd
    filename:.gitconfig
    filename:.env
    filename:.env.production
    filename:.env.staging
    filename:.env.test
    filename:.env.local
    filename:.env.development
    filename:docker-compose.yml
    filename:docker-compose.yaml
    filename:docker-compose.prod.yml
    filename:docker-compose.prod.yaml
    filename:prod.env
    filename:staging.env
    filename:.config
GitHub dorks can be a powerful tool for bug bounty hunters and security professionals. By using these dorks, you can identify repositories that may contain vulnerabilities, analyze the source code for security issues, and report vulnerabilities to the appropriate parties. Remember to always follow responsible disclosure practices and prioritize the security of the application and its users.
LinkedIn is a powerful platform for gathering Open Source Intelligence (OSINT) data. It can provide you with a wealth of information to use in your bug bounty hunting or penetration testing efforts.

Here are some practical steps that you can follow to gain insights through LinkedIn for OSINT:
- Create a LinkedIn account: If you don't already have one, create a LinkedIn account. You will need to have an account to be able to conduct searches and view profiles.
- Identify your target: Determine the name and role of the person you want to investigate on LinkedIn. It could be the CEO, a senior manager, or a developer.
- Conduct a basic search: Use the search bar to look up the name of your target. Check the filters on the left-hand side of the page to refine your search based on location, industry, or other criteria.
- Review the target's profile: Look at the target's profile to gather information such as their job title, employer, location, and connections. Take note of any public posts or articles they have written.
- Examine their connections: Look at the target's connections to identify people they know and possibly work with. This could provide additional leads for your investigation.
- Review their activity: Check the target's recent activity on LinkedIn, such as posts they have liked, comments they have made, and articles they have shared. This could reveal additional information about their interests or work.
- Use LinkedIn Sales Navigator: If you have access to LinkedIn Sales Navigator, you can use advanced search features to find additional information on your target, such as job changes or recent company news.
- Cross-reference with other sources: Use the information you gather from LinkedIn to cross-reference with other sources, such as the target's company website, social media profiles, or public records.
By following these practical steps, you can use LinkedIn to gather valuable OSINT data that can support your bug bounty hunting or penetration testing efforts. It's important to note that LinkedIn's privacy policy requires that you do not scrape or collect data in bulk. Therefore, make sure that you are using LinkedIn in a responsible and ethical manner.
Real Life Case Studies
Now, let's take a deep dive into some real-life case studies that demonstrate the power of OSINT in action. We will explore how OSINT was utilized in each case, the challenges that were faced, and the benefits that were gained from its implementation.

Case Study 1: Verizon Data Breach
In 2017, security firm UpGuard discovered an unsecured Amazon Web Services S3 bucket owned by Verizon. The bucket contained data on millions of Verizon customers, including names, addresses, and account details. UpGuard was able to discover the bucket through OSINT techniques, specifically searching for open S3 buckets using publicly available tools like AWS S3 Finder. This case highlights the importance of regularly reviewing and securing third-party services that are used by a company.
Case Study 2: Honda Data Leak
In 2020, Honda suffered a data leak that exposed the personal information of 26,000 customers in the United States. The leak was discovered by security researcher Bob Diachenko, who found an unsecured ElasticSearch database through a Shodan search. The database contained customer names, email addresses, phone numbers, and car VINs. Diachenko was able to notify Honda of the leak, and they secured the database before any sensitive information was compromised. This case highlights the importance of monitoring publicly accessible databases for sensitive information.
Case Study 3: Slack Token Leaks
In 2021, researcher Paul Price discovered that some Slack tokens were being exposed in GitHub repositories. These tokens could be used to access Slack accounts and view sensitive information. Price used GitHub's search function to find repositories containing Slack tokens and was able to notify Slack of the issue. Slack was able to revoke the tokens and prevent any potential security breaches. This case highlights the importance of regularly reviewing code repositories and other sources for sensitive information.
These case studies show the power of OSINT in identifying potential security vulnerabilities. By using publicly available tools and techniques, bug hunters can identify weaknesses that may not be immediately apparent. This is an important tool for organizations to prevent data breaches and other security incidents. It is important to regularly review third-party services, monitor publicly accessible databases, and review code repositories to identify and address vulnerabilities before they can be exploited. By doing so, organizations can keep their systems and data secure.
In this blog, we discussed the use of GitHub dorks, LinkedIn and Shodan dorks, and real-world OSINT case studies to illustrate how OSINT can be used to identify critical information about a target. In conclusion, the power of OSINT is undeniable, and it is an ever-evolving field that promises to deliver more powerful tools and techniques for bug hunters in the future. We encourage our readers to stay tuned for the next blog in our OSINT series, where we'll delve even deeper into the fascinating world of OSINT.
Commonly Asked Questions
Q1. How Shodan Works?
Ans. Shodan continuously scans the internet and collects information about internet-connected devices. then it stores this information in its database, including details such as device type, operating system, software version, and open ports. Users can search Shodan's database using a variety of filters to find specific devices or vulnerabilities.Users can use this information to identify potential security vulnerabilities and take action to secure their own devices.
Q2. What is Github?
Ans.GitHub is a web-based platform that provides a hosting service for version control repositories. It is primarily used for software development projects, but it can be used for other types of projects as well.
Q3. If i recon on employees of my bug bounty target, is this illegal?
Ans. Conducting reconnaissance on employees of a bug bounty target is a common practice for security researchers, but it is important to ensure that you are conducting your activities within legal and ethical boundaries.
Related Blogs
- What is OSINT? | OSINT Framework | Tools for OSINT | Best OSINT Techniques
- OSINT Framework | OSINT for Bug Hunters [Practical Demo] Part 1
- OSINT Framework | OSINT for Bug Hunters [Practical Demo] Part 2
- What is Smurf Attack? | What is the Denial of Service Attack? | Practical DDoS Attack Step-By-Step Guide
- What is DoS Attack | How to do Denial of Service Attack [Practical Demo]
- What is Packet Sniffing? | How to Perform Packet Sniffing | Practical Demo on Wireshark
- What is Metasploit Framework | What is Penetration Testing | How to use Metasploit
- How to Install Metasploit on Windows and Linux | [Step by Step Guide]
- How to Use Metasploit | Metasploit Commands | Metasploit Tutorial