Hello Cyber Learners,
Welcome to another blog of our intrusion detection and prevention system series. In our previous blogs, we covered the introduction and installation of Snort, and now it's time to dive deeper into the world of advanced threat detection with Snort. In this blog post, we will discuss some of the more advanced features of Snort, such as Protocol Decoding and Payload Inspection. We'll also cover how to detect SQL Injection, Malware Attacks, and how to prevent Brute Force Attacks using Snort. So, let's get started and learn how to take your network security to the next level with Snort!
- Installing Snort on Windows and Linux
- Writing Your First Snort Rule
- Integrating Snort with SIEM
- Monitoring Network Traffic with Snort
- Advance Threat Detection with Snort
- Real-World Use Cases for Snort
- Conclusion
- FAQ
Installing Snort on Windows and Linux
If you don't have Snort installed on your system, you can refer to my blogs for the installation process.
For Windows, Snort - Intrusion Detection System & Prevention System | Installation & Use in Windows
For Linux, Snort-Intrusion Detection System & Prevention System | Installation & Use in Linux
Writing Your First Snort Rule
Now, after installing the snort, we will learn how to create and customize Snort rules for different types of attacks
Snort rules are used to define the criteria for detecting attacks. Here, we will cover the basics of writing Snort rules.
Step 1: Understanding Snort Rules
Snort rules are composed of two parts: the header and the options.
The header contains the rule type, protocol, source IP address, source port, destination IP address, and destination port. The options specify the content to look for in the packet payload, the direction of the traffic, and other characteristics.
Step 2: Creating a Basic Rule
The basic format for a Snort rule is as follows:
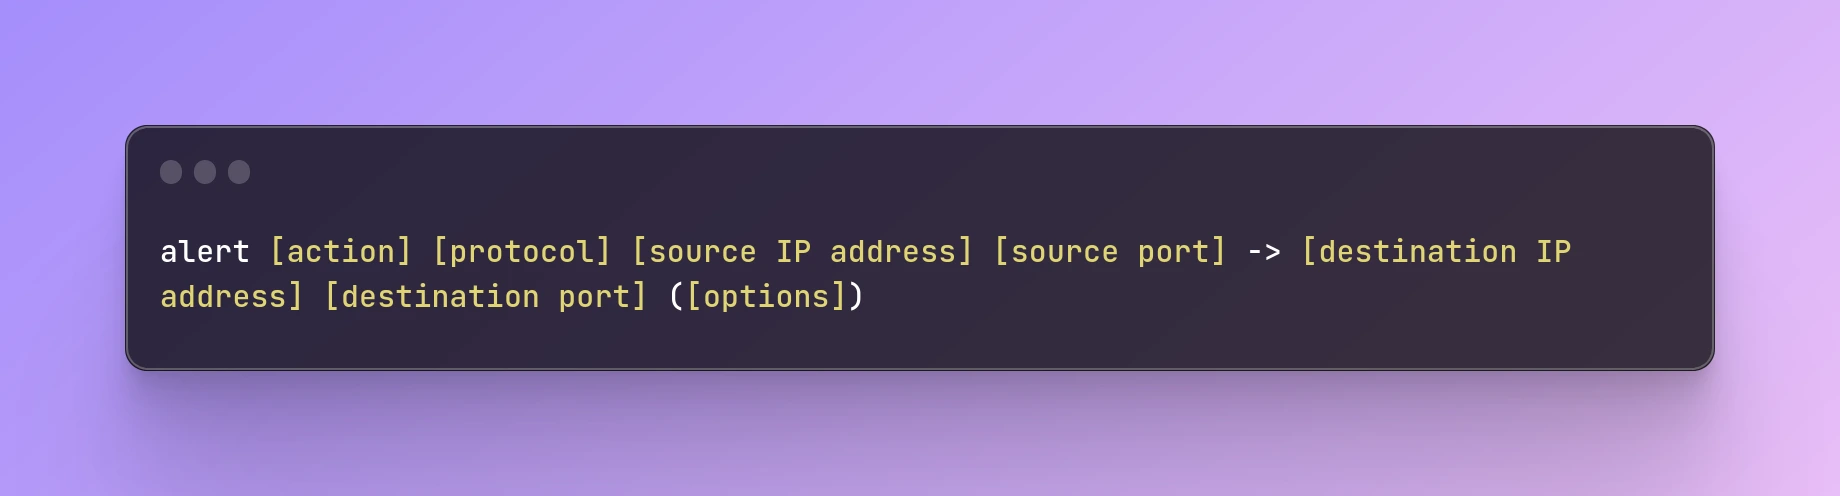
alert [action] [protocol] [source IP address] [source port] -> [destination IP address] [destination port] ([options])
Here's an example of a basic Snort rule:
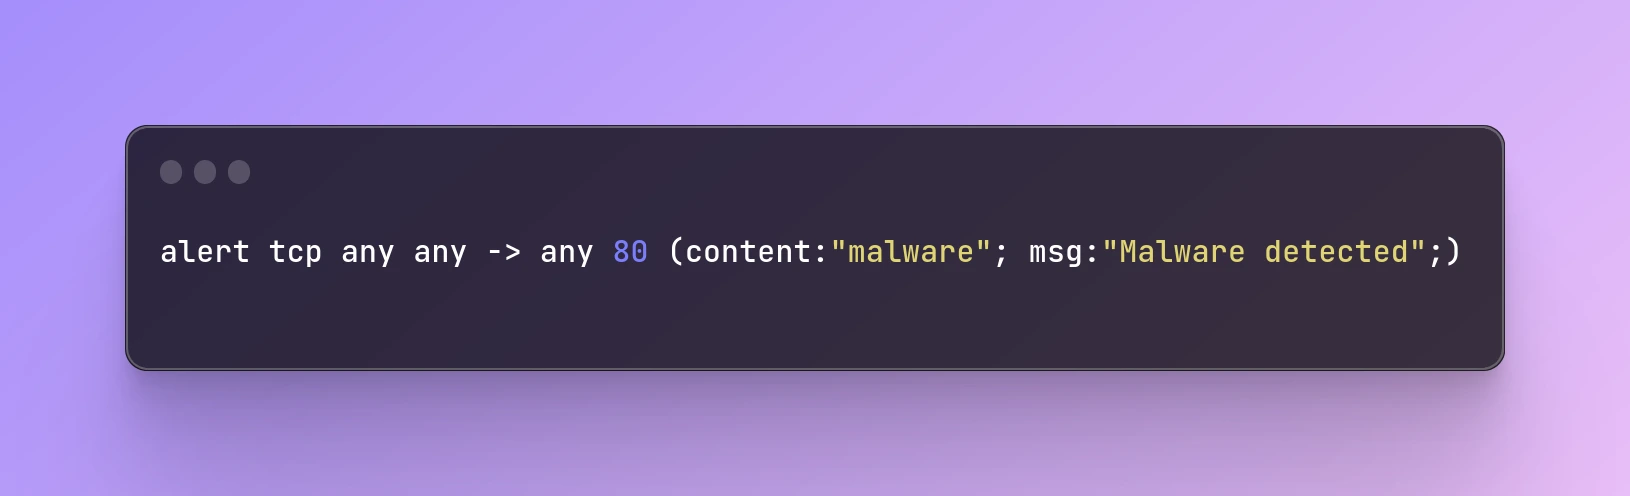
alert tcp any any -> any 80 (content:"malware"; msg:"Malware detected";)
This rule triggers an alert when it detects the string "malware" in the payload of a TCP packet going from any source port to port 80 on any destination IP address.
Step 3: Adding More Options
You can add more options to a Snort rule to make it more specific. For example, you can specify the direction of the traffic using the "->" operator for outgoing traffic and "<-" for incoming traffic. You can also use "!" to negate an option.
Here's an example of a more specific Snort rule:
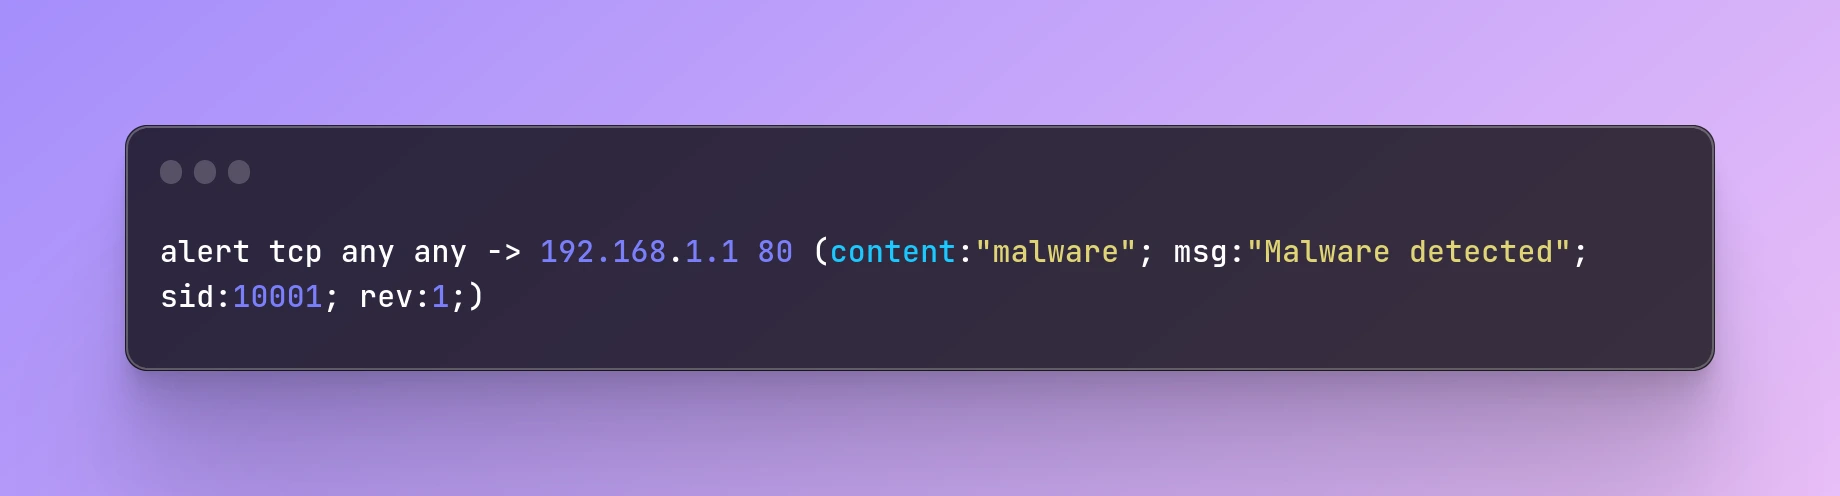
alert tcp any any -> 192.168.1.1 80 (content:"malware"; msg:"Malware detected"; sid:10001; rev:1;)
This rule triggers an alert when it detects the string "malware" in the payload of a TCP packet going from any source port to port 80 on the IP address 192.168.1.1. The "sid" option specifies the unique ID of the rule, while the "rev" option specifies the revision number of the rule.
Step 4: Testing Your Rule
After writing your rule, you can test it using Snort's command-line interface. Open a command prompt and navigate to the directory where Snort is installed. Enter the following command to start Snort in packet capture mode:
snort -vde -c [path to your snort.conf file]
This command starts Snort in verbose mode with packet logging enabled, using the configuration file you specified. To test your rule, send a packet that matches the rule criteria through the network. If Snort detects the packet, it will generate an alert according to the action specified in the rule.
Snort rules are a powerful tool for detecting network attacks. Remember to test your rules thoroughly before deploying them in a production environment.
Integrating Snort with SIEM
Now, after writing the snort rules, let's learn How to integrate this system with a Security Information and Event Management (SIEM) tool to enhance your security operations.
Integrating Snort with a Security Information and Event Management (SIEM) tool can enhance your security operations by providing a centralized platform for monitoring and analyzing security events. here, we will cover the basics of integrating Snort with a SIEM tool.
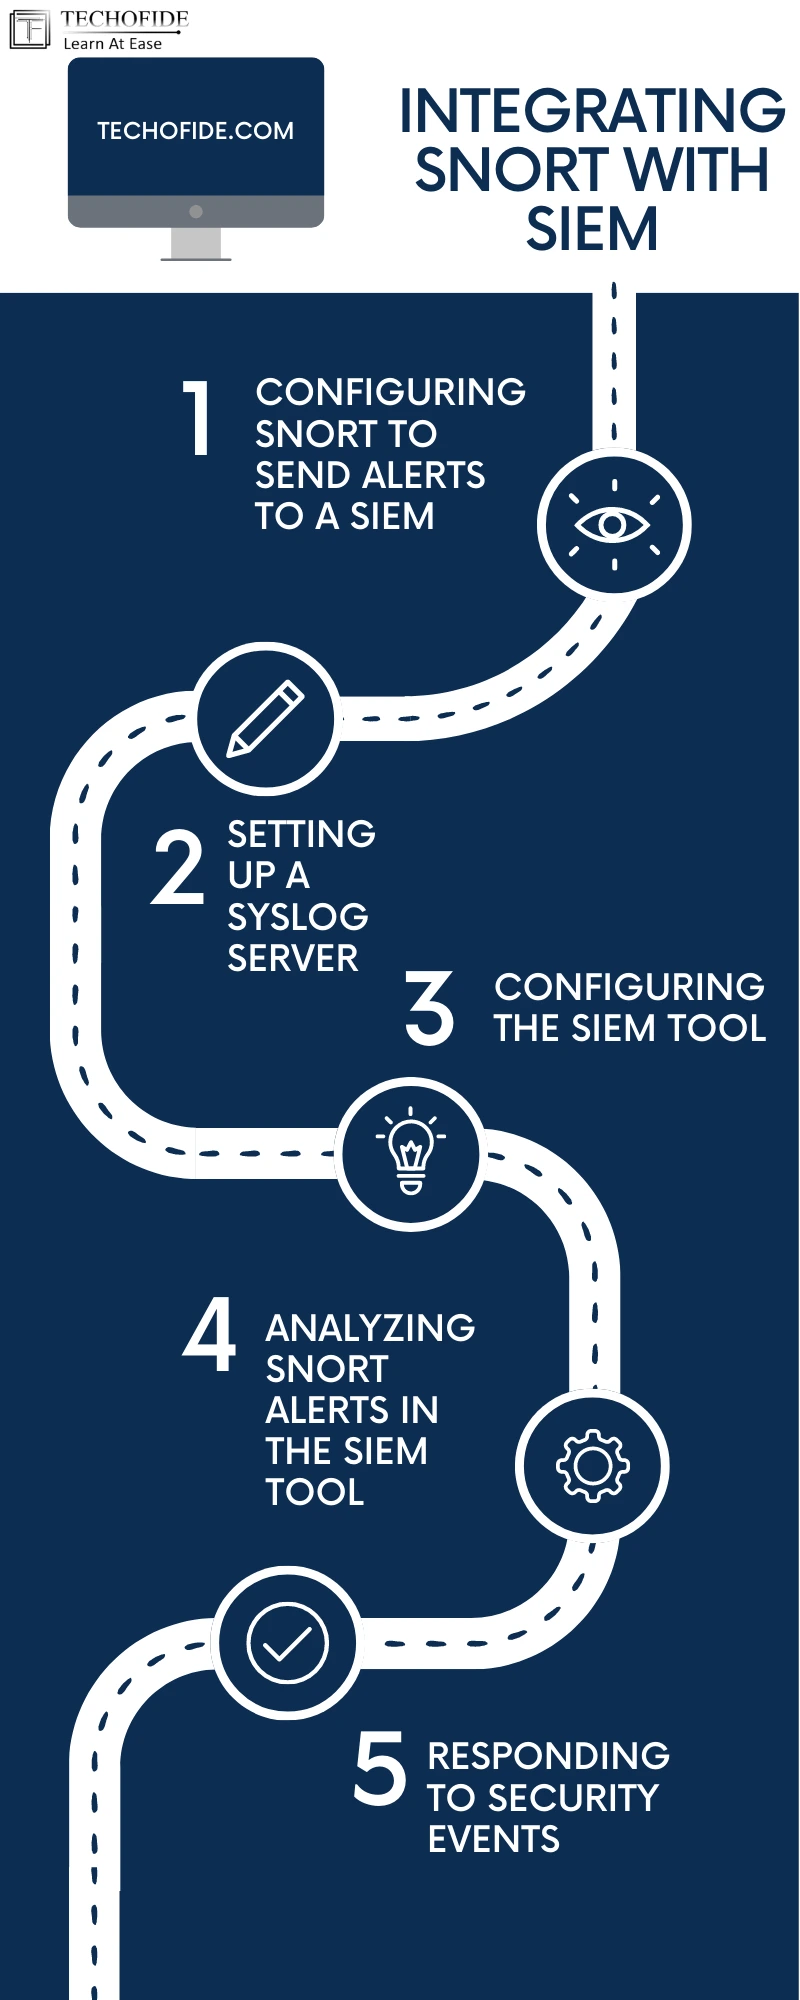
Step 1: Configuring Snort to Send Alerts to a SIEM
To integrate Snort with a SIEM tool, you need to configure Snort to send alerts to a syslog server. This can be done by adding the following line to your snort.conf file:
output alert_syslog: LOG_AUTH LOG_ALERT
This line tells Snort to send alerts to the syslog server using the LOG_AUTH facility and the LOG_ALERT priority.
Step 2: Setting Up a Syslog Server
Next, you need to set up a syslog server to receive and store Snort alerts. You can use a third-party syslog server or a SIEM tool that supports syslog.
Step 3: Configuring the SIEM Tool
After setting up the syslog server, you need to configure the SIEM tool to receive and process Snort alerts. This usually involves configuring the SIEM tool to listen for incoming syslog messages and setting up rules and filters to process and classify the alerts.
Step 4: Analyzing Snort Alerts in the SIEM Tool
Once the SIEM tool is configured, you can start analyzing Snort alerts in the SIEM console. The SIEM tool should provide a dashboard that shows a summary of the alerts, along with details such as the source and destination IP addresses, ports, and the type of attack detected.
Step 5: Responding to Security Events
Finally, you need to respond to security events detected by Snort and the SIEM tool. This may involve taking immediate action to block the attacker, investigating the root cause of the attack, or deploying additional security measures to prevent future attacks.
Monitoring Network Traffic with Snort
Snort is a widely used open-source network intrusion detection system (NIDS) that can be used to monitor network traffic and detect potential security threats. Let's see some basics of using Snort to monitor network traffic and detect potential security threats.
Step 1: Choose the Network Interface to Monitor
Before you can start using Snort to monitor network traffic, you need to choose the network interface to monitor. You can use the following command to list all available network interfaces on your system:
ifconfig -a
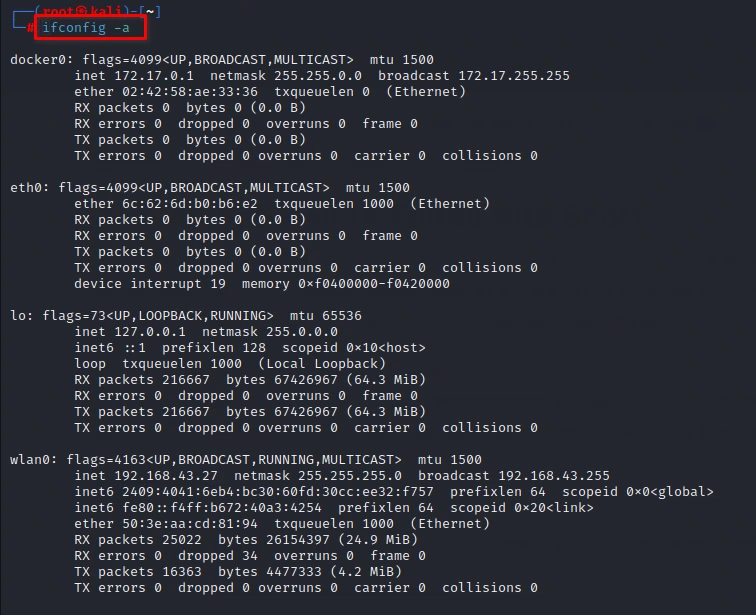
Once you have identified the interface you want to monitor, you can use it in the Snort command line.
Step 2: Start Snort with the Appropriate Rules
Snort uses rules to identify potential security threats in network traffic. You can download pre-defined rules from the Snort community or create your own. Once you have chosen the rules to use, you can start Snort with the following command:
sudo snort -i eth0 -c /etc/snort/snort.conf -A console
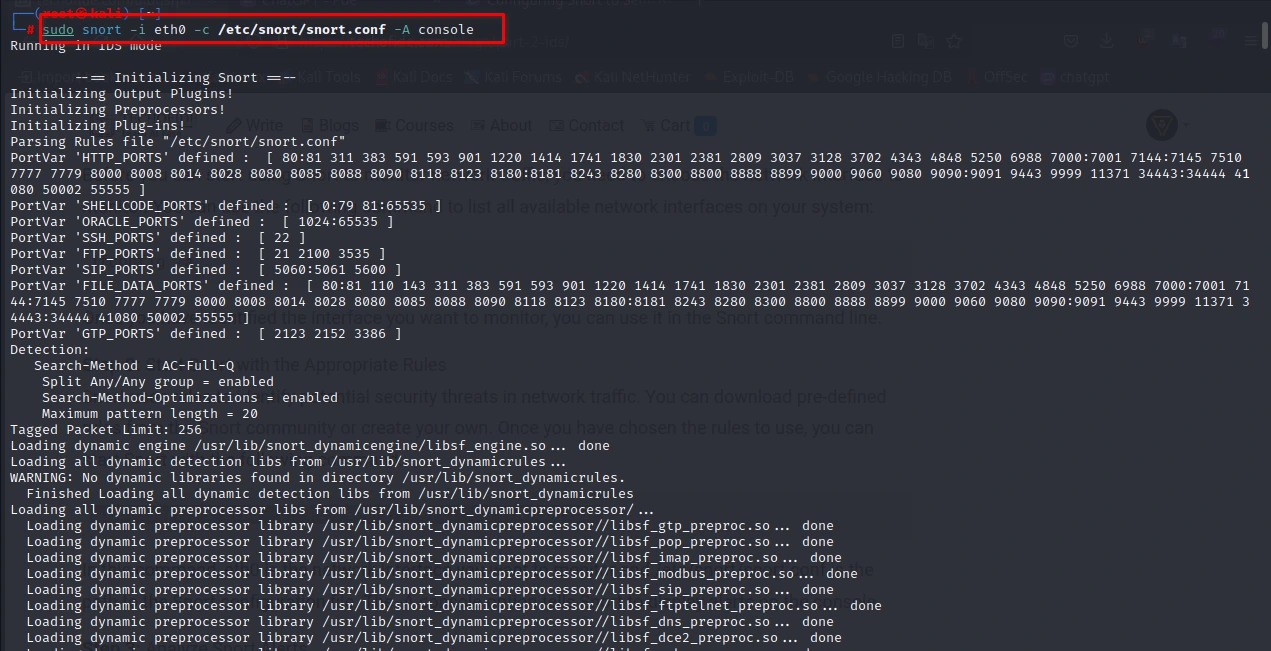
In this command, eth0 is the network interface you want to monitor and /etc/snort/snort.conf is the path to the Snort configuration file. The -A console option tells Snort to display alerts on the console.
Step 3: Analyze Snort Alerts
Snort will generate alerts when it detects potential security threats in the network traffic it monitors. You can analyze these alerts to identify potential security threats and take appropriate action.
Snort alerts are displayed on the console when you start Snort with the -A console option. Alternatively, you can configure Snort to log alerts to a file or send them to a centralized log server for analysis.
Advanced Threat Detection with Snort
In addition, to Snort's basic features, It also offers advanced functionality such as protocol decoding and payload inspection that can enhance the accuracy of threat detection. Now let's see some of these advanced features and provide practical examples of how to use them to detect and prevent security threats.
Protocol Decoding
Protocol decoding is the process of analyzing network traffic to extract meaningful information about the protocols used in the communication. Snort is capable of decoding a wide range of protocols, including TCP, UDP, ICMP, and many others. By decoding protocols, Snort can identify anomalous behavior that may indicate a security threat.
Example: Detecting Suspicious DNS Traffic
One common threat is the use of DNS for data exfiltration. Attackers can use DNS requests and responses to exfiltrate data from a compromised network. To detect this type of activity, you can use Snort's protocol decoding capabilities to analyze DNS traffic and identify suspicious behavior.
Here's an example Snort rule that detects DNS requests that exceed a certain length:
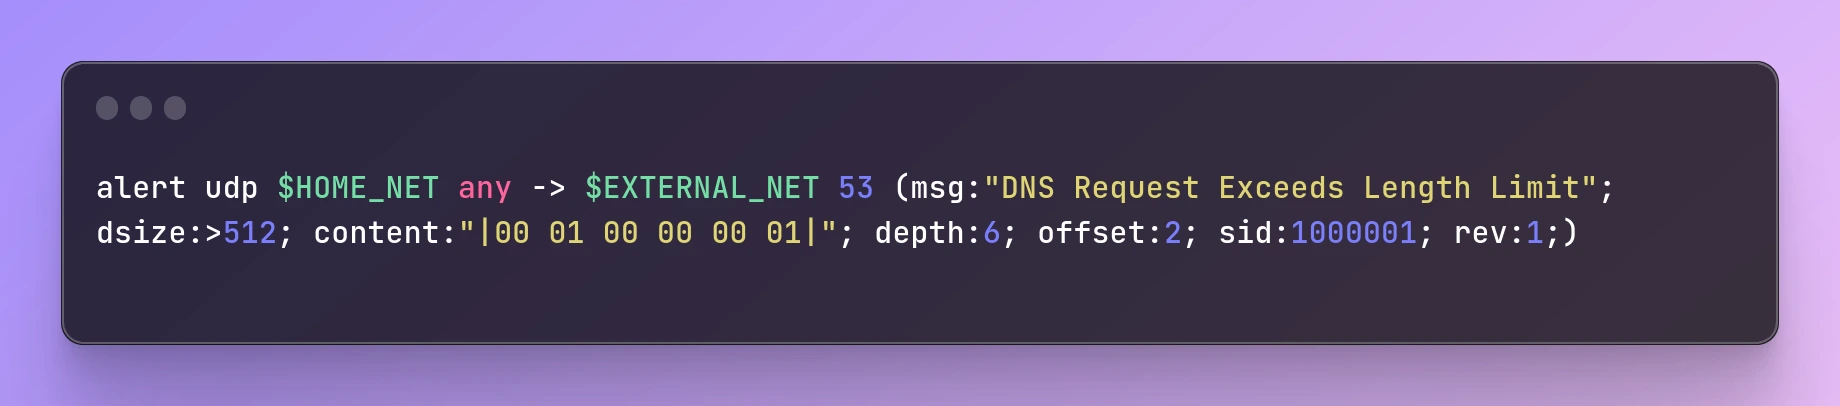
alert udp $HOME_NET any -> $EXTERNAL_NET 53 (msg:"DNS Request Exceeds Length Limit"; dsize:>512; content:"|00 01 00 00 00 01|"; depth:6; offset:2; sid:1000001; rev:1;)
This rule matches DNS requests from the internal network ($HOME_NET) to external DNS servers ($EXTERNAL_NET) that exceed 512 bytes in size. The rule checks for the presence of the DNS query flag in the packet header (|00 01 00 00 00 01|) and generates an alert if the request exceeds the length limit.
Example: Detecting Suspicious HTTP Traffic
Another common threat is the use of HTTP for command and control (C2) communication. Attackers can use HTTP requests and responses to send commands and receive data from a compromised network. To detect this type of activity, you can use Snort's protocol decoding capabilities to analyze HTTP traffic and identify suspicious behavior.
Here's an example Snort rule that detects HTTP requests that contain a specific user agent string:
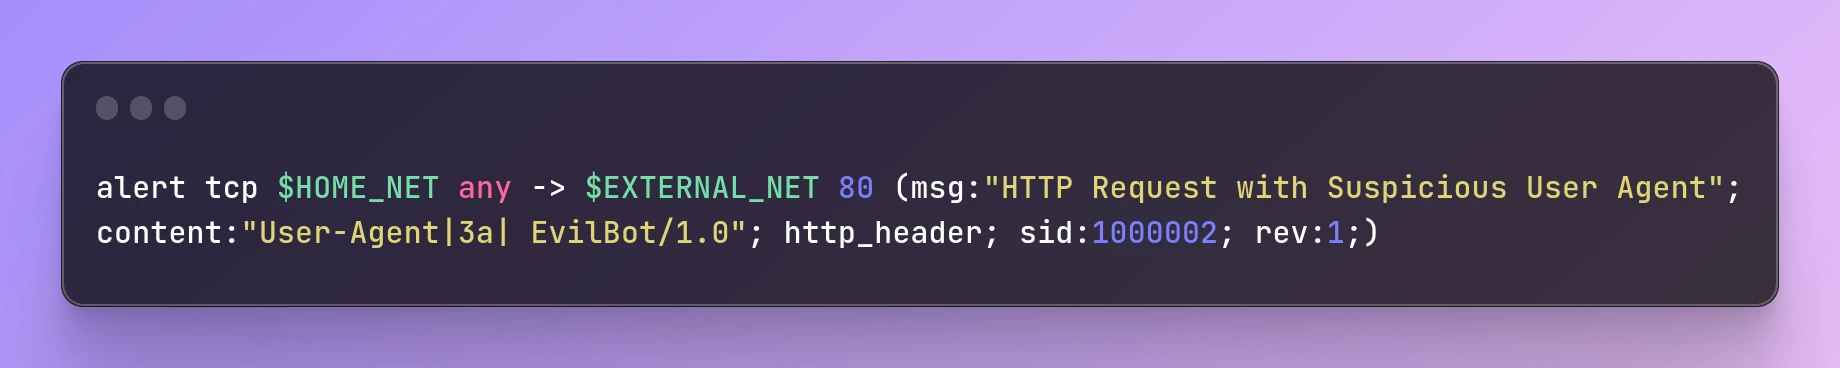
alert tcp $HOME_NET any -> $EXTERNAL_NET 80 (msg:"HTTP Request with Suspicious User Agent"; content:"User-Agent|3a| EvilBot/1.0"; http_header; sid:1000002; rev:1;)
This rule matches HTTP requests from the internal network ($HOME_NET) to external web servers ($EXTERNAL_NET) that contain the user agent string "EvilBot/1.0". The rule checks for the presence of the user agent string in the HTTP request header and generates an alert if it is found.
Payload Inspection
Payload inspection is another advanced feature in Snort that can be used for more effective threat detection. It allows Snort to inspect the content of the packets that it captures, including application layer data. Payload inspection can be useful for detecting attacks that use specific patterns or signatures in the payload data.
To enable payload inspection in Snort, you need to use the content keyword in your rules. This keyword allows you to specify the content that you want to match in the packet payload.
For example, the following rule will match packets that contain the string "password" in the payload:
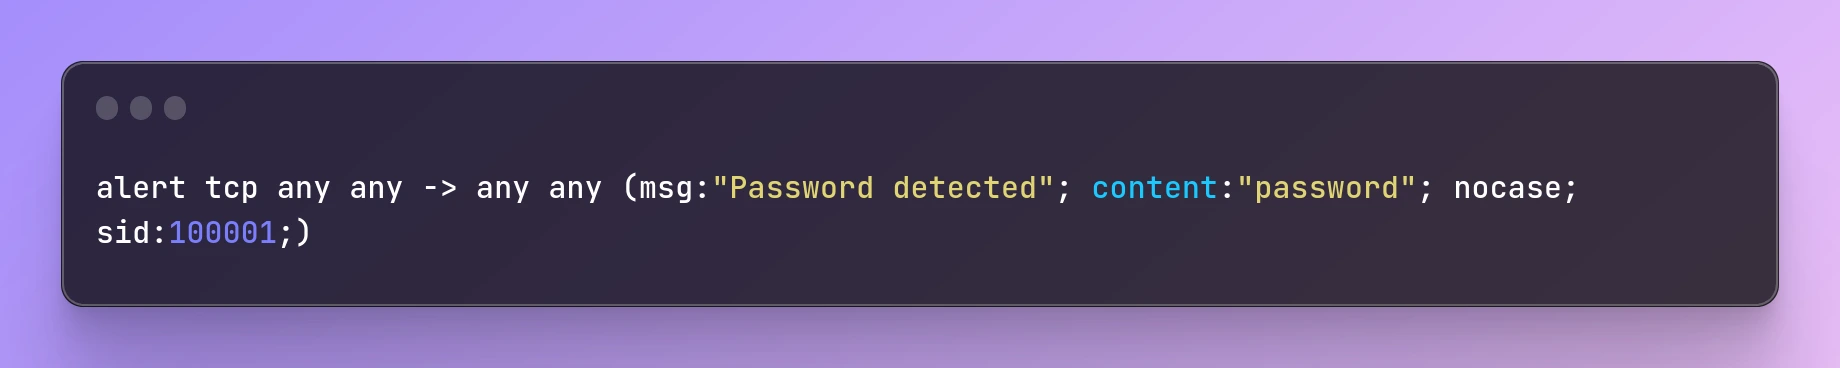
alert tcp any any -> any any (msg:"Password detected"; content:"password"; nocase; sid:100001;)
In this rule, the content keyword is used to specify the string "password" that we want to match in the packet payload. The nocase option is used to make the string case-insensitive, so that it will match both "password" and "PASSWORD". The sid option is used to specify a unique identifier for the rule.
Payload inspection can be combined with other advanced features in Snort, such as regular expressions and byte_jump, to create more complex and powerful rules.
For example, the following rule will match packets that contain a credit card number in the payload:
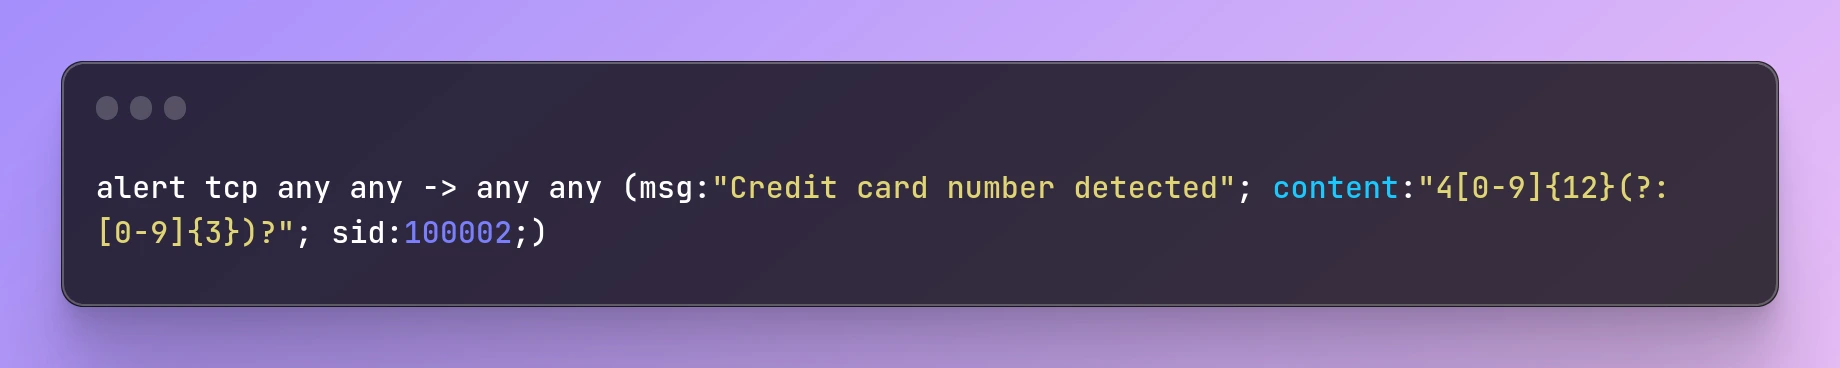
alert tcp any any -> any any (msg:"Credit card number detected"; content:"4[0-9]{12}(?:[0-9]{3})?"; sid:100002;)
In this rule, the content keyword is used to specify a regular expression that matches a credit card number. The regular expression is 4[0-9]{12}(?:[0-9]{3})?, which matches any string that starts with the digit 4, followed by 12 digits, and optionally followed by another 3 digits. This regular expression is based on the standard format for credit card numbers.
Real-World Use Cases for Snort
Now let's take a look at Case studies that demonstrate how Snort can be used to detect and prevent real-world cyber attacks.
Snort is a versatile intrusion detection and prevention system that can be used to protect against a wide range of cyber-attacks. Let's see some of the detections with Snort.
1) Detecting SQL Injection Attacks
SQL injection attacks are one of the most common types of web application attacks. They involve inserting malicious SQL statements into a web application form, which can lead to unauthorized access to the database or other sensitive information.
Snort can be used to detect SQL injection attacks by analyzing the web traffic between the client and server. It can look for specific SQL keywords or malicious patterns in the traffic to alert security teams of a potential attack.
Here's an example Snort rule that can detect SQL injection attacks:
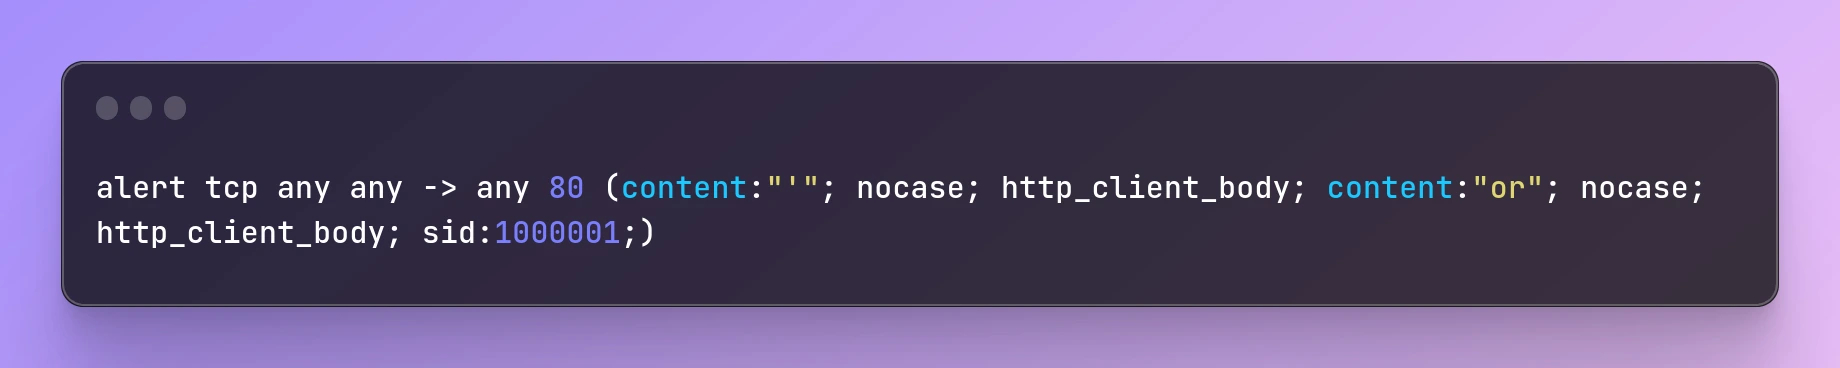
alert tcp any any -> any 80 (content:"'"; nocase; http_client_body; content:"or"; nocase; http_client_body; sid:1000001;)
This rule looks for the presence of a single quote (') followed by the word "or" in the HTTP client body of traffic on port 80. If these keywords are found together, Snort will trigger an alert with the ID 1000001.
2) Detecting XSS Attacks
Cross-Site Scripting (XSS) is a type of attack that allows an attacker to inject malicious code into a web page, which is then executed by the victim's browser. This can lead to the theft of sensitive information, such as login credentials or credit card numbers. below show you how to use Snort to detect and prevent XSS attacks on your web application.
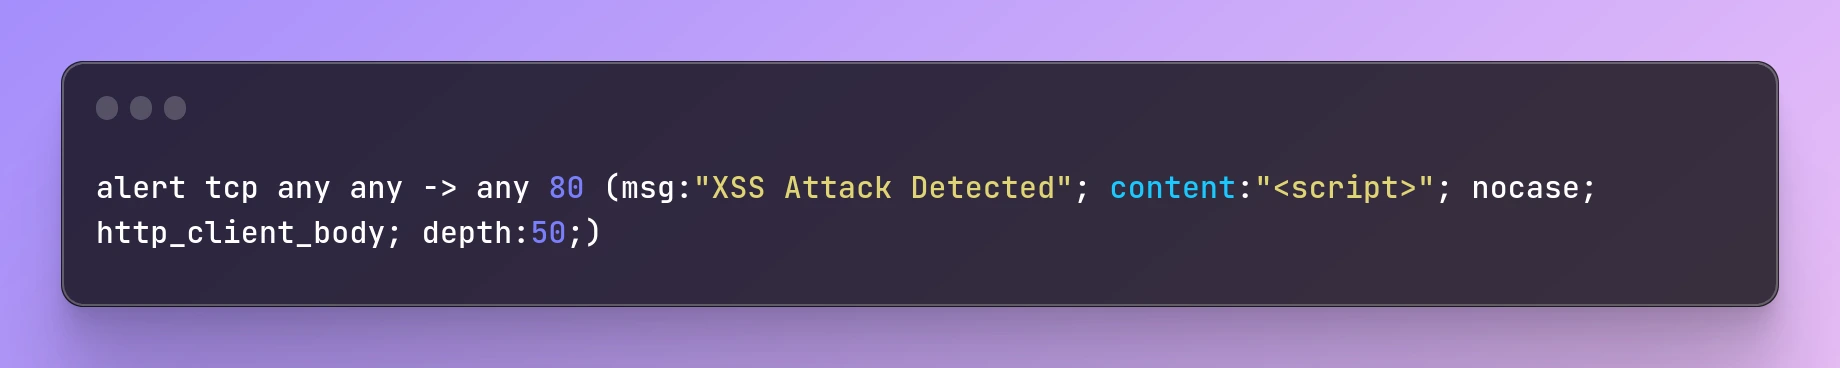
alert tcp any any -> any 80 (msg:"XSS Attack Detected"; content:"<script>"; nocase; http_client_body; depth:50;)
This rule will generate an alert if Snort detects the presence of a script tag in the HTTP client body (i.e., the body of the HTTP request). We set the depth to 50 to limit the search to the first 50 bytes of the client body.
3) Detecting Malware Infections
Malware infections can be devastating to organizations, often resulting in data loss, system downtime, and other serious consequences. Snort can be used to detect malware infections by analyzing network traffic for suspicious patterns or behavior.
One way to detect malware infections with Snort is by using file signatures. By analyzing the content of network traffic, Snort can identify files with known malware signatures and alert security teams of a potential infection.
Here's an example Snort rule that can detect the presence of a known malware signature:
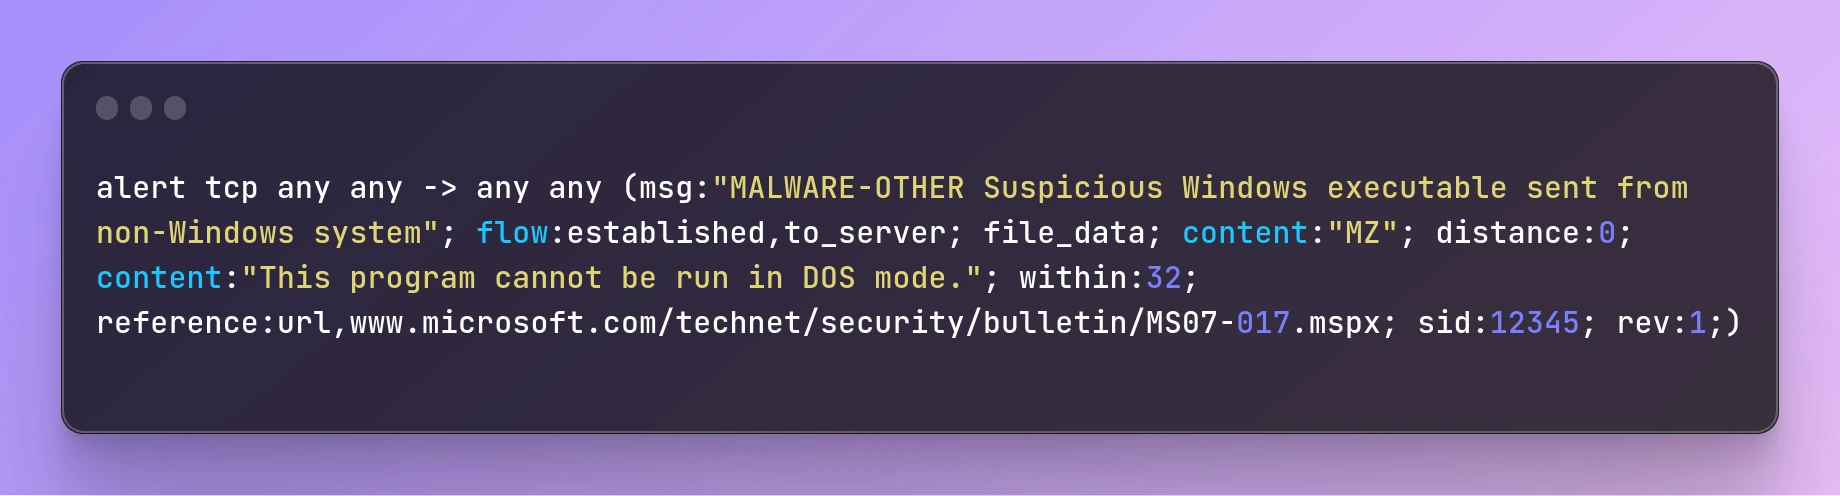
alert tcp any any -> any any (msg:"MALWARE-OTHER Suspicious Windows executable sent from non-Windows system"; flow:established,to_server; file_data; content:"MZ"; distance:0; content:"This program cannot be run in DOS mode."; within:32; reference:url,www.microsoft.com/technet/security/bulletin/MS07-017.mspx; sid:12345; rev:1;)
This rule looks for the presence of the "MZ" file signature in network traffic, which is a marker that identifies executable files on Windows systems. If this signature is found, along with the text "This program cannot be run in DOS mode." within 32 bytes of it, Snort will trigger an alert with the ID 12345.
4) Detecting Brute Force Attacks
Brute force attacks are a common method used by attackers to gain access to systems or applications by guessing usernames and passwords. Snort can be used to detect brute force attacks by analyzing login attempts and looking for patterns that indicate a brute force attack.
Here's an example Snort rule that can detect brute force attacks:
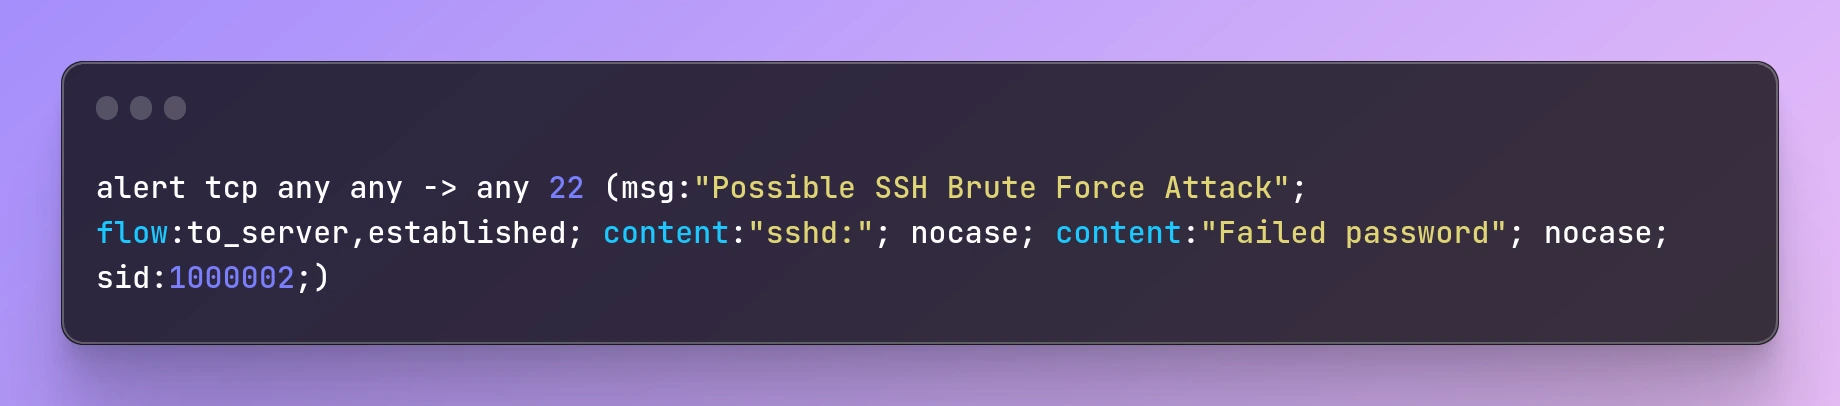
alert tcp any any -> any 22 (msg:"Possible SSH Brute Force Attack"; flow:to_server,established; content:"sshd:"; nocase; content:"Failed password"; nocase; sid:1000002;)
This rule looks for failed SSH login attempts on port 22. If the traffic contains the string "sshd:" followed by "Failed password", Snort will trigger an alert with the ID 1000002.
These are just a few examples of the many ways Snort can be used to detect and prevent cyber-attacks. By leveraging its advanced features, such as protocol decoding and payload inspection, organizations can enhance their security posture and stay ahead of emerging threats.
Conclusion
Congratulations on completing this blog series on Snort! Throughout this series, you have learned about the basics of intrusion detection and prevention systems, the installation and configuration of Snort, writing Snort rules, integrating Snort with SIEM, monitoring network traffic with Snort, and exploring the advanced features of Snort for enhanced threat detection.
In addition, you have seen real-world examples of how Snort has been used to detect and prevent cyber-attacks. I hope you found this series informative and useful in your journey towards enhancing your organization's cybersecurity.
Thank you for joining me on this adventure! I look forward to seeing you in my next blog series, where we will explore more topics related to cybersecurity. Stay safe and secure!
Commonly Asked Questions
Q1. How can I use Snort to detect advanced persistent threats (APTs)?
Ans. APTs are complex and sophisticated threats that often use multiple attack vectors and evasive techniques to bypass traditional security measures. Snort can be configured to detect APTs by using advanced detection mechanisms like behavioral analysis, machine learning, and threat intelligence integration.
Q2. How to automate the incident response process using Snort?
Ans. Snort can be integrated with automation tools like SOAR (Security Orchestration, Automation, and Response) platforms to automate the incident response process. This can include automatically blocking or quarantining malicious traffic, notifying security teams, and generating incident reports.
Q3. Can I use Snort to detect insider threats?
Ans. Insider threats can be difficult to detect as they often use legitimate credentials to access resources within the network. Snort can be configured to detect insider threats by monitoring user behavior, using correlation techniques to detect suspicious activity, and by integrating with other security tools like User and Entity Behavior Analytics (UEBA) platforms.
Q4. How Snort is used to monitor cloud-based environments?
Ans. As more organizations adopt cloud-based infrastructures, it's important to monitor and secure these environments. Snort can be used to monitor cloud-based environments by deploying sensors within the cloud infrastructure or by using network taps to monitor traffic in transit to and from the cloud environment.
Q5. How can I use Snort to monitor Industrial Control Systems (ICS) and SCADA systems?
Ans. ICS and SCADA systems are commonly used in critical infrastructure sectors and can be targeted by cyber attackers. Snort can be configured to monitor ICS and SCADA systems by using specialized rules and detection mechanisms that are specific to these systems. Additionally, Snort can be integrated with other ICS security tools to provide more comprehensive monitoring and protection.
Related Blogs
- What is Intrusion Detection System | What is Intrusion Prevention System | IDS vs IPS
- Snort - Intrusion Detection System & Prevention System | Installation & Use in Linux
- Snort - Intrusion Detection System & Prevention System | Installation & Use in Windows
- What is Mobile Device Security | How to Hack a Phone | Practical Demo
- What is Website Hacking | Web Application Penetration Testing | Lab Setup
- What is OSINT? | OSINT Framework | Tools for OSINT | Best OSINT Techniques
- What is Smurf Attack? | What is the Denial of Service Attack? | Practical DDoS Attack Step-By-Step Guide
- What is Packet Sniffing? | How to Perform Packet Sniffing | Practical Demo on Wireshark
- What is Metasploit Framework | What is Penetration Testing | How to use Metasploit