Hello Cyber learners,
Welcome to our comprehensive guide on setting up OWASP ZAP as a proxy for your browser and performing a vulnerability scan. If you're new to OWASP ZAP, don't worry! We've got you covered. If you want to learn more about what OWASP ZAP is and its importance in web application security, check out our blog post OWASP ZAP | A Powerful Web Application Security Testing Tool . And if you're unsure about how to install OWASP ZAP, head over to our blog post How to Install OWASP ZAP on Windows and Linux for a step-by-step tutorial.
In this blog, we will walk you through the entire process of configuring OWASP ZAP as a proxy for your browser, setting up FoxyProxy for easy switching, and integrating ZAP with your web application. We'll also guide you on performing a vulnerability scan using OWASP ZAP and interpreting the scan results. So, let's dive in and enhance your web application security with OWASP ZAP.
- Configure Your Browser to Use ZAP as a Proxy
- Setup Foxyproxy
- Configure ZAP to Work with Your Web Application
- Perform a vulnerability scan with OWASP ZAP
- Conclusion
Configure Your Browser to Use ZAP as a Proxy
To capture and analyze web traffic, ZAP needs to be configured as a proxy for your web browser. Here's how to do it:
Step 1: Open ZAP and navigate to the "Tools" menu.
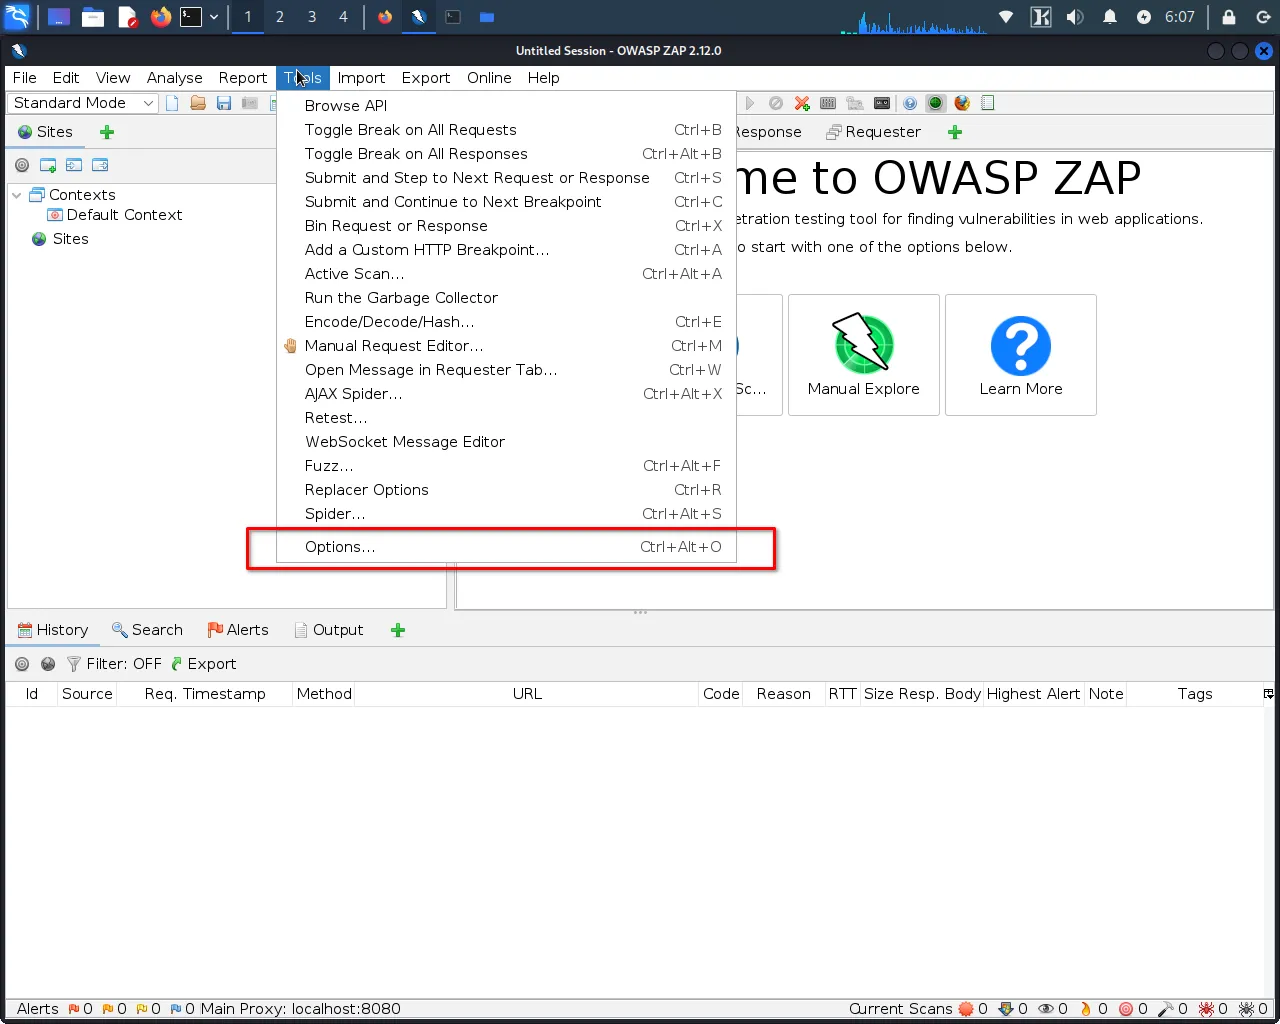
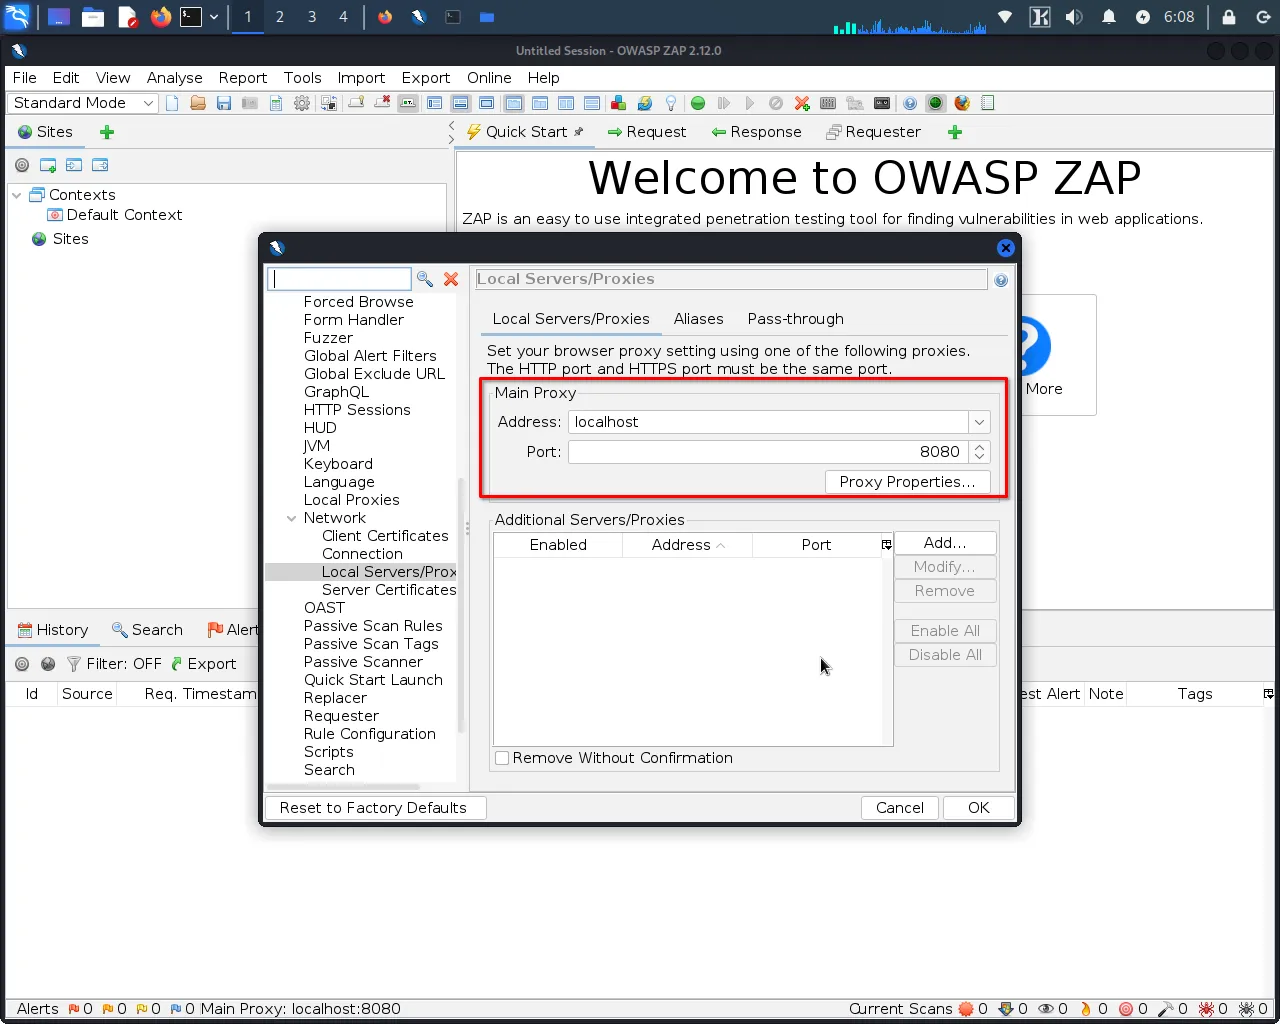
Step 2: Click on "Options>Local Proxy".This will open the local proxy settings window, where you can configure OWASP ZAP as a proxy for your web browser.
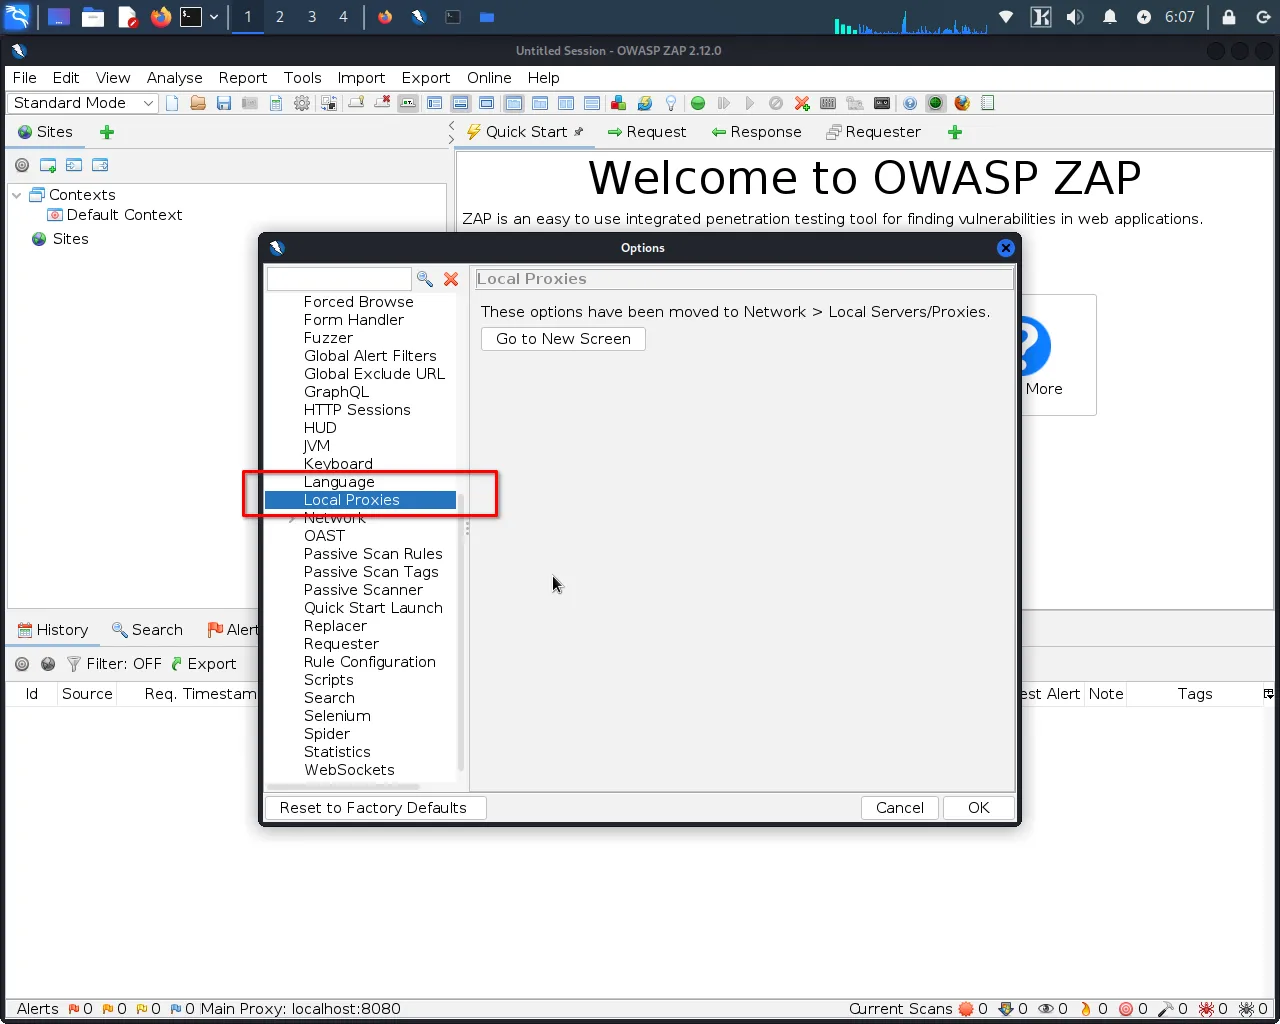
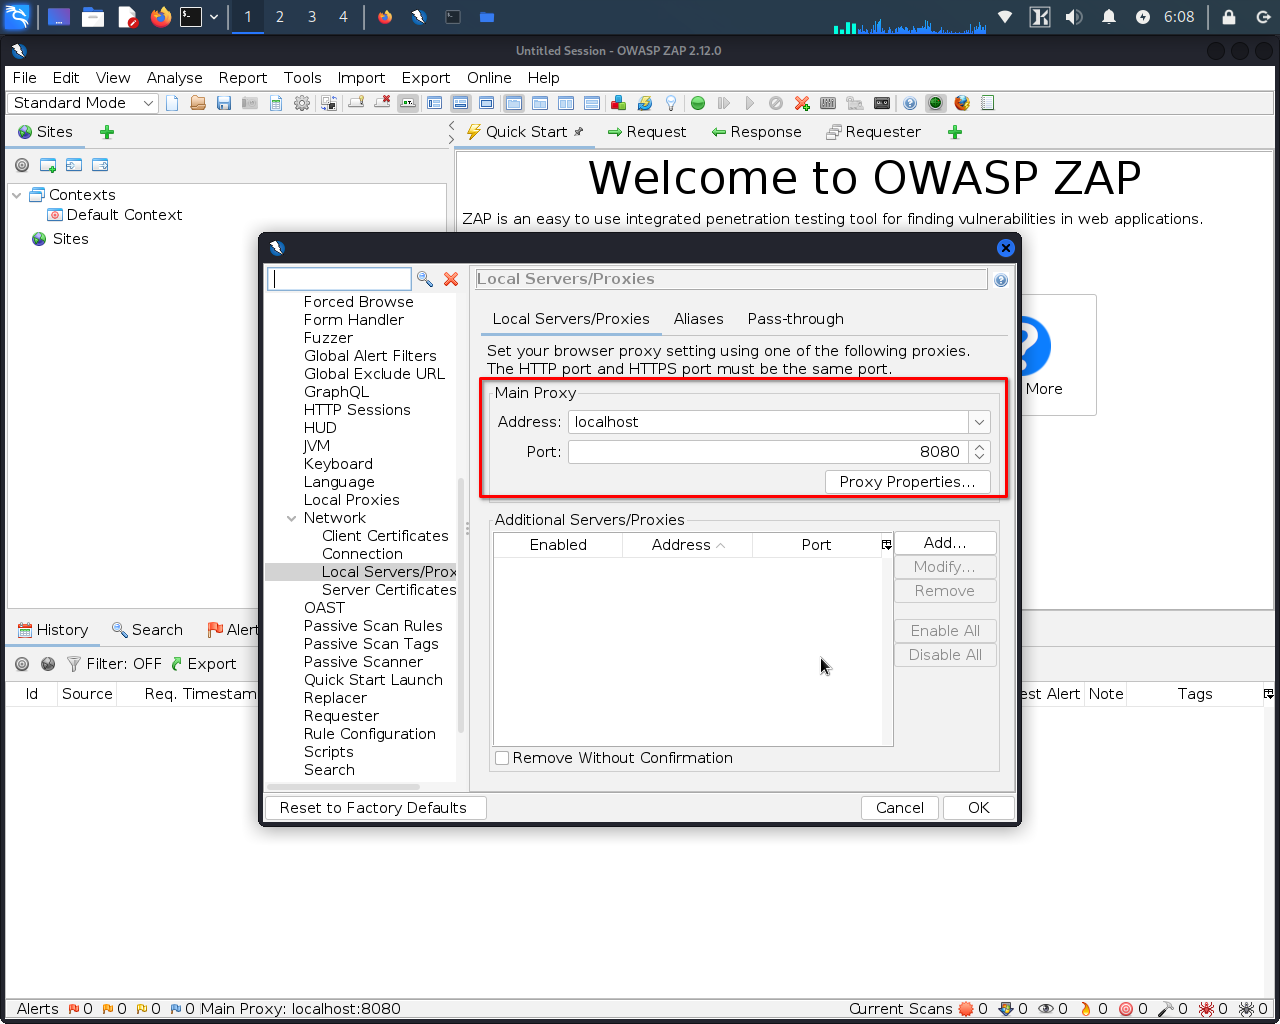
Step 3: In the local proxy settings window, note the proxy listening address and port number, as you'll need this information in the next step. The default listening address is usually "localhost" or "127.0.0.1", and the default port number is usually "8080".
Step 4: Open your web browser and navigate to the proxy settings.
The location of the proxy settings may vary depending on the web browser you are using. For example, in Firefox, you can access the proxy settings by clicking on the "Menu>Options>General>Network Settings".
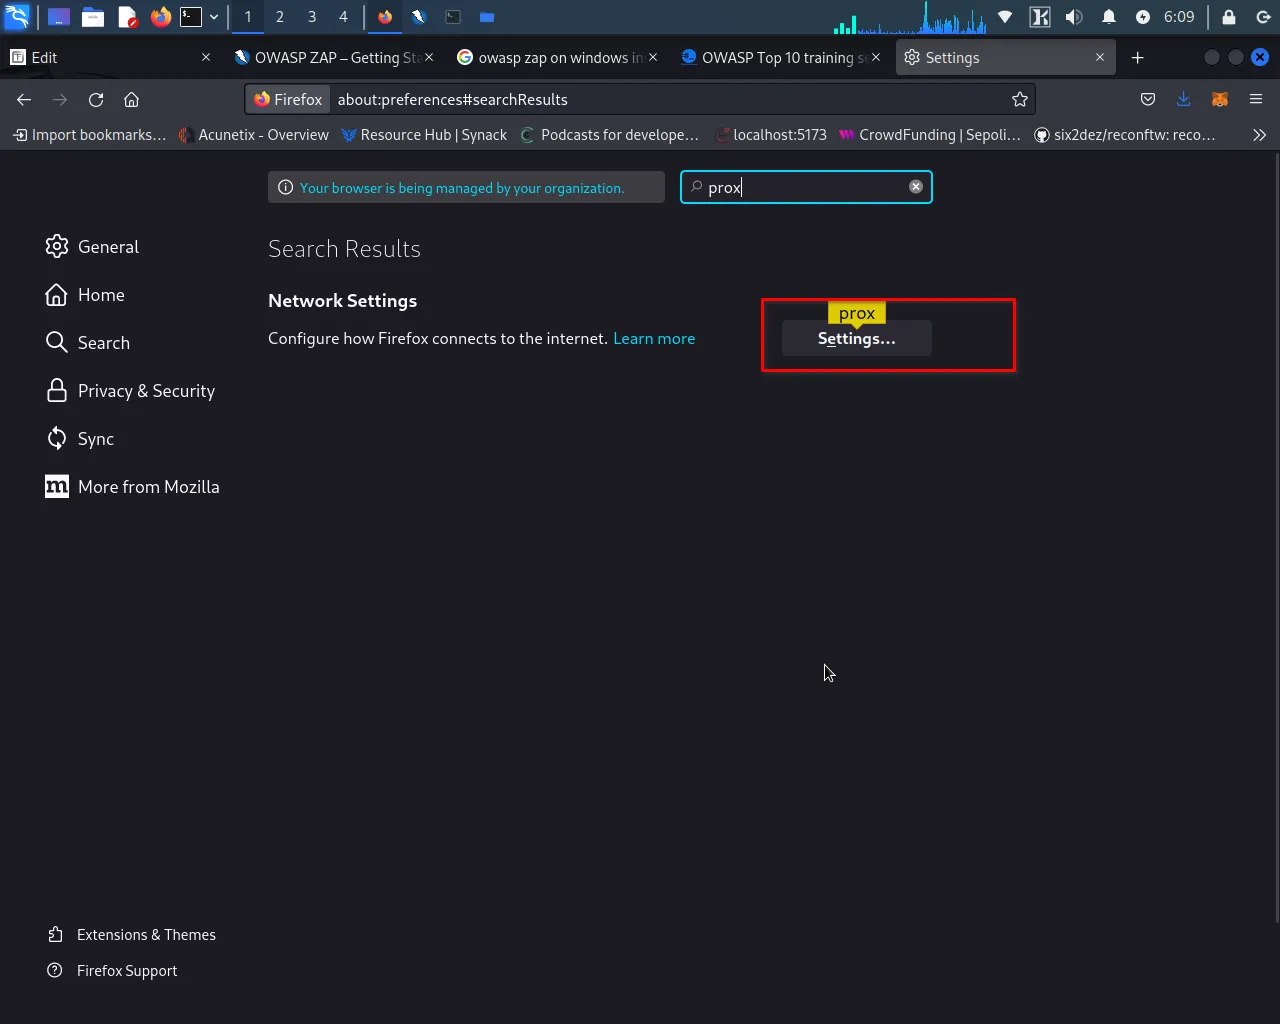
Step 5: Configure your browser to use the proxy listening address and port number that you noted in Step 3.
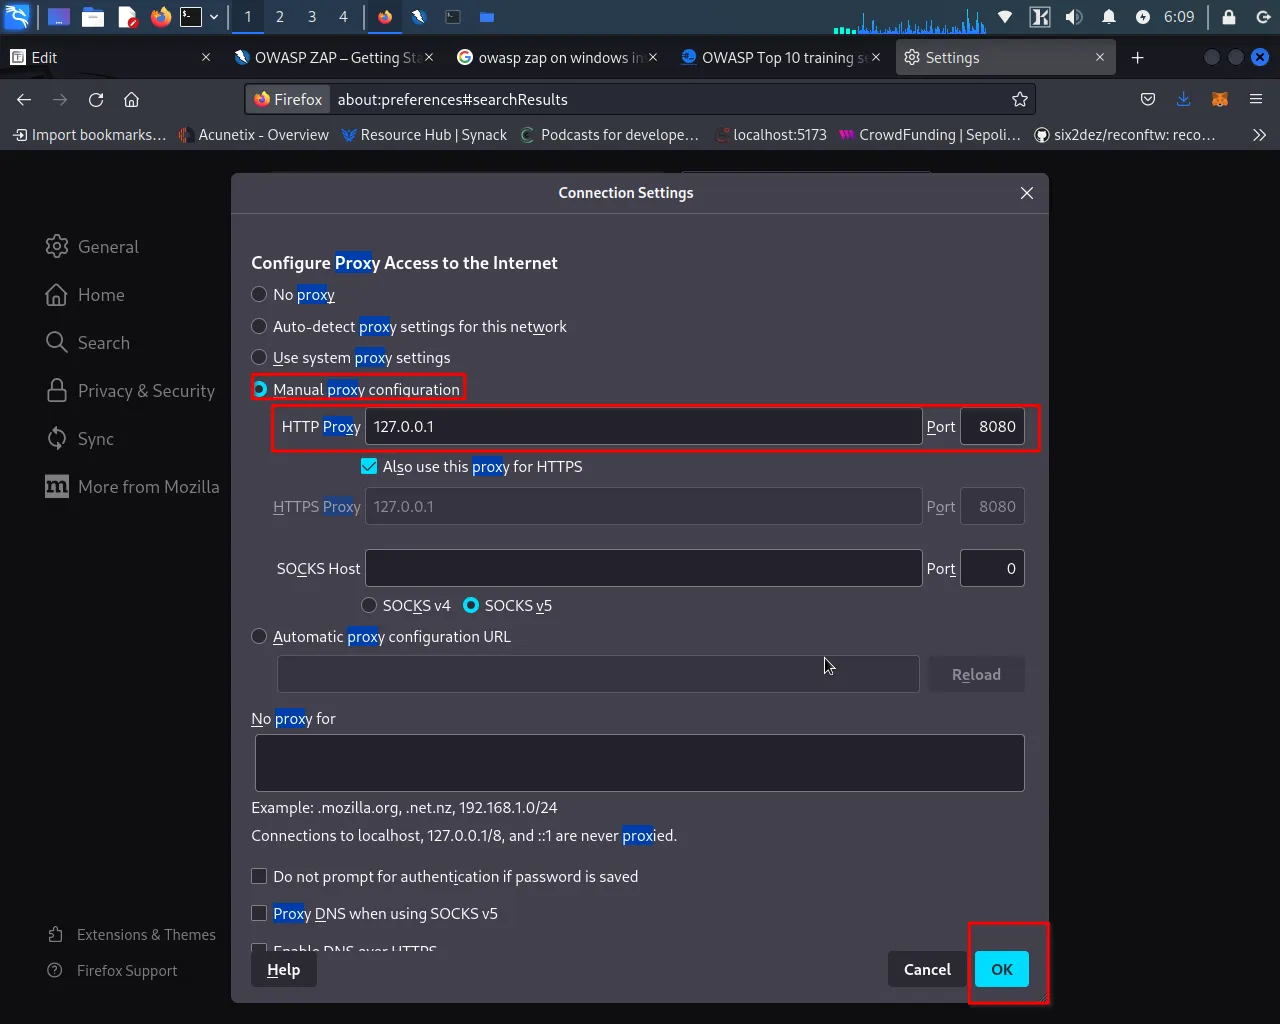
Once you have done this, click on "OK" or "Apply" to save the changes. Your browser is now configured to use OWASP ZAP as a proxy, and you can start capturing and analyzing web traffic.
Setup Foxyproxy
With the use of the above method, you can set up Zap, but in real-world testing, you have to turn it on and off Zap many times, this is very time-consuming and irritating work to go to browser settings, and turn off the proxy, To make this process faster and easier, you can use the FoxyProxy extension.
If you are using Chrome, open the Chrome Web Store > search for "FoxyProxy" > Add to Chrome. Confirm the installation, and then configure FoxyProxy by clicking on the extension's icon in the toolbar and selecting "Options." From there, you can add and manage proxy servers based on your needs.
For Edge users, open the Edge Add-ons Store, search for "FoxyProxy," and click "Get" to add the extension. Confirm the installation, and then configure FoxyProxy by clicking on the extension's icon in the toolbar and selecting "Options." Here, you can add and manage proxy servers according to your preferences.
Here's how to set up FoxyProxy for use with OWASP ZAP in Firefox:
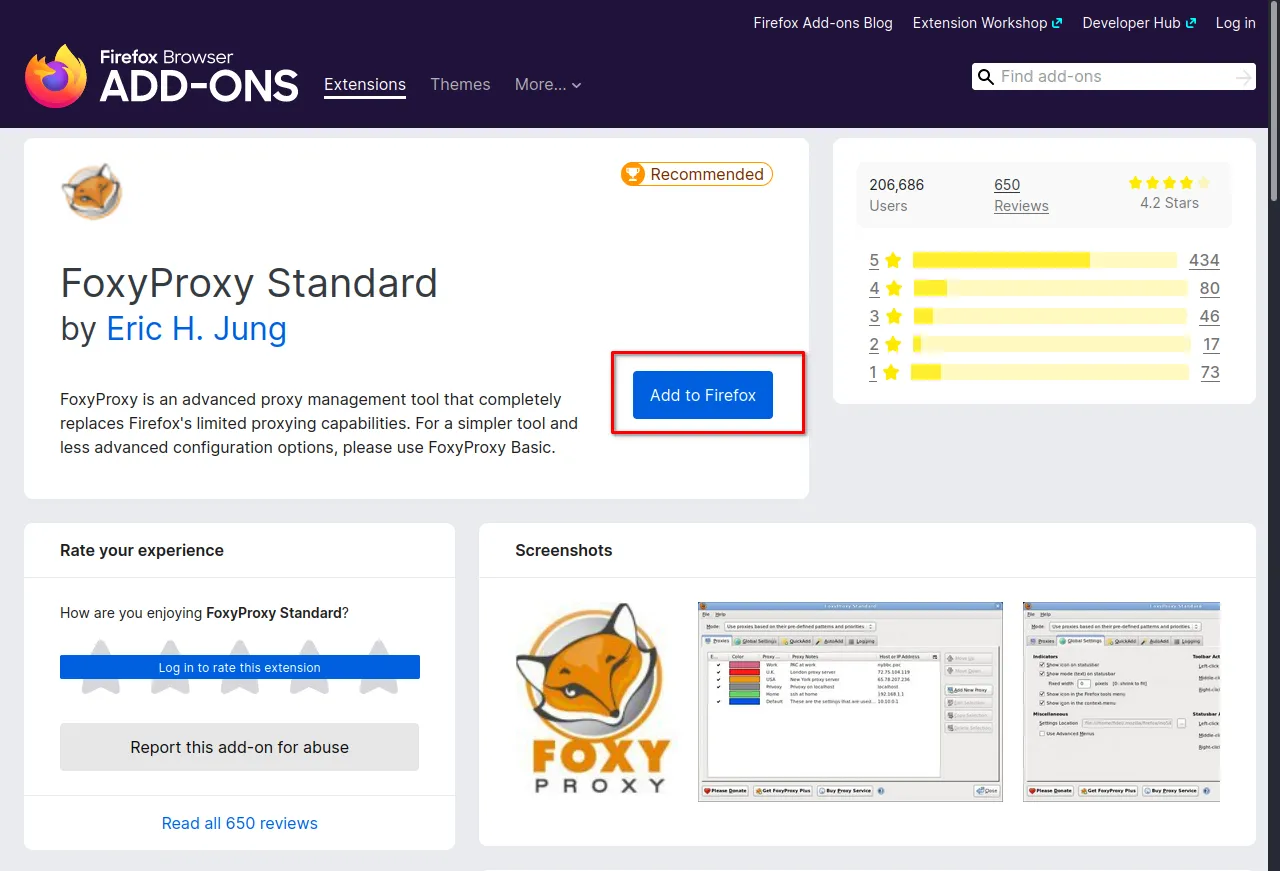
Step 1: Install the foxyproxy extension in your web browser. You can do this by navigating to the web store of your browser and searching for "FoxyProxy". Install the extension and wait for it to finish.
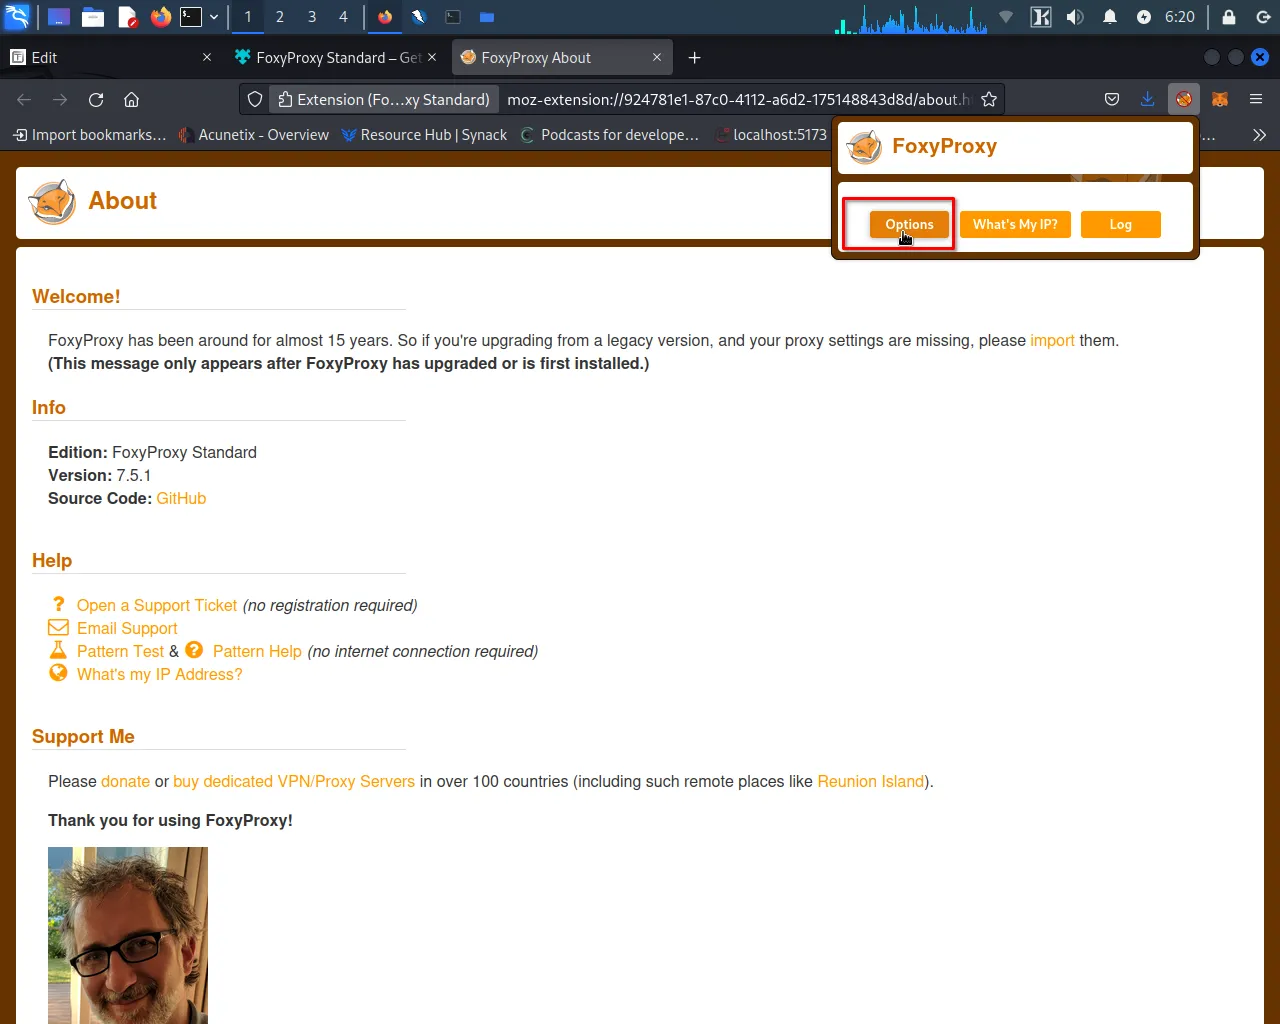
Step 2: After installing the FoxyProxy extension, click on its icon in the browser's toolbar and select "Options" from the dropdown menu. This will open the FoxyProxy options window.
Step 3: Set the Below Options in FoxyProxy Options
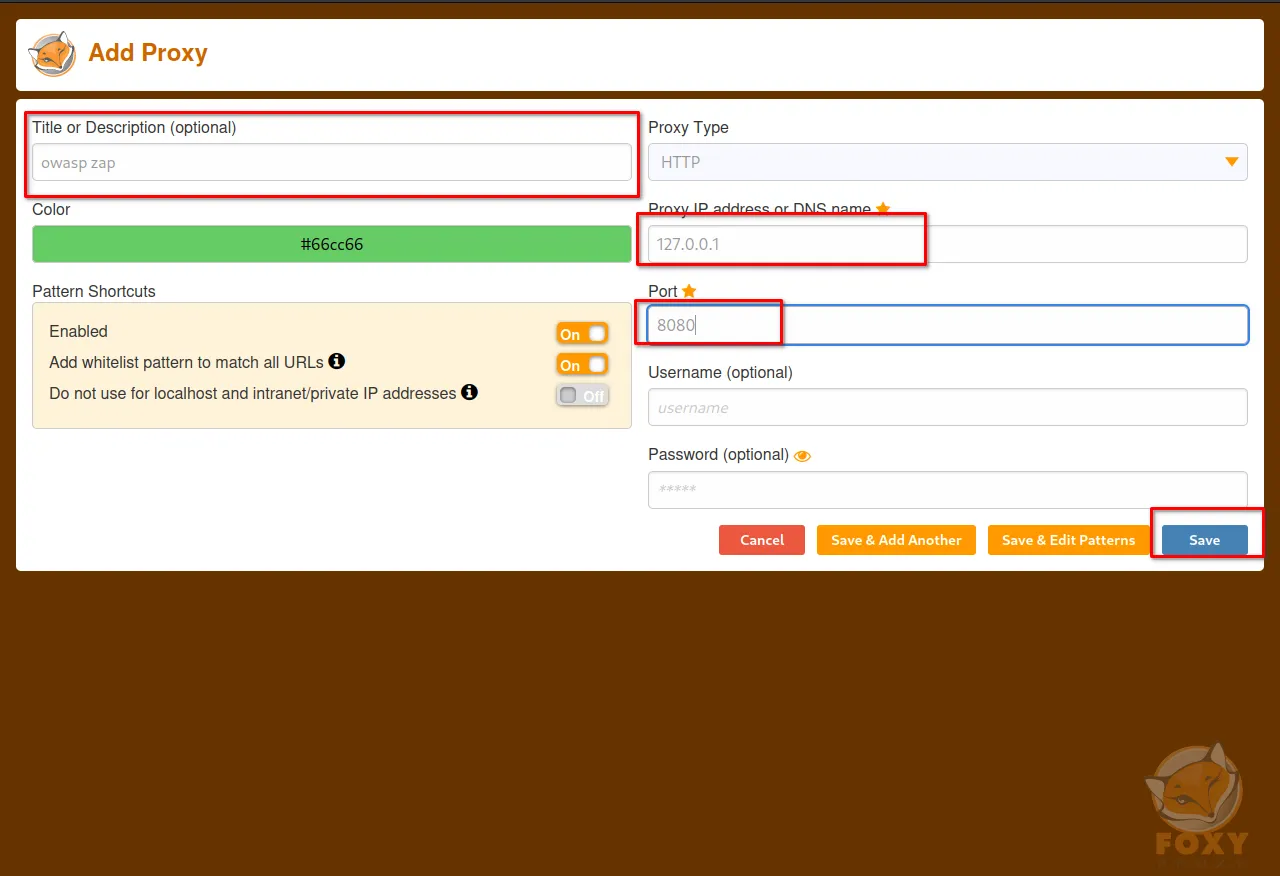
Step 4: After setting the above options in the FoxyProxy options window, click on the "Save" button to save the changes.
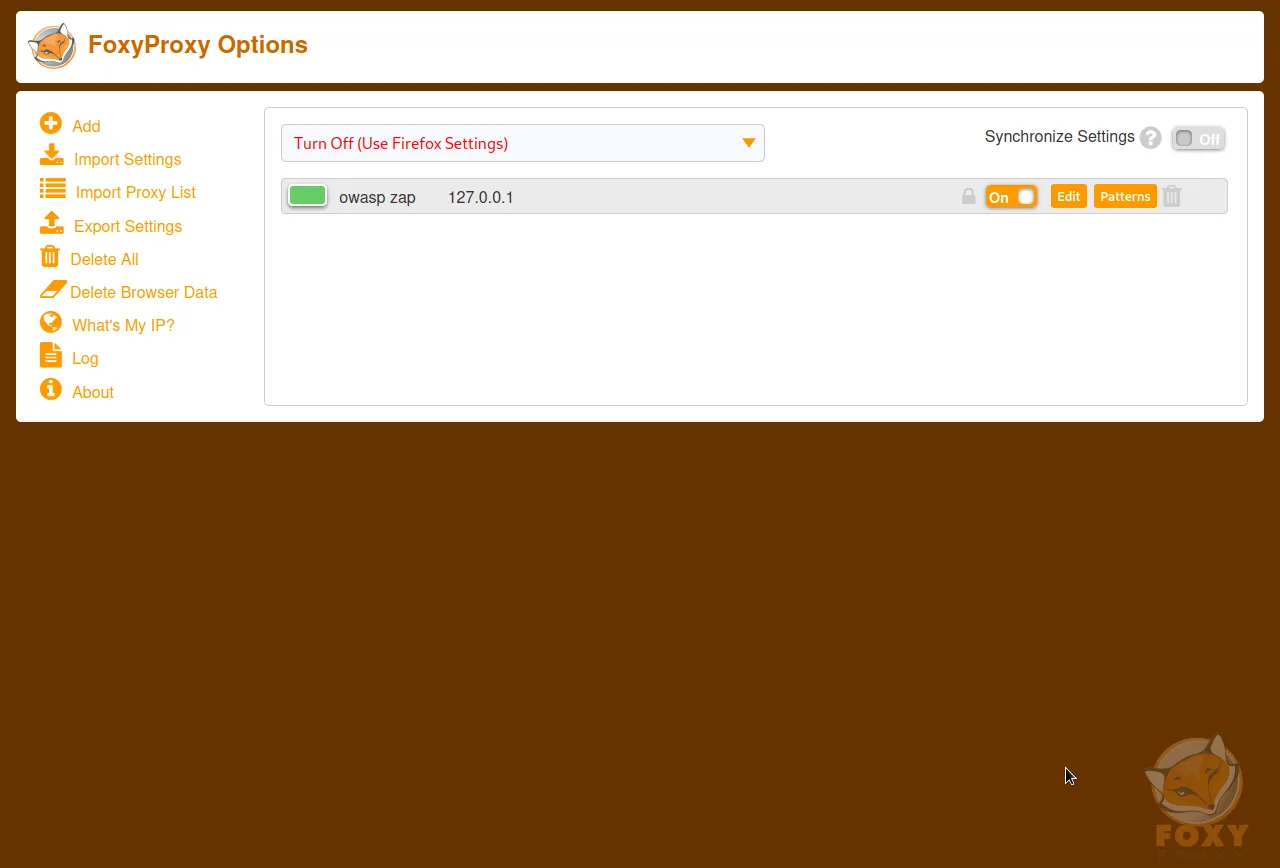
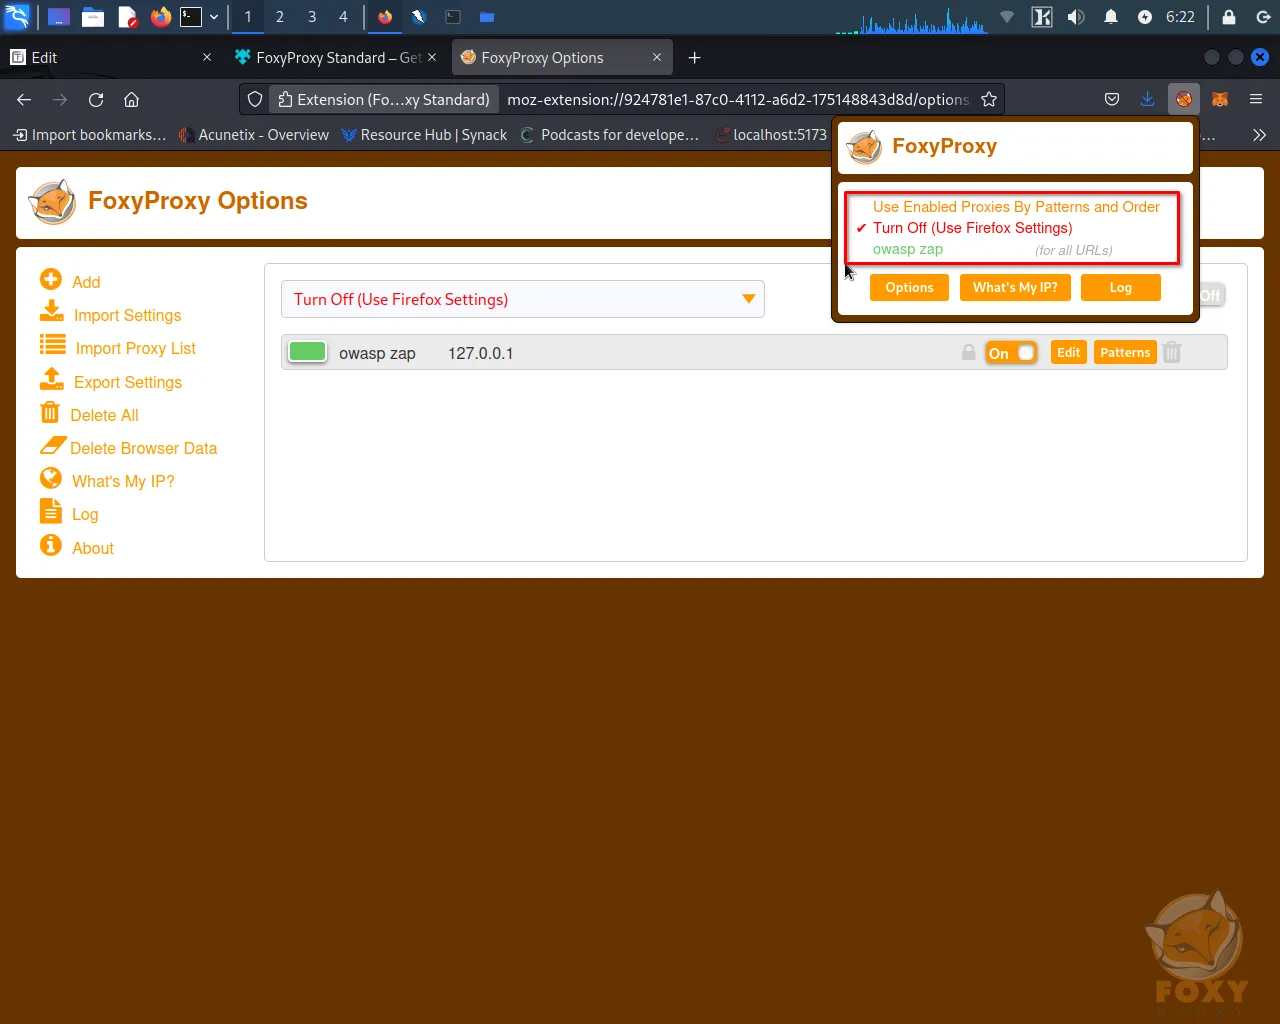
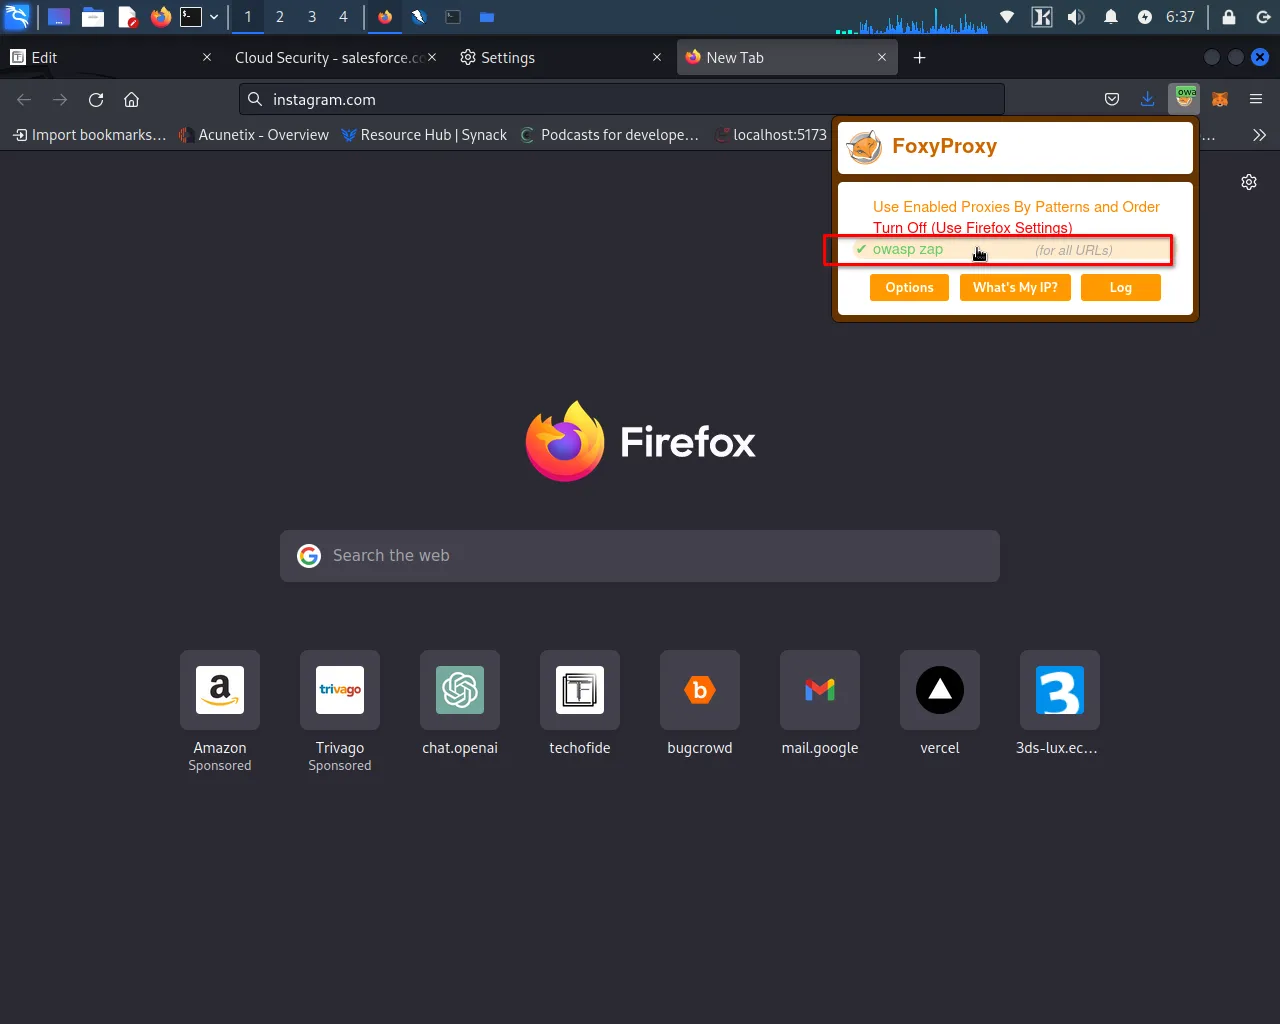
Step 5: Now, you can change your browser proxy in a single click by clicking on the FoxyProxy icon in the browser's toolbar and selecting the "OWASP ZAP" proxy from the list. This will turn on OWASP ZAP as a proxy for your browser. When you're done testing, simply select "Turn off" from the FoxyProxy menu to turn off the proxy.
Configure ZAP to Work with Your Web Application
After configuring your browser to use OWASP ZAP as a proxy, the next step is to set it up to work with your web application. This allows ZAP to intercept and analyze web traffic between your browser and the application, and identify potential security vulnerabilities.
Step 1: Open OWASP ZAP and go to the "Tools" menu.
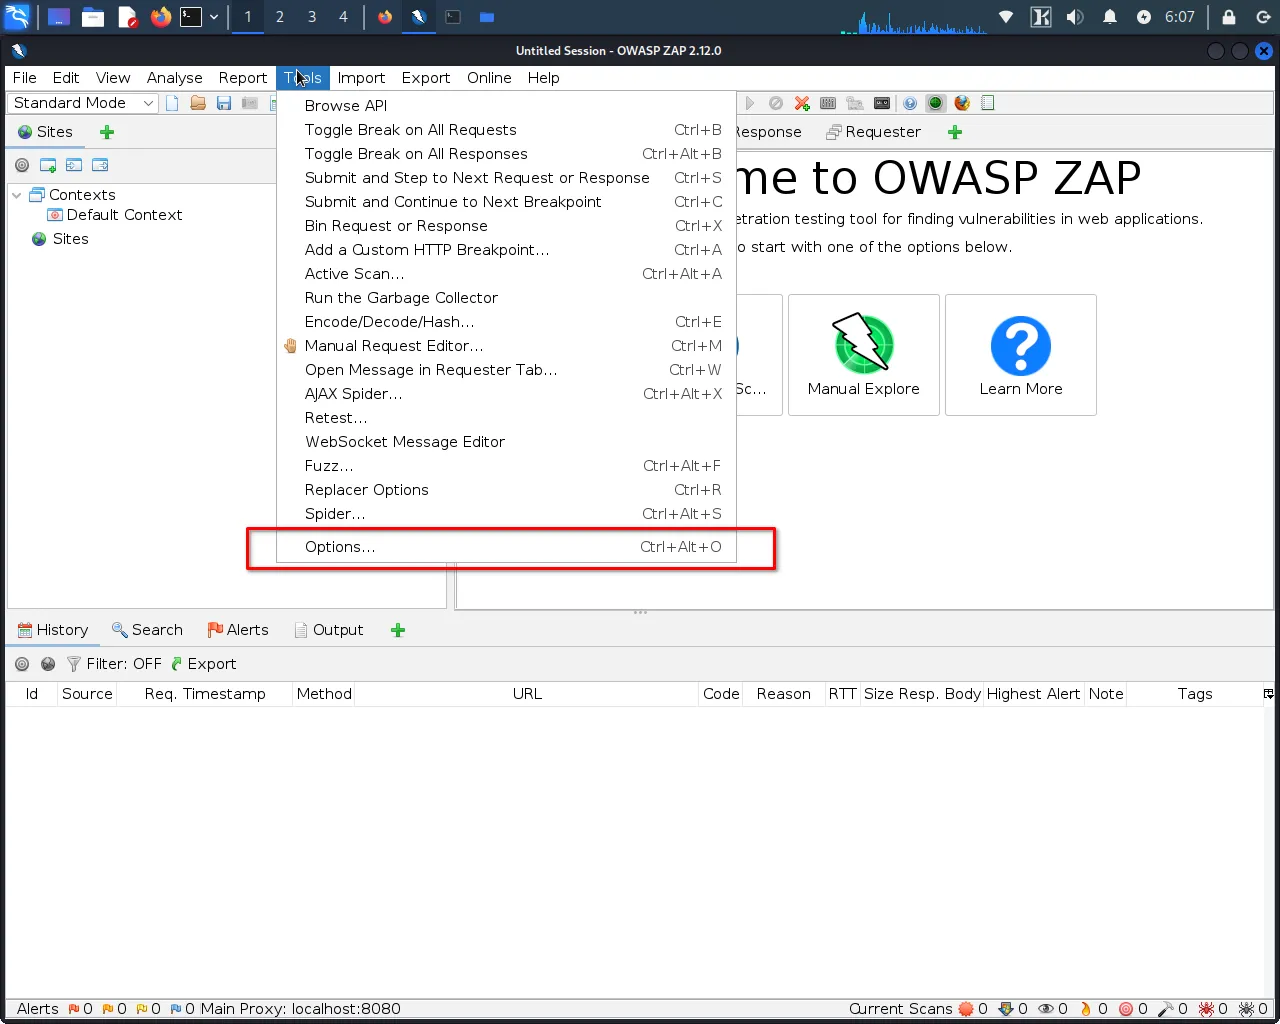
Step 2: Select "Tools>Options>Dynamic SSL Certificate".
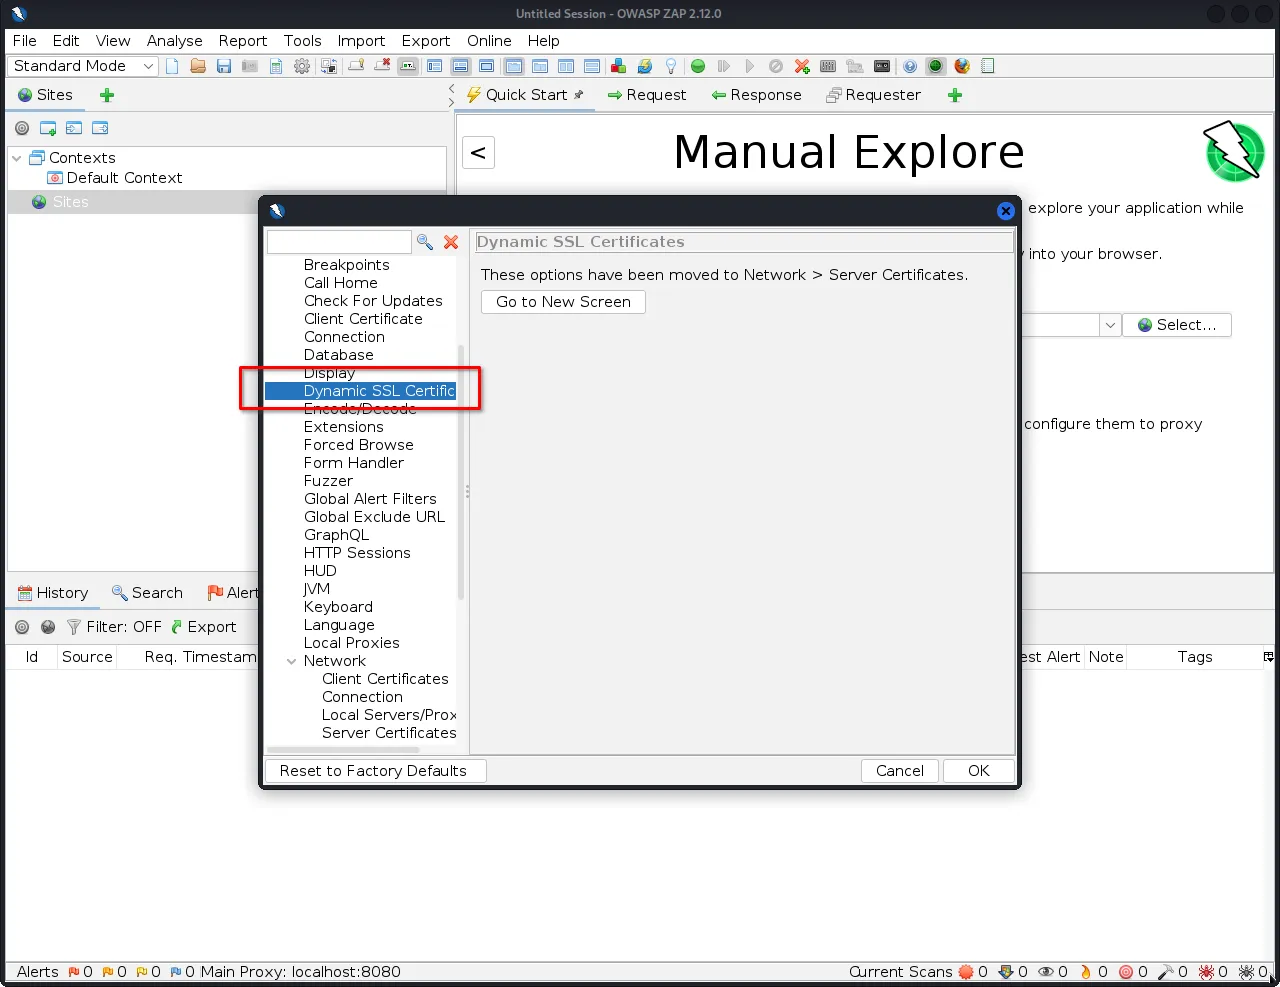
Step 3: Click on the "Generate" button to create a new SSL certificate.
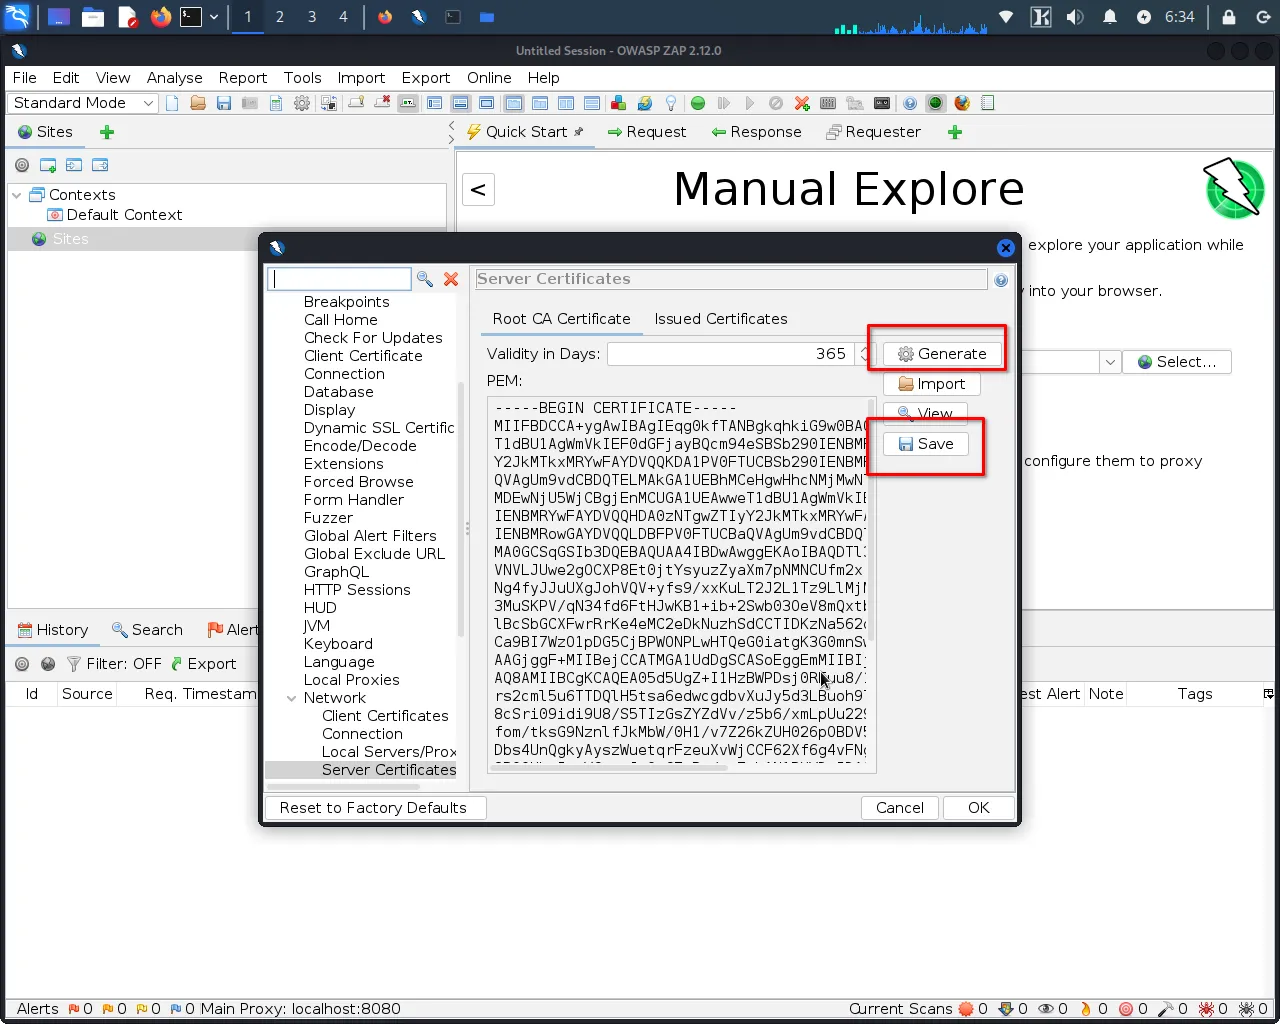
Step 4: Once the certificate is generated, click "Save" to save it to a location on your computer.
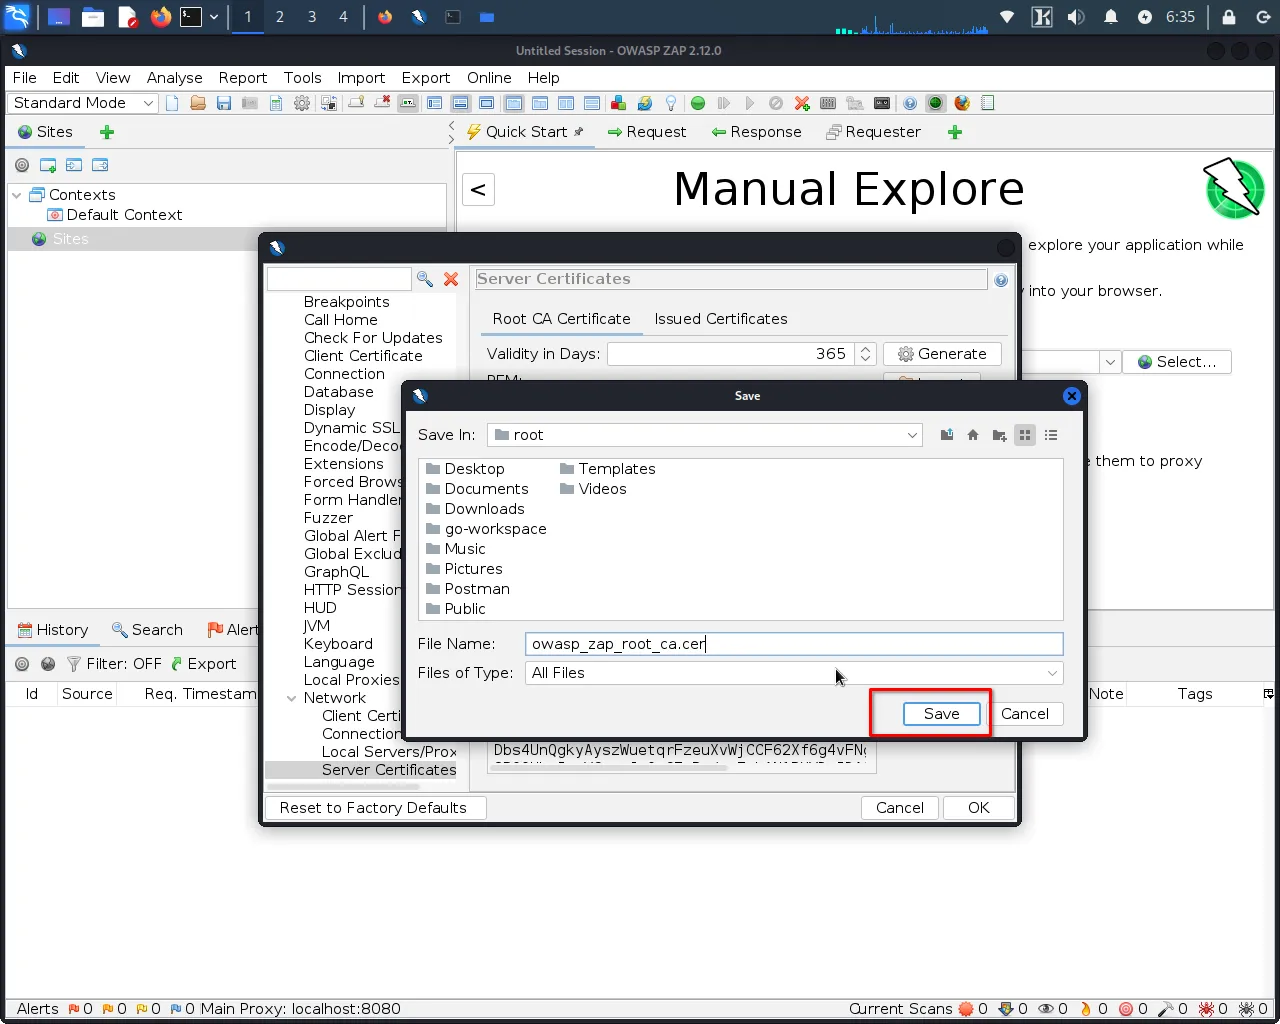
Step 5: Open your preferred web browser (Firefox, Chrome, IE, etc.) and navigate the settings or options menu.
In the settings menu, look for the "Security" or "Privacy" section and select "Certificates" or "SSL/TLS Certificates".
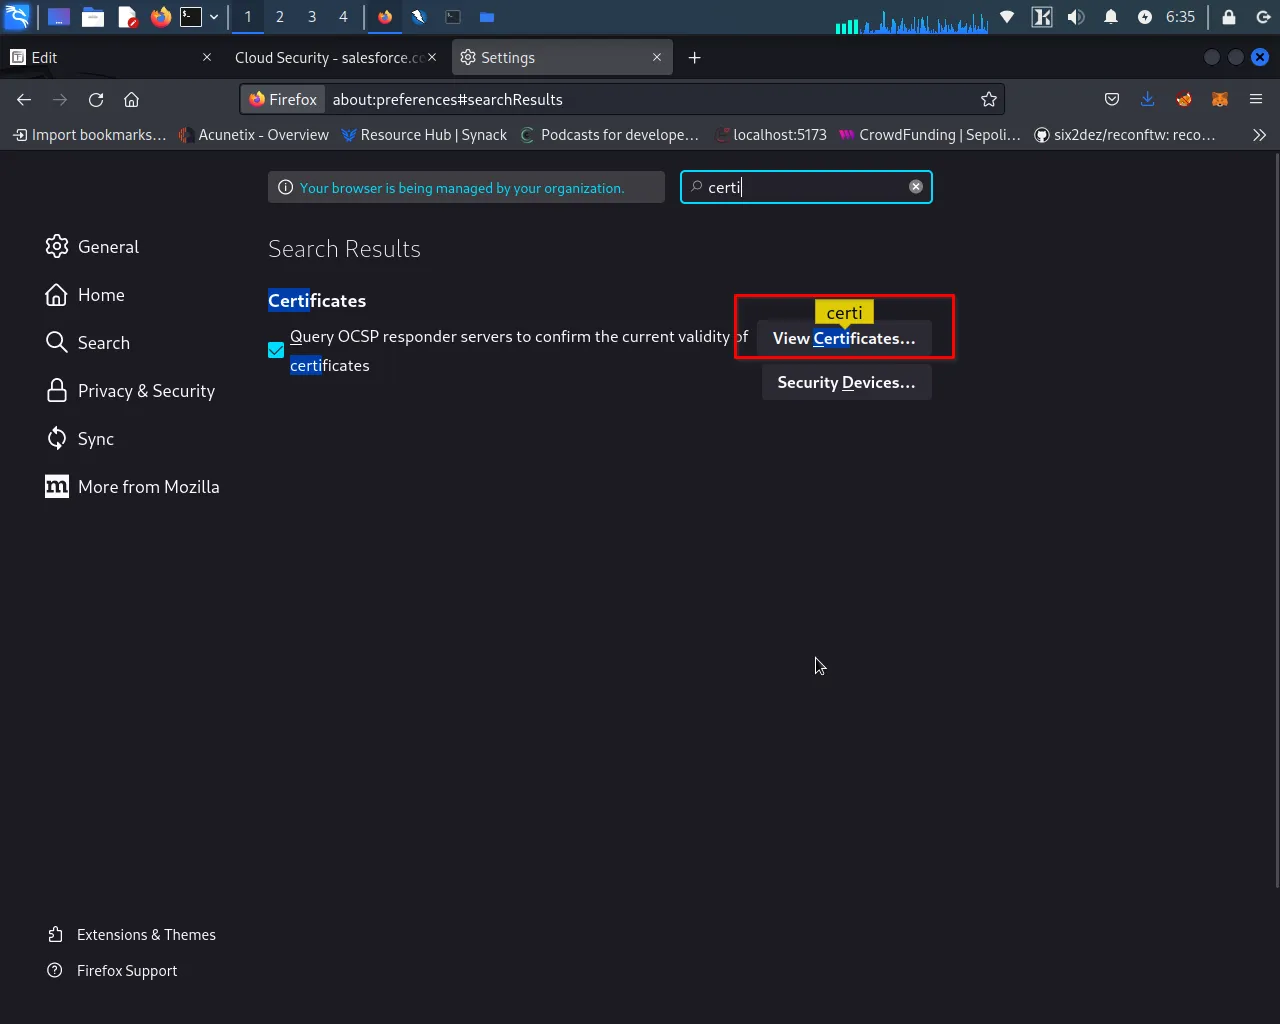
Step 6: Click on the "Import" or "Install" button and select the SSL certificate that you saved in step 4.
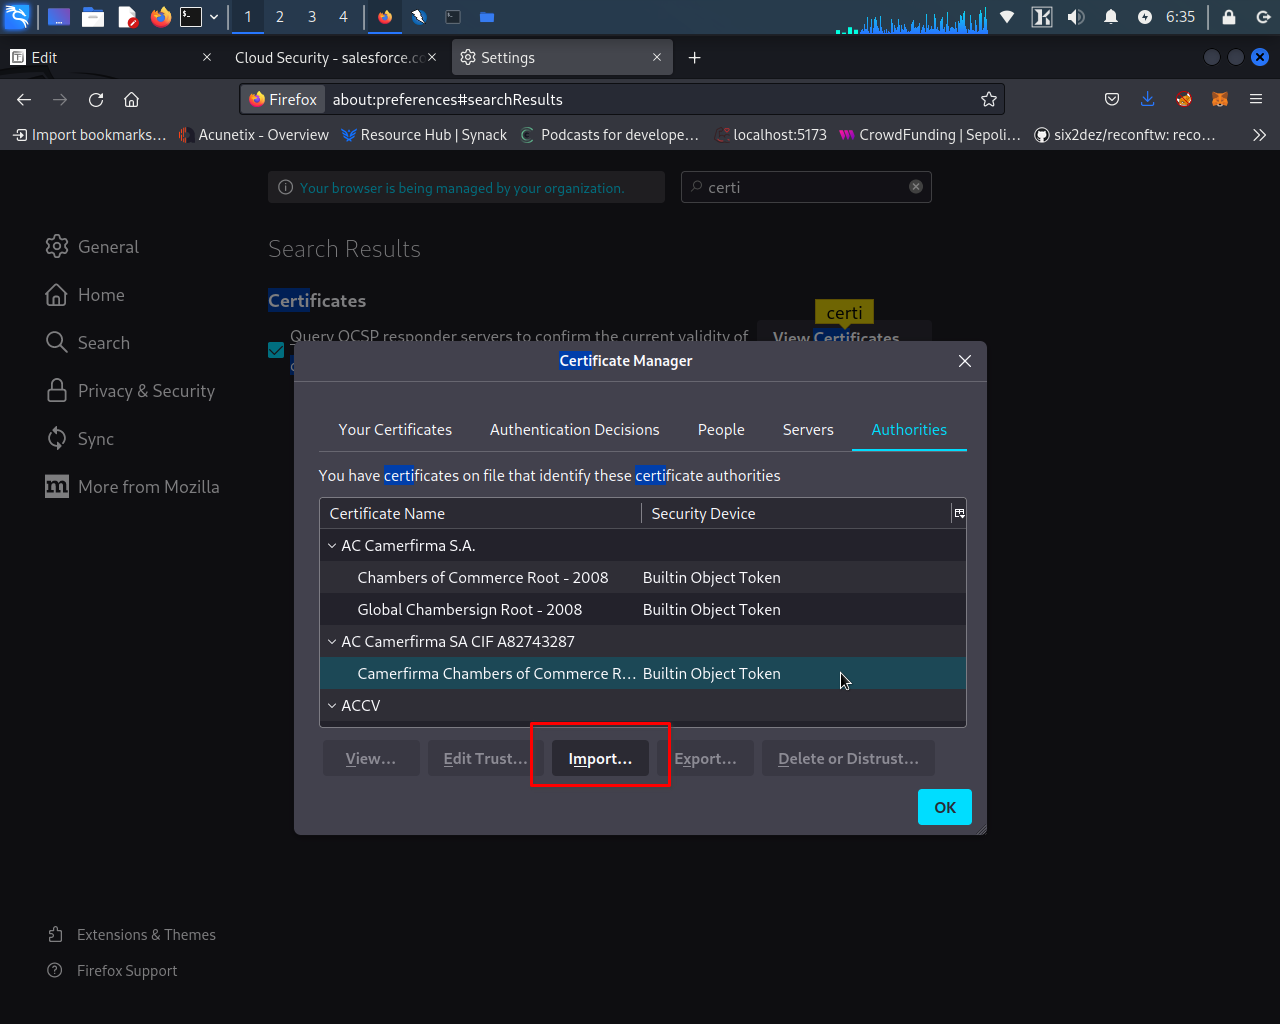
Step 7: select the certificate.
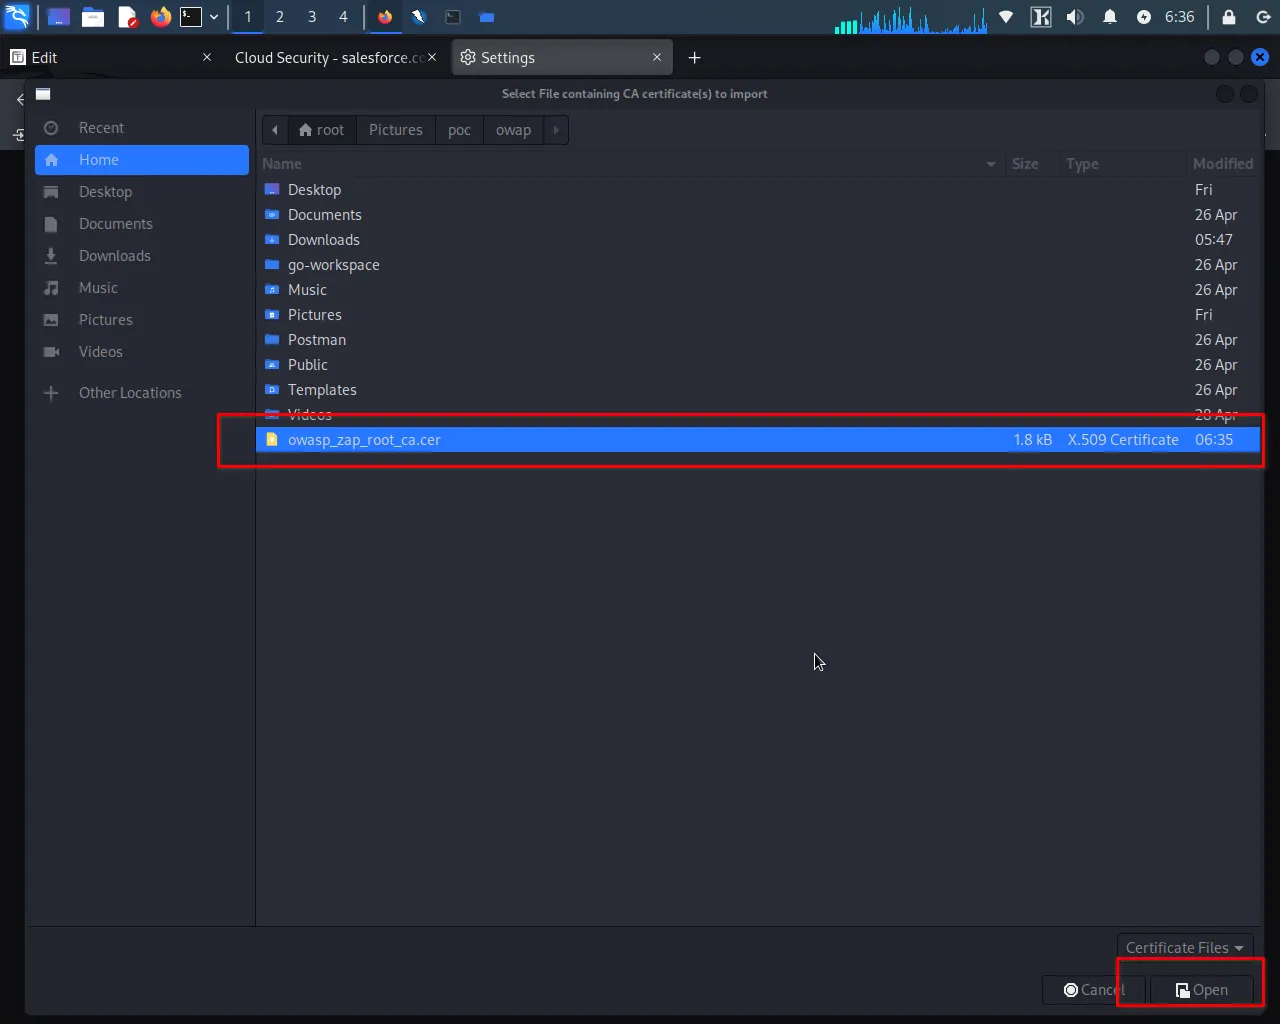
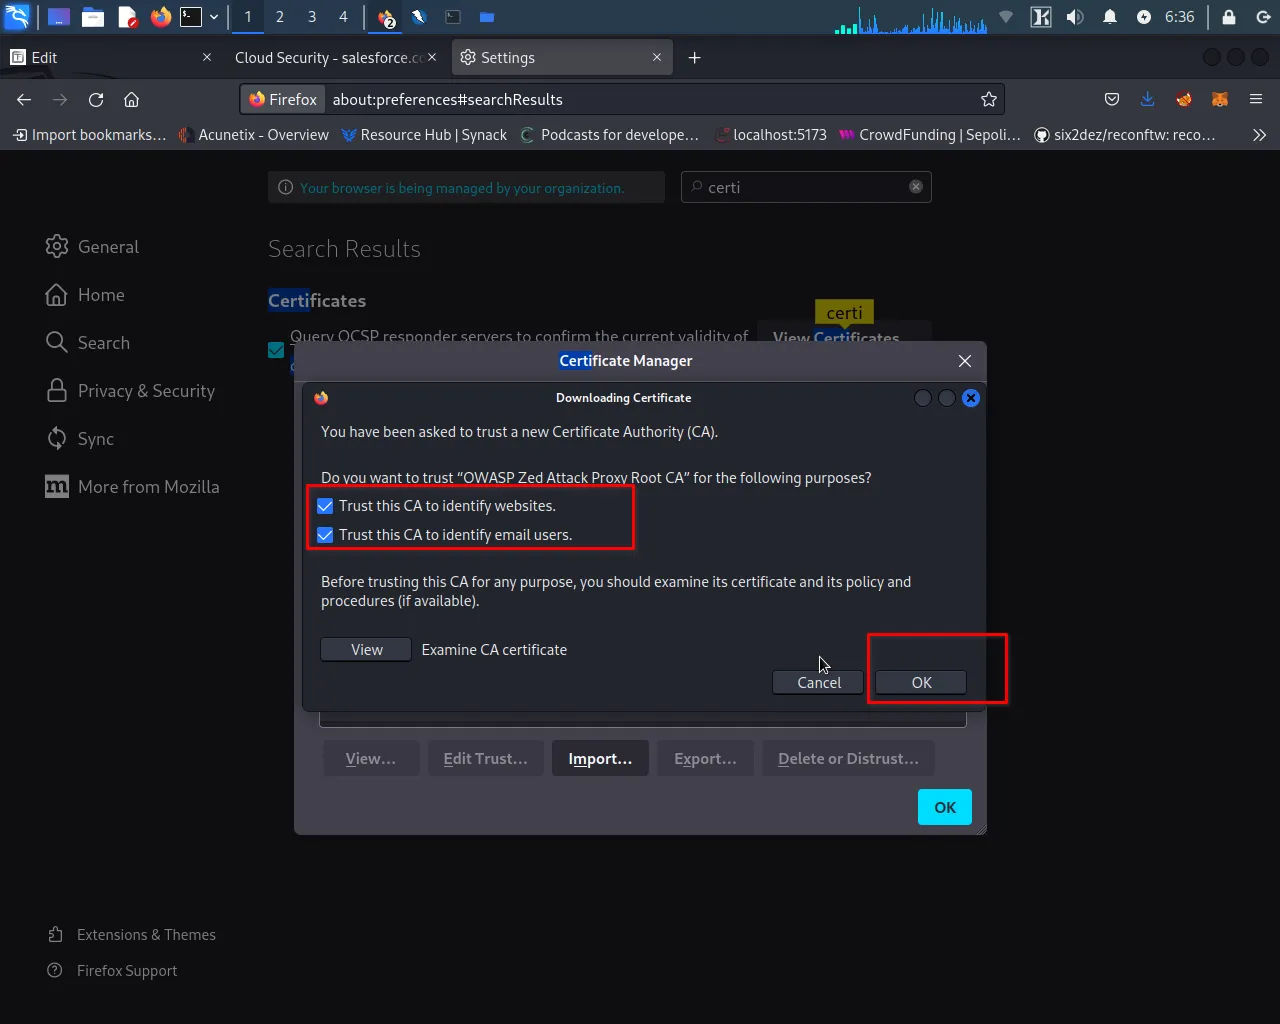
Step 8: Select both checkboxes and click on "ok".
Step 9: Go to the Foxy proxy, select Owasp Zap
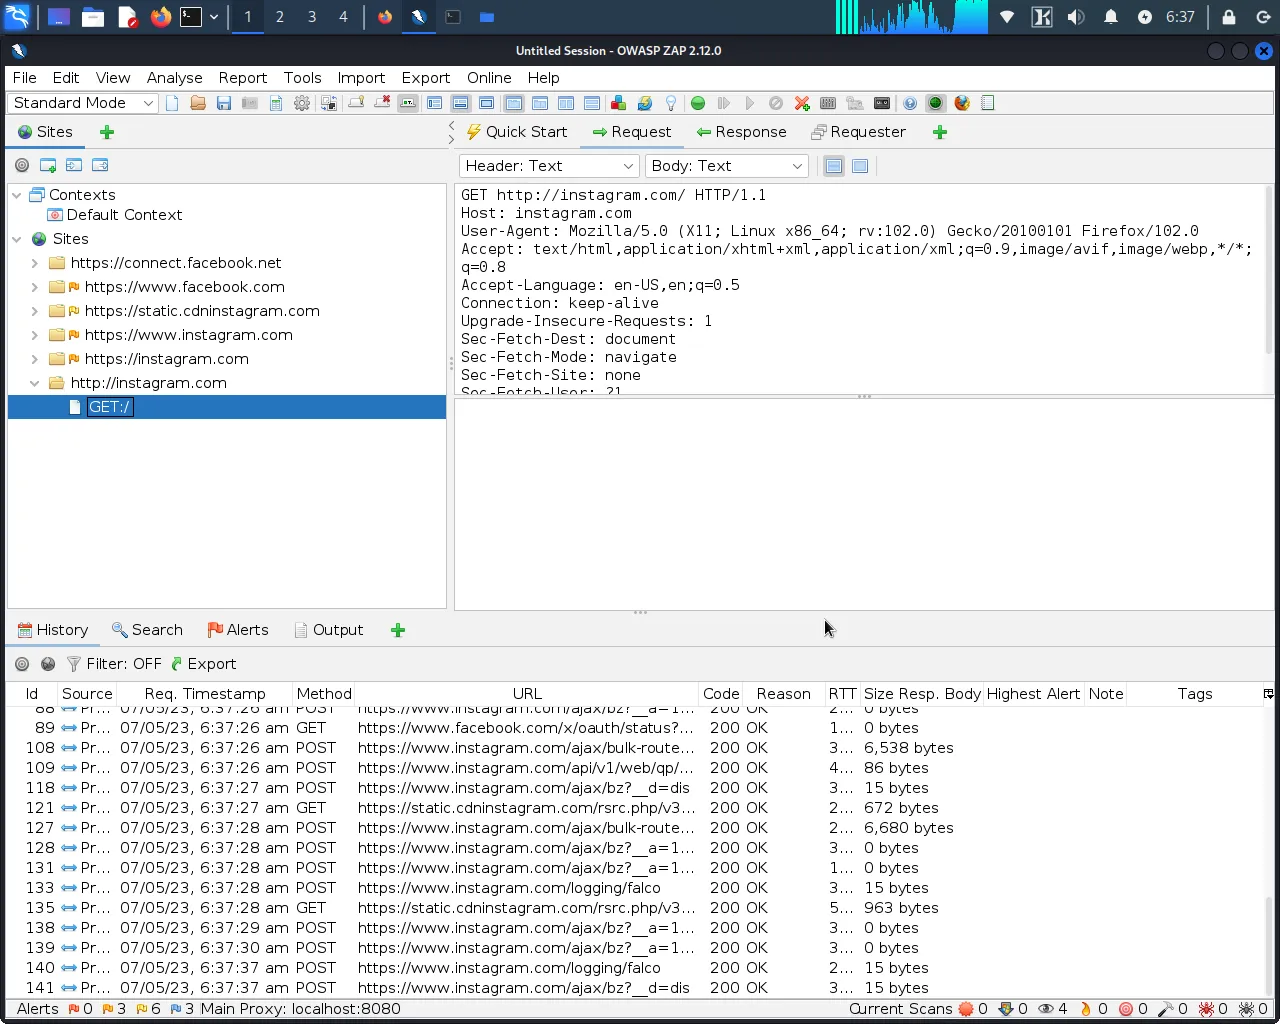
Step 10: Now, visit any website, and you can see your requests are being intercepted by OWASP ZAP.
Perform a vulnerability scan with OWASP ZAP
Now that you've configured ZAP to work with your web application, it's time to perform a vulnerability scan. Here's how to do it:
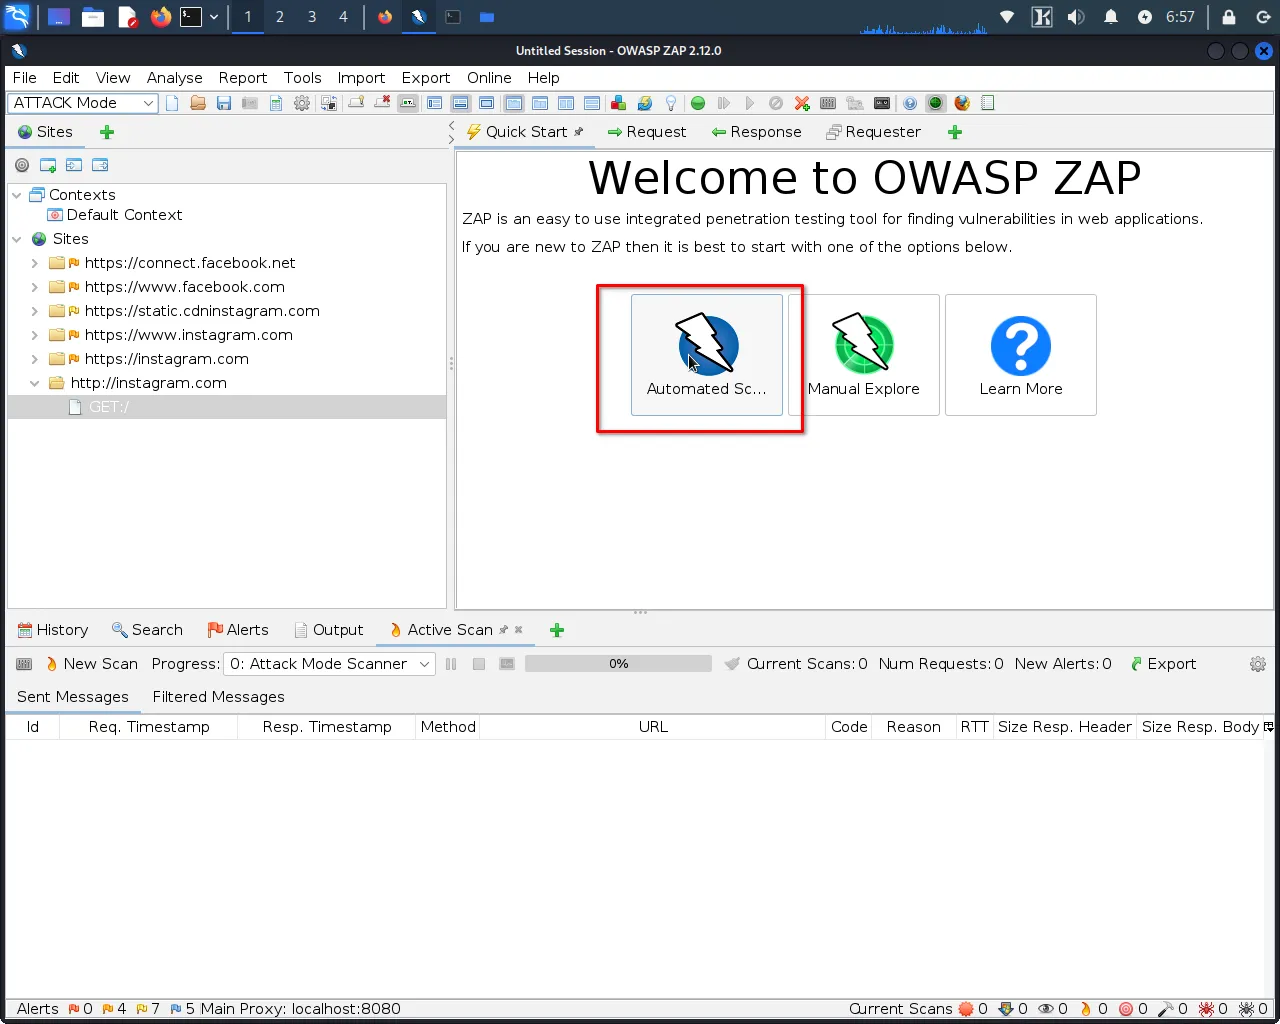
Step 1: Navigate to the "Quick Start" menu in ZAP and select "Automated Scan".
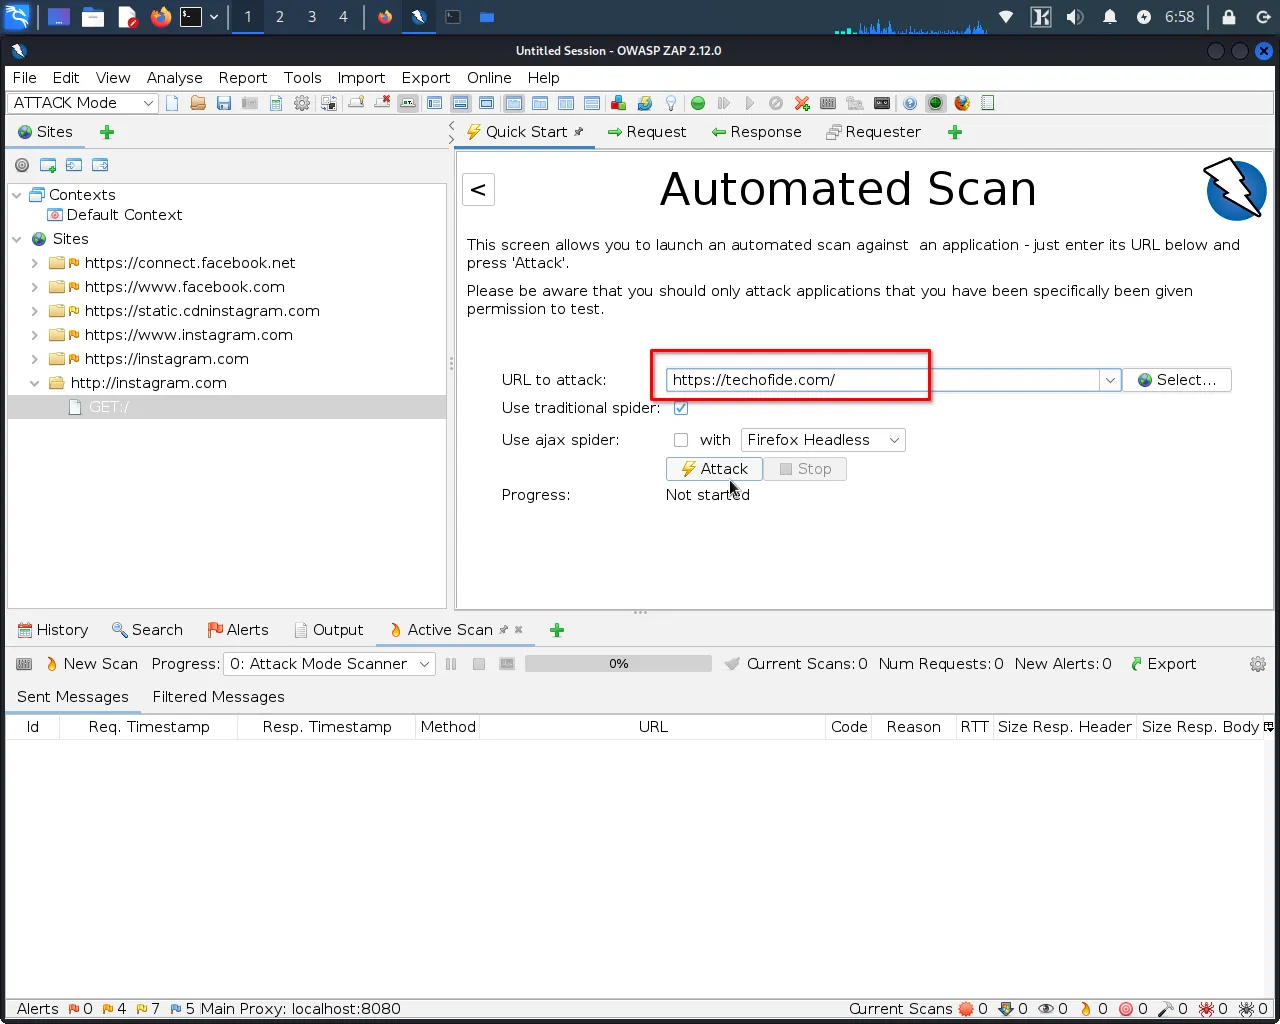
Step 2: Enter the website's URL.
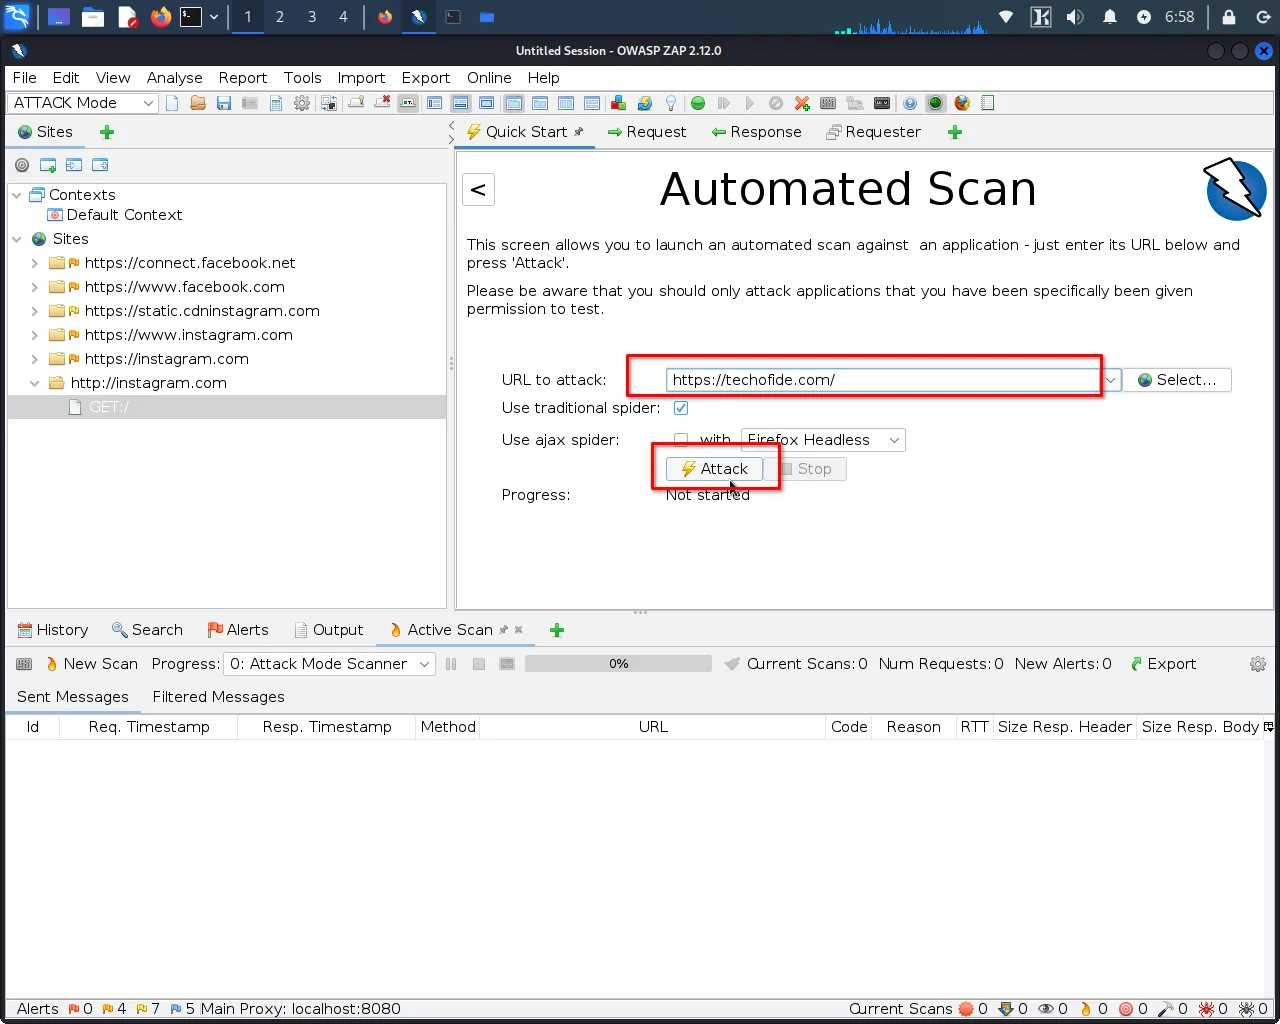
Step 3: Click "Attack" to begin the vulnerability scan.
Step 4: ZAP will now scan the selected parts of the web application for vulnerabilities and generate a report of any issues it finds.
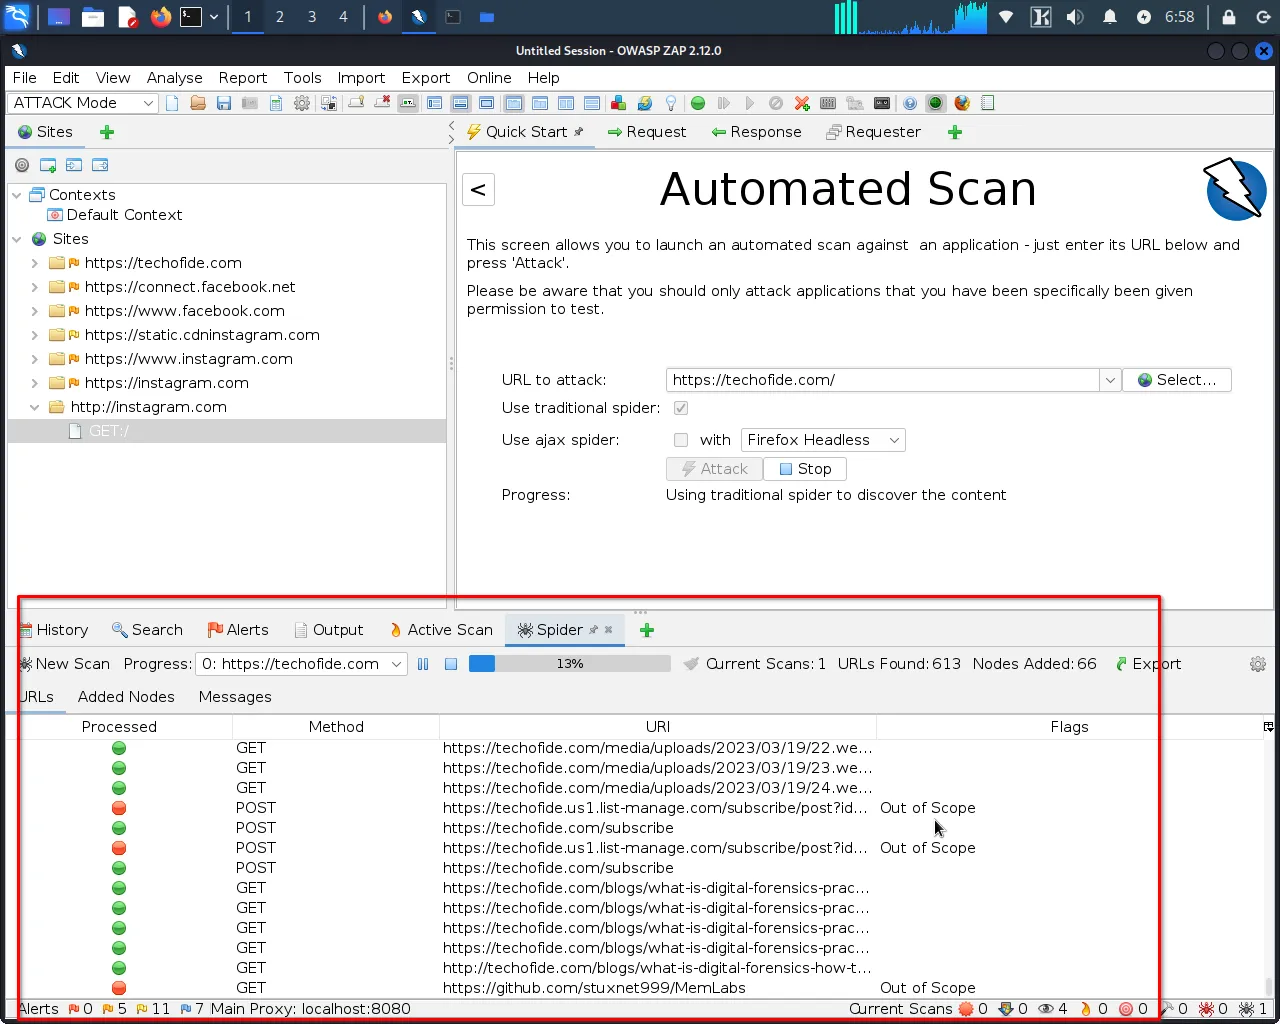
This process may take several minutes, depending on the size and complexity of the website.
Step 5: Review the report and prioritize the vulnerabilities based on their severity level.
Then, please take the necessary steps to fix the vulnerabilities and re-scan the website to ensure they have been addressed.
Conclusion
In conclusion, this comprehensive guide has covered the process of setting up OWASP ZAP as a browser proxy, configuring FoxyProxy for easy switching, and integrating ZAP with your web application. We've explored the steps to perform a vulnerability scan and interpret the results, equipping you with the knowledge to strengthen your web application security. In our next blog post, we'll delve into more advanced techniques and explore the advanced features of OWASP ZAP for finding vulnerabilities. Join us to expand your expertise and take your security testing to the next level. Stay tuned for more exciting insights!
Commonly Asked Questions
Q1. Can I use OWASP ZAP with any web browser?
Ans. Yes, OWASP ZAP can be configured as a proxy for various web browsers, including Firefox, Chrome, Internet Explorer, and more. The process may vary slightly depending on the browser, but the general concept remains the same.
Q2. Is FoxyProxy necessary for using OWASP ZAP as a proxy?
Ans. FoxyProxy is not necessary to use OWASP ZAP as a proxy, but it can significantly streamline the process by allowing you to switch the proxy on and off with a single click. It saves time and eliminates the need to manually change proxy settings in your browser.
Q3. How does OWASP ZAP handle SSL/TLS certificates?
Ans. OWASP ZAP can generate a dynamic SSL certificate that allows it to intercept and analyze HTTPS traffic between your browser and the web application. By importing and trusting this certificate in your browser, you enable ZAP to capture encrypted traffic for vulnerability scanning.
Q4. Can OWASP ZAP detect all types of vulnerabilities?
Ans. OWASP ZAP is a powerful tool for detecting various types of web application vulnerabilities, including but not limited to cross-site scripting (XSS), SQL injection, insecure direct object references, and more. However, it's important to note that no tool can guarantee 100% coverage, and manual testing and additional security measures are also recommended.
Related Blogs
- OWASP ZAP | A Powerful Web Application Security Testing Tool
- What is the Dark Web | Is Dark Web Illegal? - An Introduction
- What is Wireshark | How to Use Wireshark [Practical Demo]
- How to Install Kali Linux Step By Step Guide
- What is Computer Network | Basics of Networking [With Practical Examples]
- Types of Network Topology with Network Topology Diagram | Techofide
- What is DoS Attack | How to do Denial of Service Attack [Practical Demo]
- Nmap Commands | How to Use Nmap Tool
- Linux Commands | Linux Commands Cheat Sheet
- What is OSINT? | OSINT Framework | Tools for OSINT | Best OSINT Techniques