Hello there, readers! This article will teach you about Burp Suite, one of the most widely used tools for online application penetration testing. You will also comprehend. What is Burp Suite, exactly? What is Burp Suite and how does Burp Suite works? Burp Suite download and installation for Windows and Linux systems, as well as an introduction to some of Burp Suite's fundamental features and tools.
If you are new to Web Application Pentesting/Web App, Hacking/Bug Bounty, Pen Tester, and Development, we recommend that you simply skim through the material without overthinking any significance of the terms.
If you want to know how to start your career in ethical hacking then you can check our blog on How to Become an Ethical Hacker | Techofide where our IT professional thoughts and experiences are shared.
Note: We're only teaching you for educational purposes and to broaden your horizons. Because we know that both ethical and non-ethical hackers use these tools, Techofide will not be held liable for any unlawful/false actions you engage in.
- What is Burp Suite?
- Burp Suite Editions
- How does Burp Suite work?
- Burp Suite Download for Windows and Linux
- Installation in Windows and Linux
- Installing Burp Suite CA Certificate
- Burp Suite Configuration
- How to use Burp Suite?
- Burp Suite Tutorial
- Conclusion
What is Burp Suite?
Burp Suite is a leading Web Penetration Testing software written in Java. It has evolved into an industry-standard toolkit for information security experts worldwide. Burp Suite aids in the detection of online application vulnerabilities and the verification of attack vectors. Burp Suite aspires to be an all-in-one toolset, with add-ons available to expand its functionality. Its user-friendly interface makes it a better choice than free alternatives like OWASP organizations ZAP.
Burp Suite Editions
Burp Suite is available in three different versions/forms, depending on your requirements. Burp Suite comes in three flavors: a free community edition (which I utilized for this blog), a $399/year professional edition, and a $3999/year business edition.
Enterprise Edition
Burp Suite Enterprise Edition allows you to scan your whole portfolio for online vulnerabilities automatically. Scheduled scans, CI/CD connections, and straightforward remediation guidance and reporting eliminate bottlenecks and save time for AppSec teams. It fulfils the needs of both small and large businesses, but it is not intended for usage by individual customers.
Professional Edition
Over thousands of penetration testers and bug bounty hunters use Burp Suite Professional to scan vulnerabilities quicker. This edition is for professionals with an automated scanner (which might give false positives) and web crawler and costs $399 per year.
Community Edition
The Community Edition aims to teach all the basics of web security testing. Designed for anyone who wants to learn how to use the tool can use this free resource offered.
How does Burp Suite work?
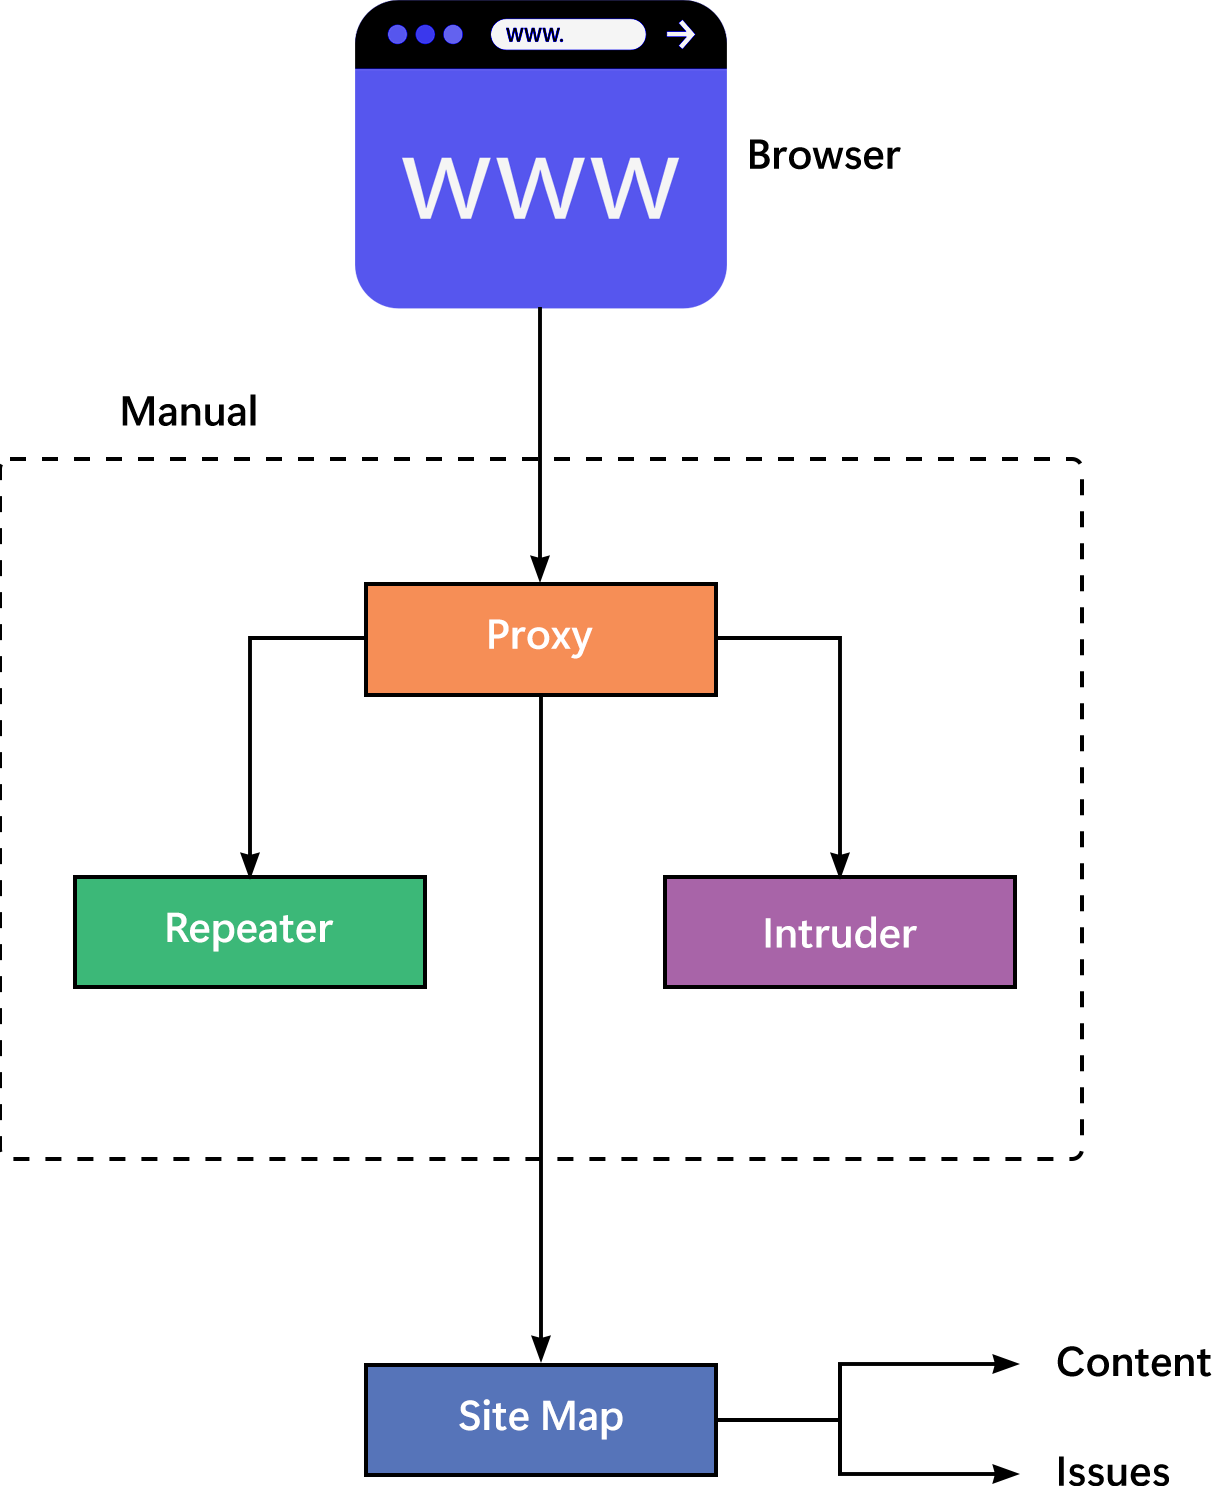
Burp Suite can be described as an Interception Proxy in its most basic form. A penetration tester can set up their internet browser to redirect traffic through the Burp Suite proxy server while viewing their target application. Burp Suite then operates as a (kind of) Man In The Middle, capturing and analyzing each request to and from the target web application. Individual HTTP requests can be parsed, manipulated, and replayed by penetration testers to examine potential arguments or injection locations. Manual and automated fuzzing attacks can use injection sites to find potentially undesired application behaviours, crashes, and error messages.
Burp Suite Download for Windows and Linux
Go to the official Portswigger website's download page, select Windows (64-bit) if you are on a Windows machine and Linux (64-bit) if you are on a Linux machine, and click on Download.
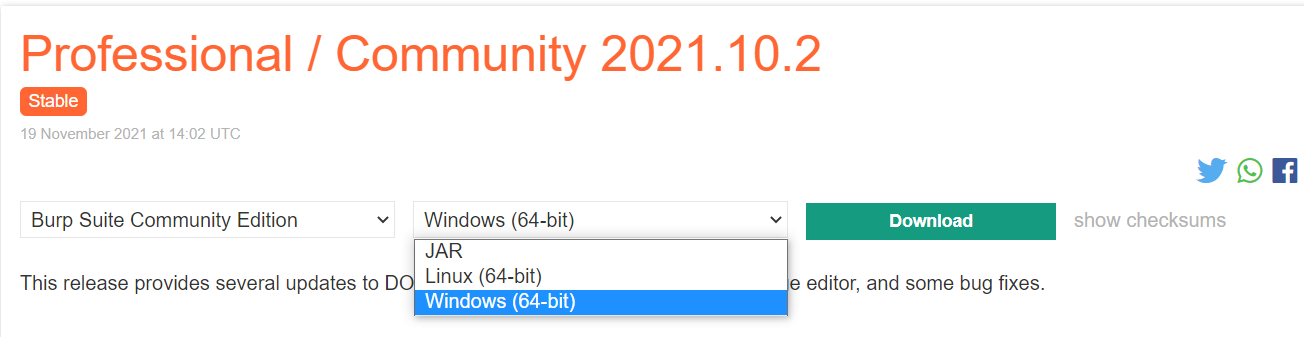
For Windows (64-bit) you will get a .exe or executable file Example: burpsuite_community_windows-x64_v2021_10_2.exe.

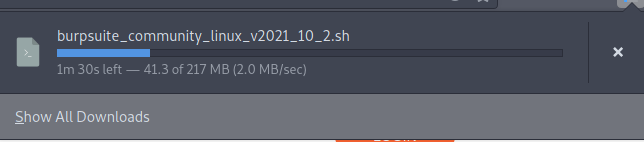
For Linux (64-bit) you will get a .sh or bash binary file Example: burpsuite_community_linux_v2021_10_2.sh
Installation in Windows and Linux
Windows
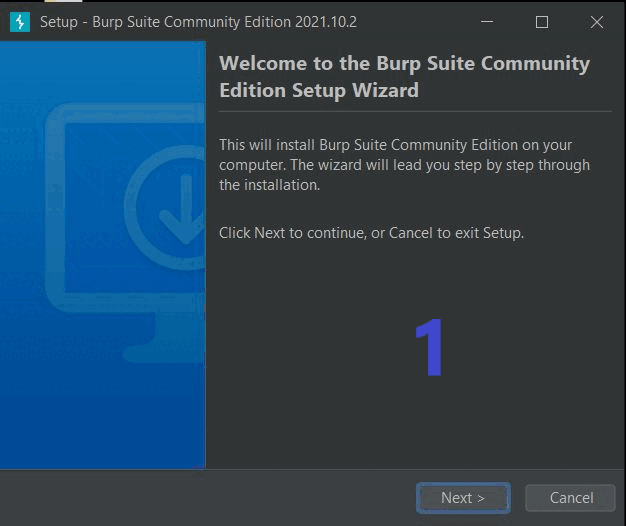
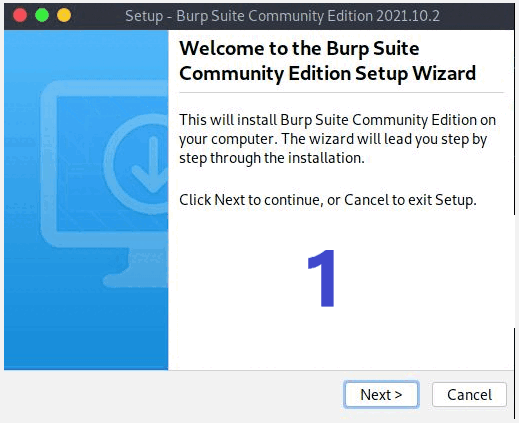
Start the application and click on Next until it starts extracting files, and click on Finish.
Linux
Step 1: Open a Terminal and go to the Downloads directory.
Note: Shell is case sensitive so downloads and Downloads are different directories. Also, if you haven't read our blog on terminal basics, I strongly advise you to do so for first-time users.
cd Downloads #navigate to the Downloads directory
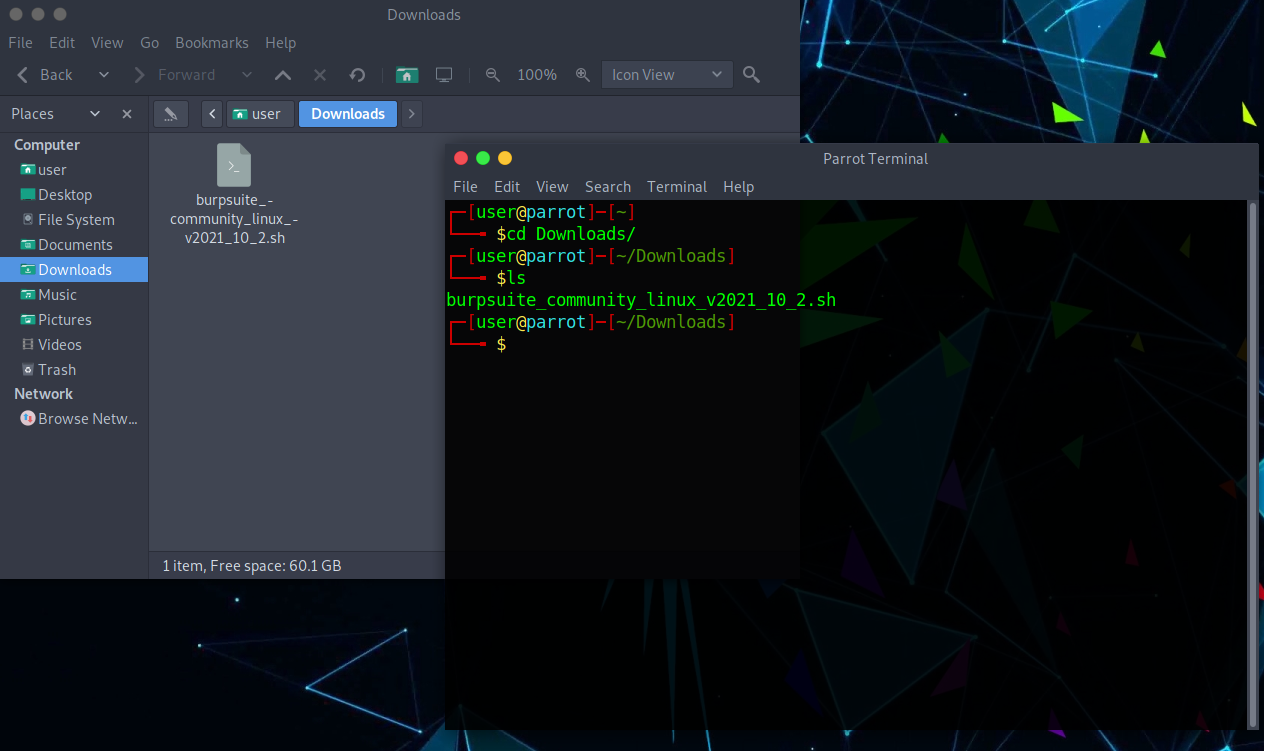
Step 2: Make the file executable and run the file.
chmod +x burpsuite_community_linux_v2021_10_2.sh    #gives the bash script permission to execute
./burpsuite_community_linux_v2021_10_2.sh           #executes the script
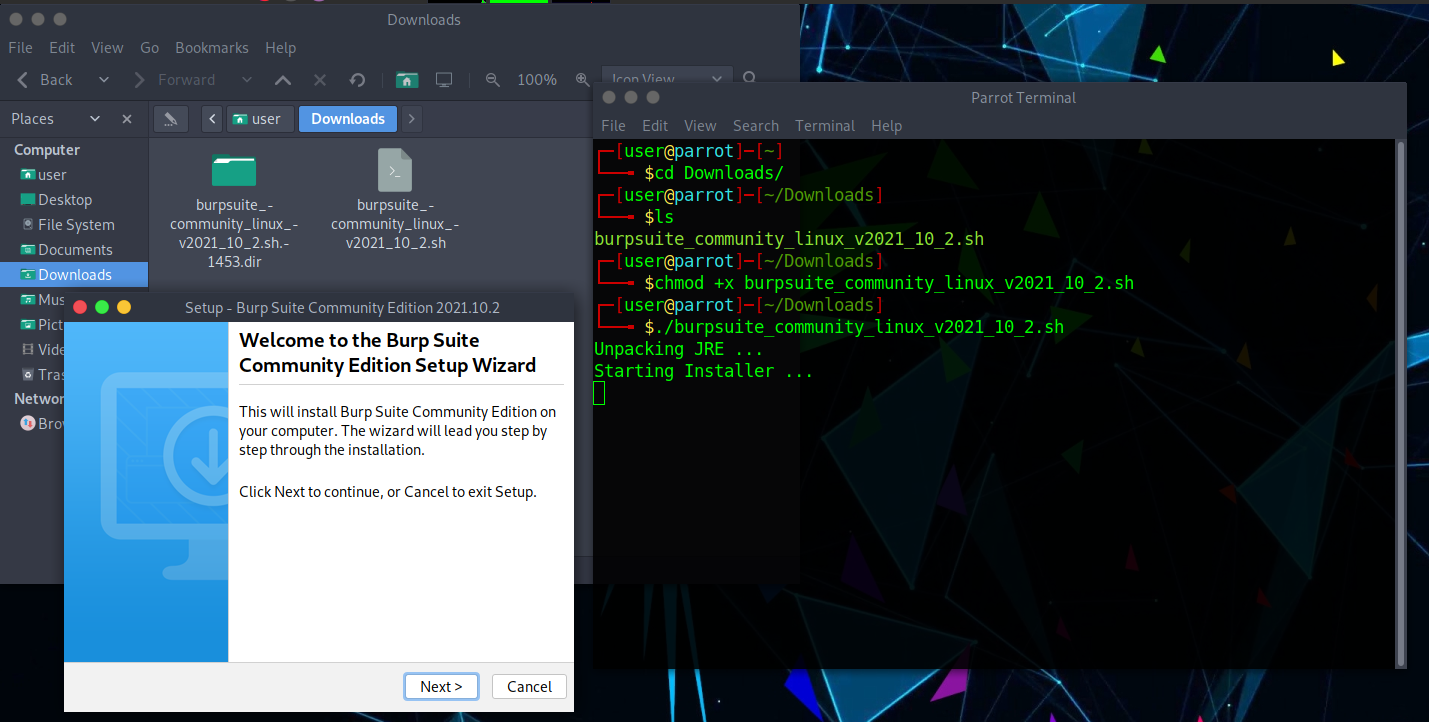
Step 3: Now click on Next until it starts extracting files and click on Finish.
Installing Burp Suite CA Certificate
Installation of a CA certificate is a necessary process without Burp's self-signed Certificate Authority (CA) certificate the browser will throw an "invalid security certificate" error with the message "...issuer certificate is unknown". To see more information about the error, click the Advanced button. For both Windows and Linux computers, the processes to install a CA Certificate are the same.
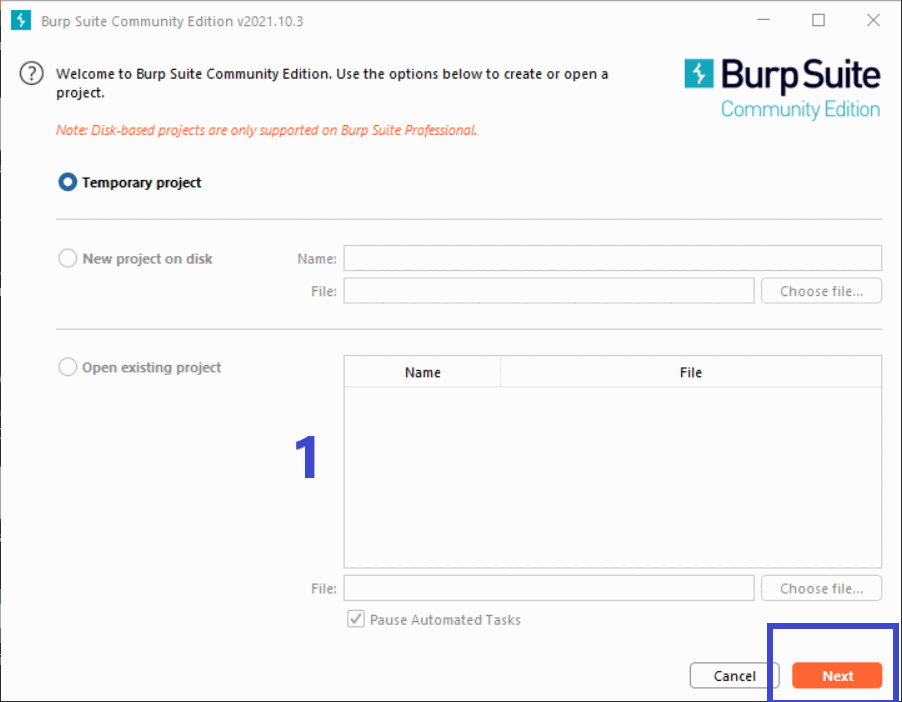
Step 1: Make sure the temporary project is selected, and click on Next. Use burp default settings and click on start burp.
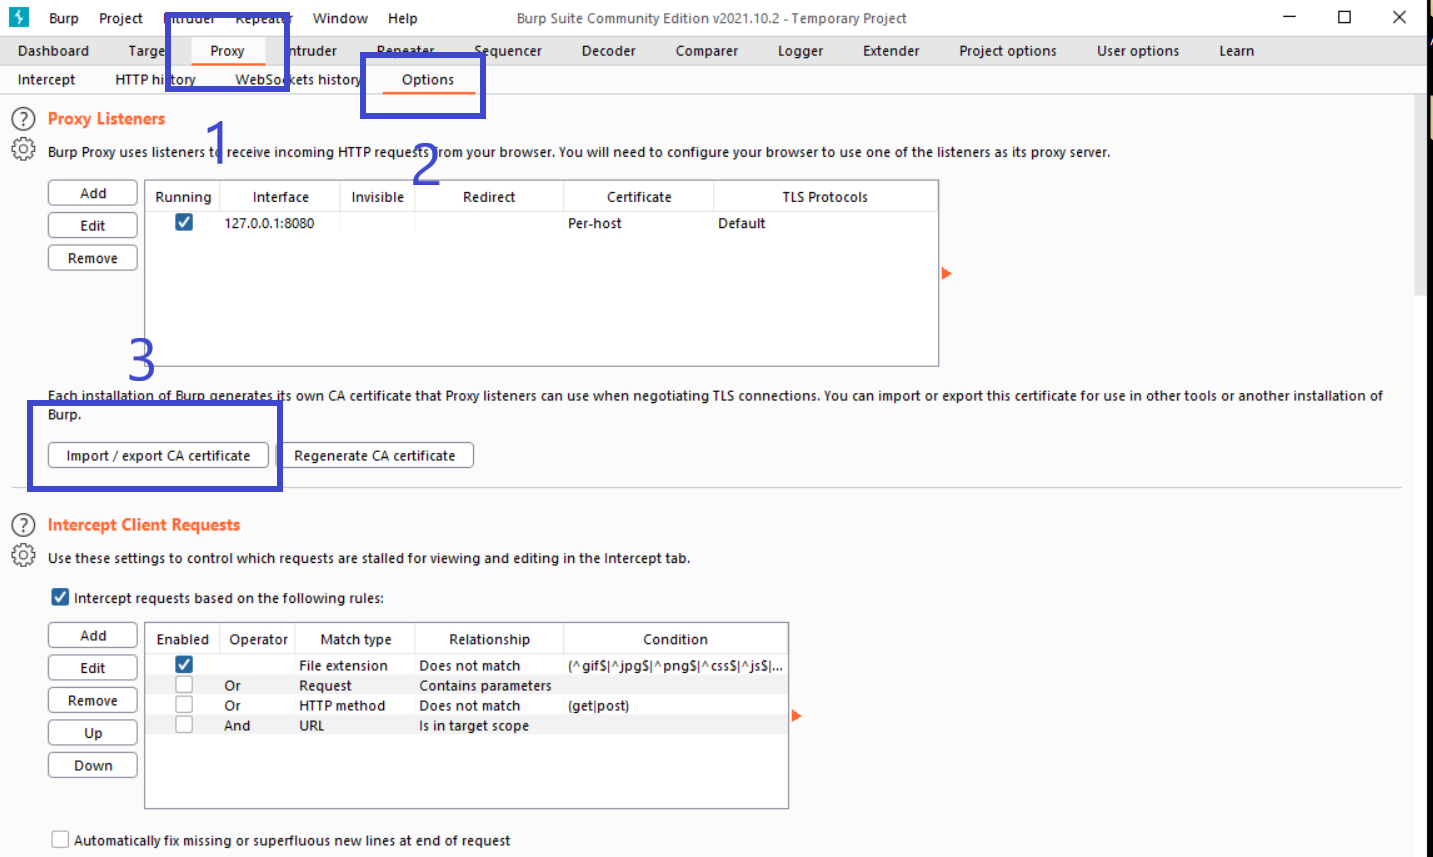
Step 2: Click on the Proxy tab, click on Options, and click on Import/Export CA Certificate.
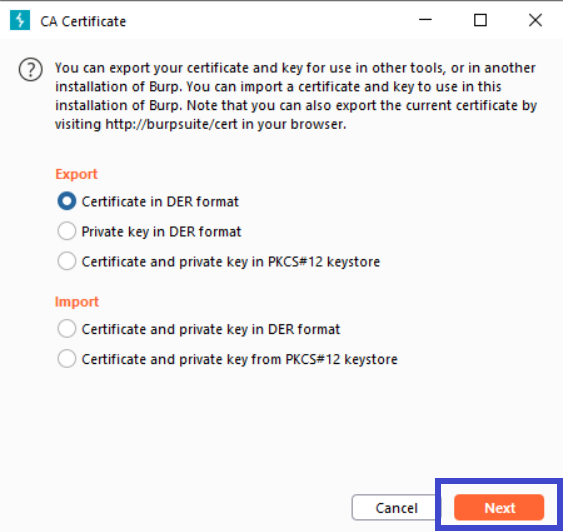
Step 3: A new window will appear, click on Certificate in DER Format and click on Next.
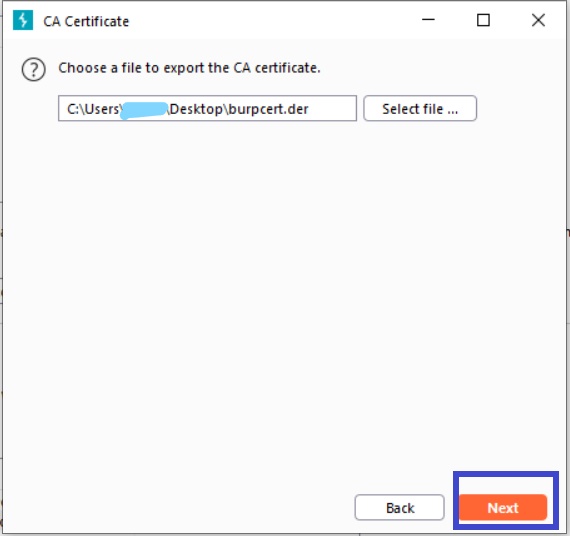
Step 4: Click on Select and give the name, in my case burpcert.der click on Save and then Next.
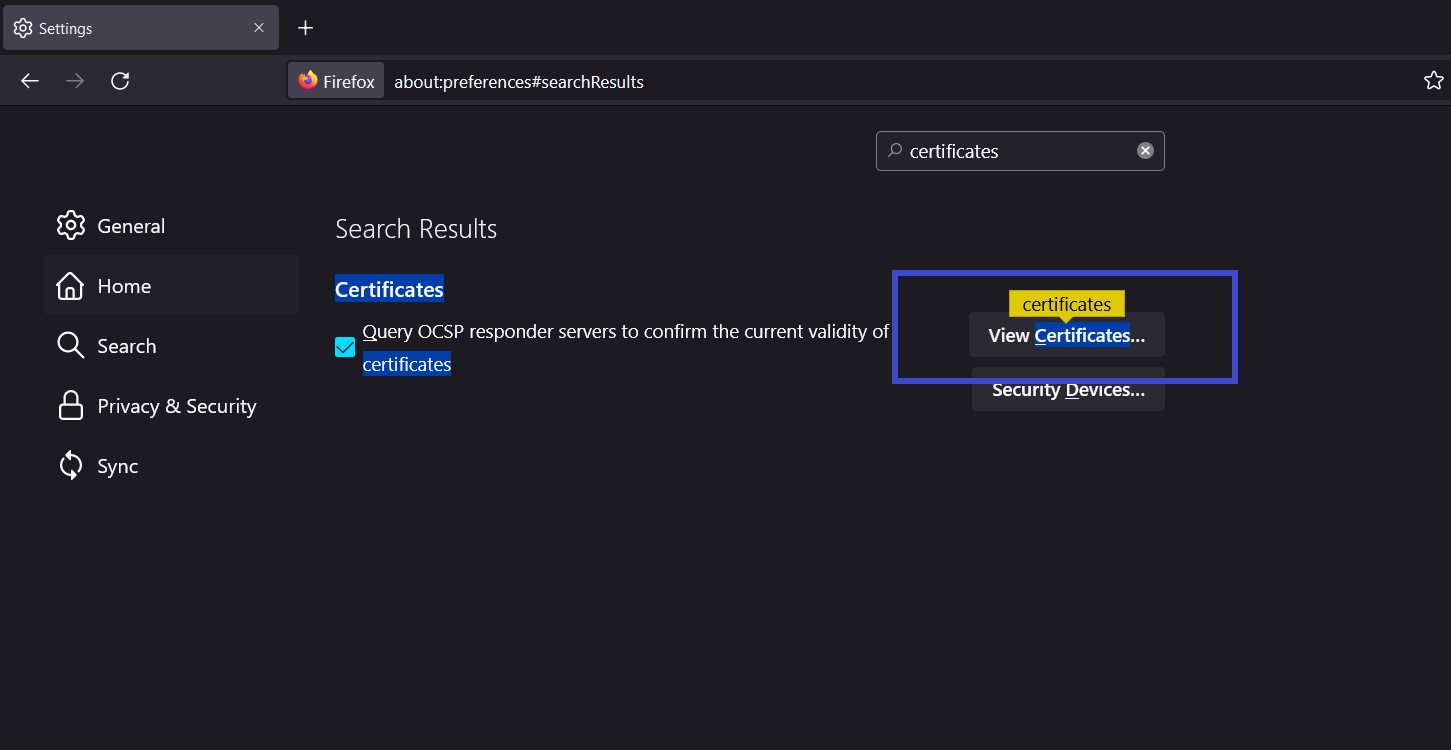
Step 5:Now select your preferred browser; I'll be using Firefox. Search for certificates in settings and then click View Certificates.
Step 6: A prompt will open, now click on Import, under the Authorities section.
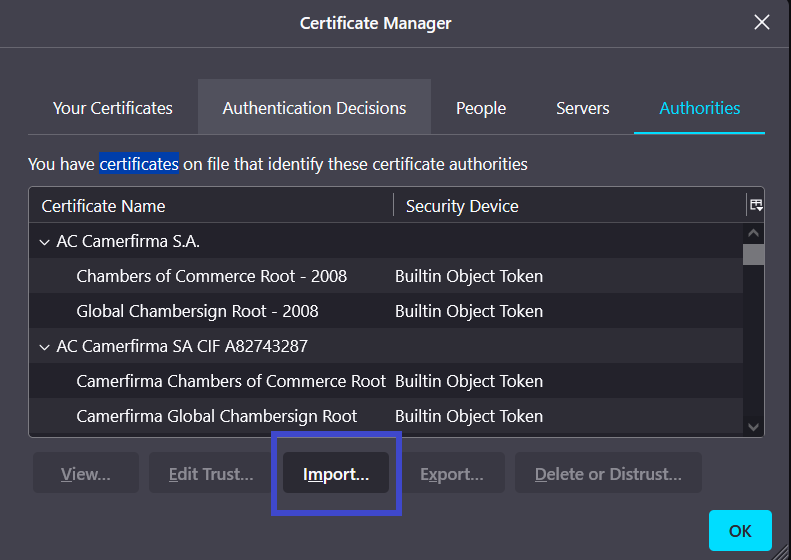
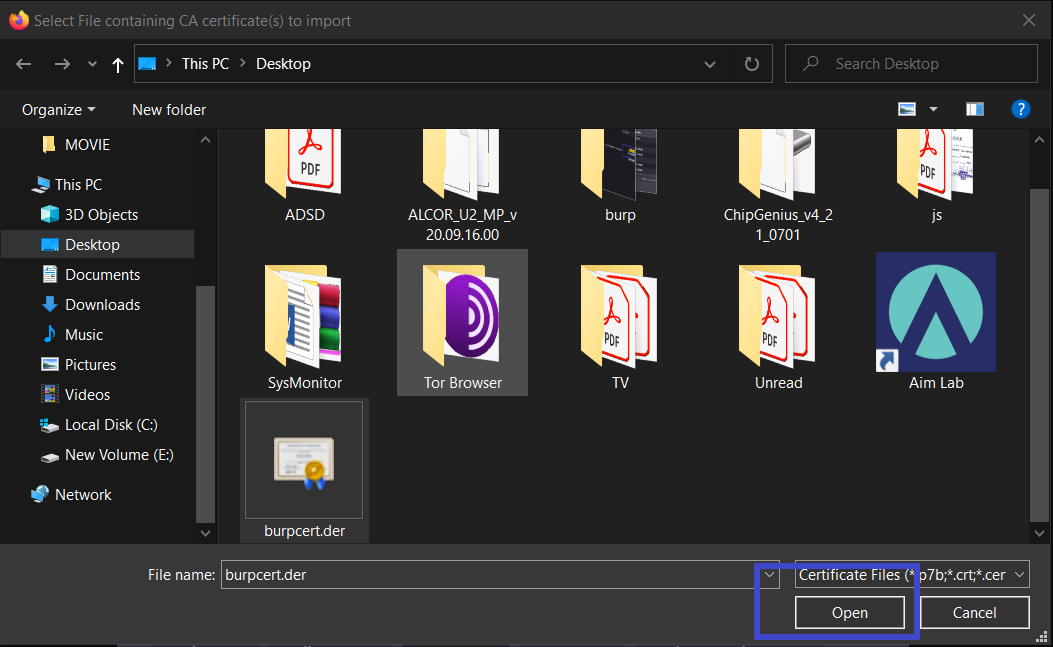
Step 7: A new window will open, search for the burpcert.der file we saved in Step 4 and click on open.
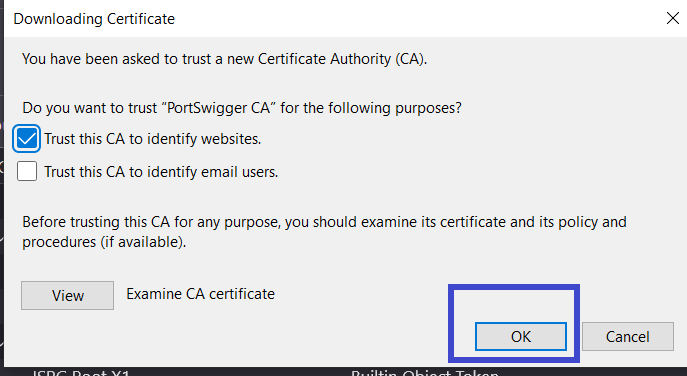
Step 8: It will ask you to modify your trust settings; tick the option that says This certificate can identify websites, then click OK and restart Firefox. That's it, the Burp Suite CA Certificate has been successfully installed.
Let's configure the browser so that it may make requests to the Burp Suite proxy when we've successfully installed the CA Certificate. You can either edit your browser's proxy settings or install an extension (FoxyProxy) for a more user-friendly interface.
Burp Suite Configuration
Change the proxy settings in your browser by following the steps below.
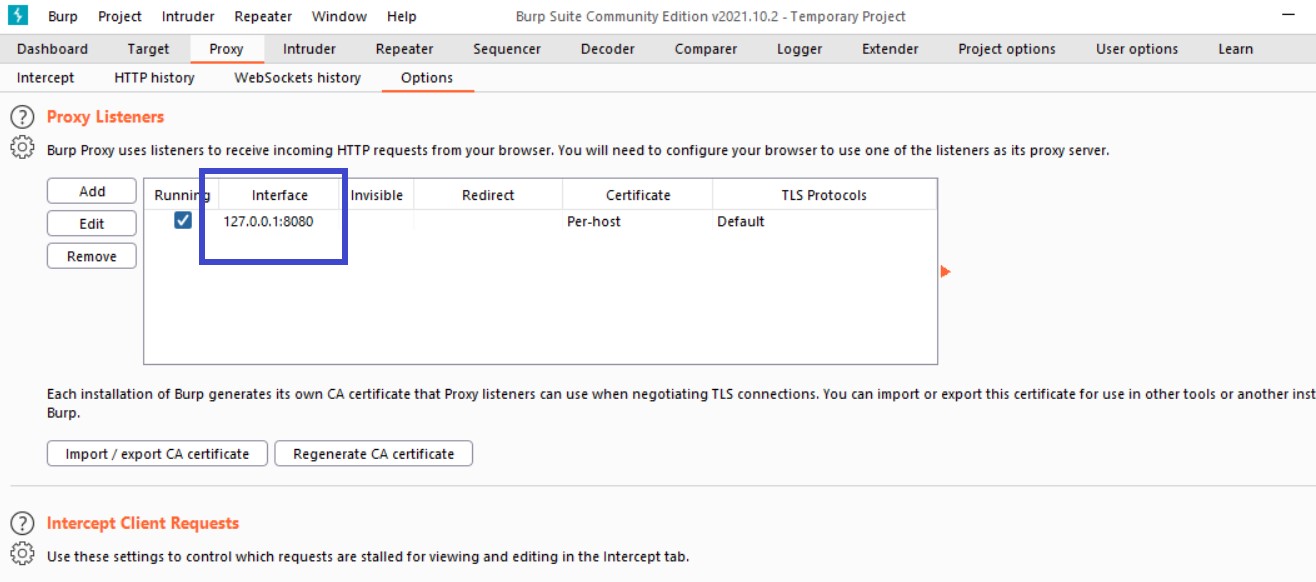
Step 1: Open Burp Suite, go to the Proxy tab, and click on Options. Note the interface, in my case 127.0.0.1:8080
Step 2: Open the Firefox browser, go to settings and search for proxy, and click on Settings as shown below under Network Settings.
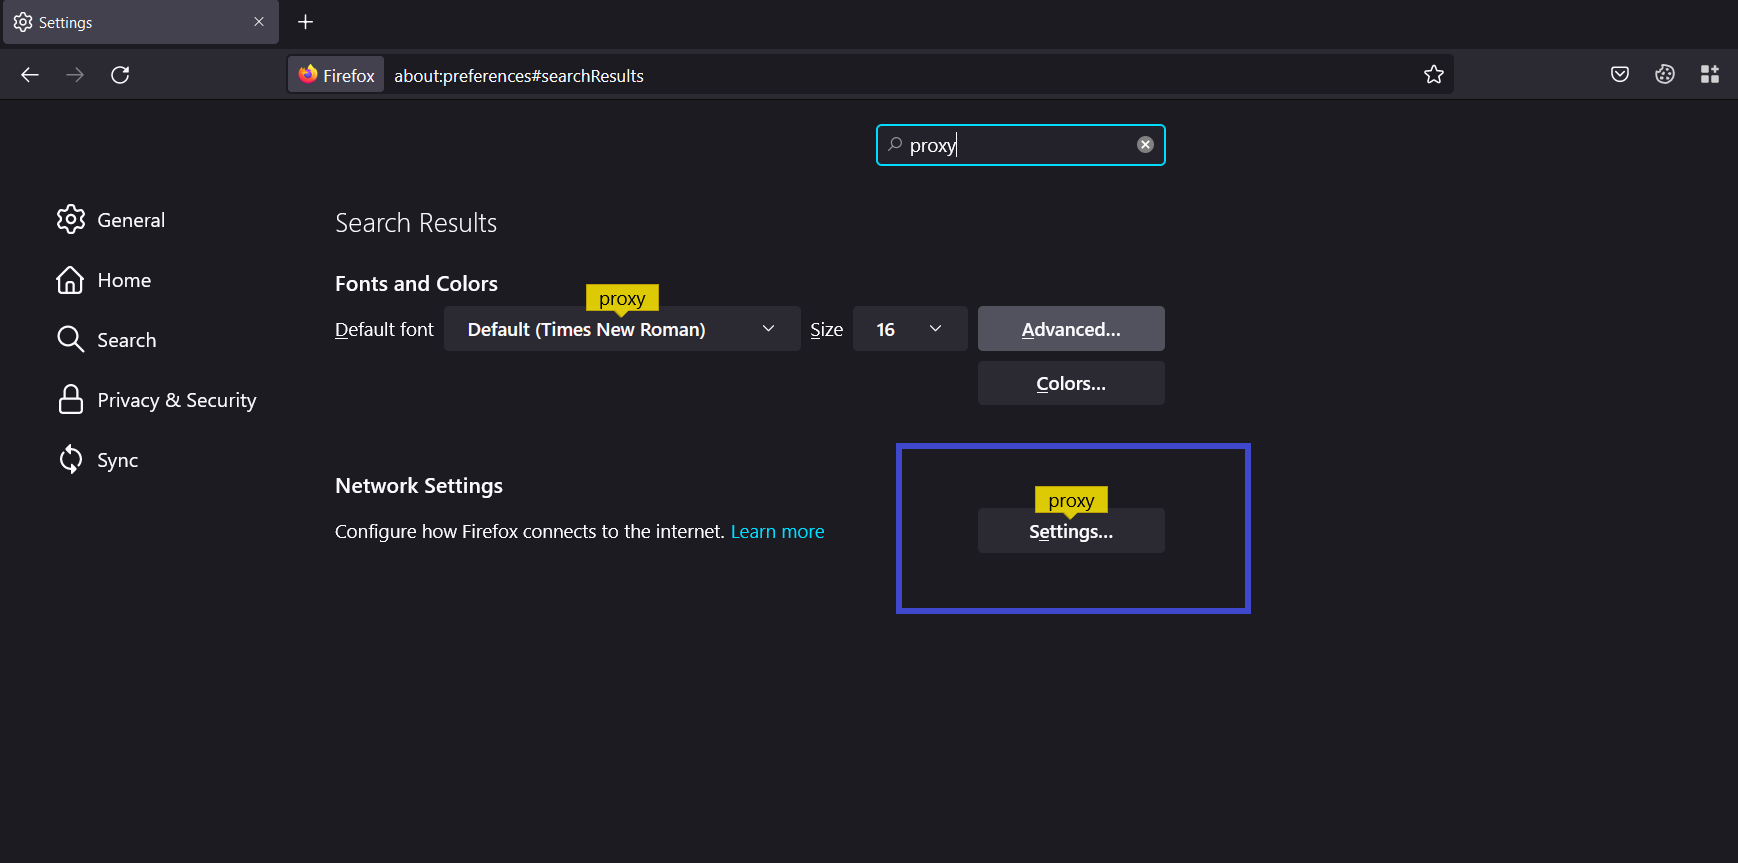
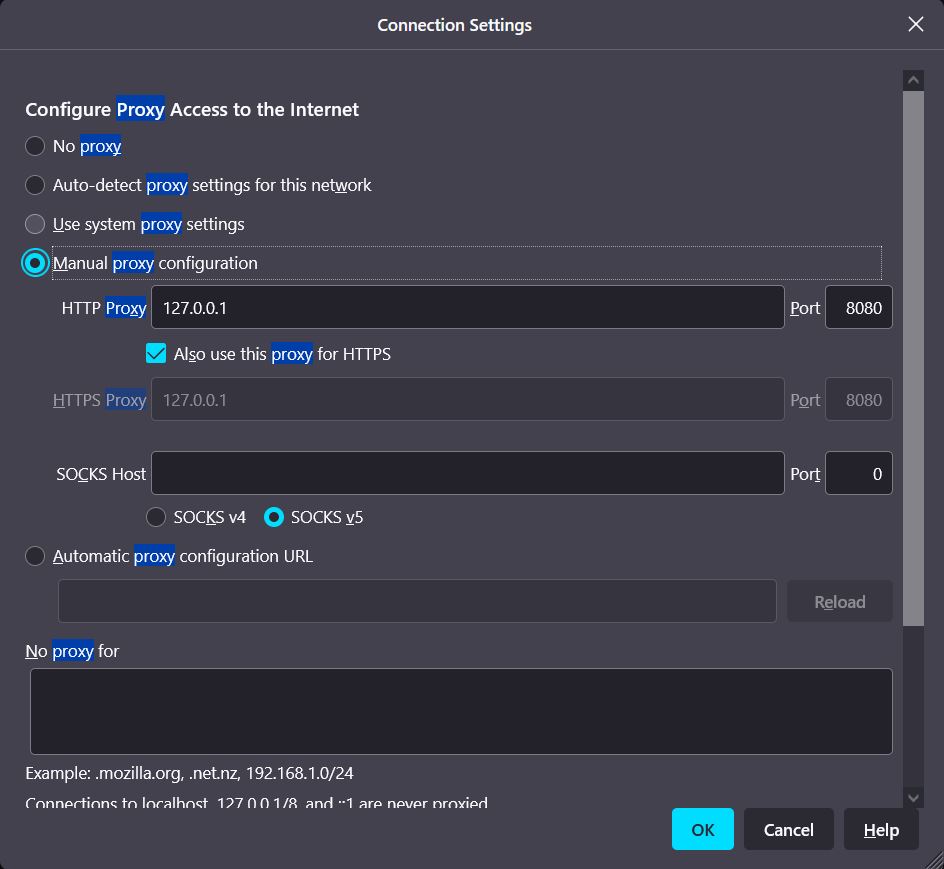
Step 3: A prompt will open for connection settings make sure Manual Proxy Configuration is selected and enter the Interface you noted in the previous step as shown below, and click on OK.
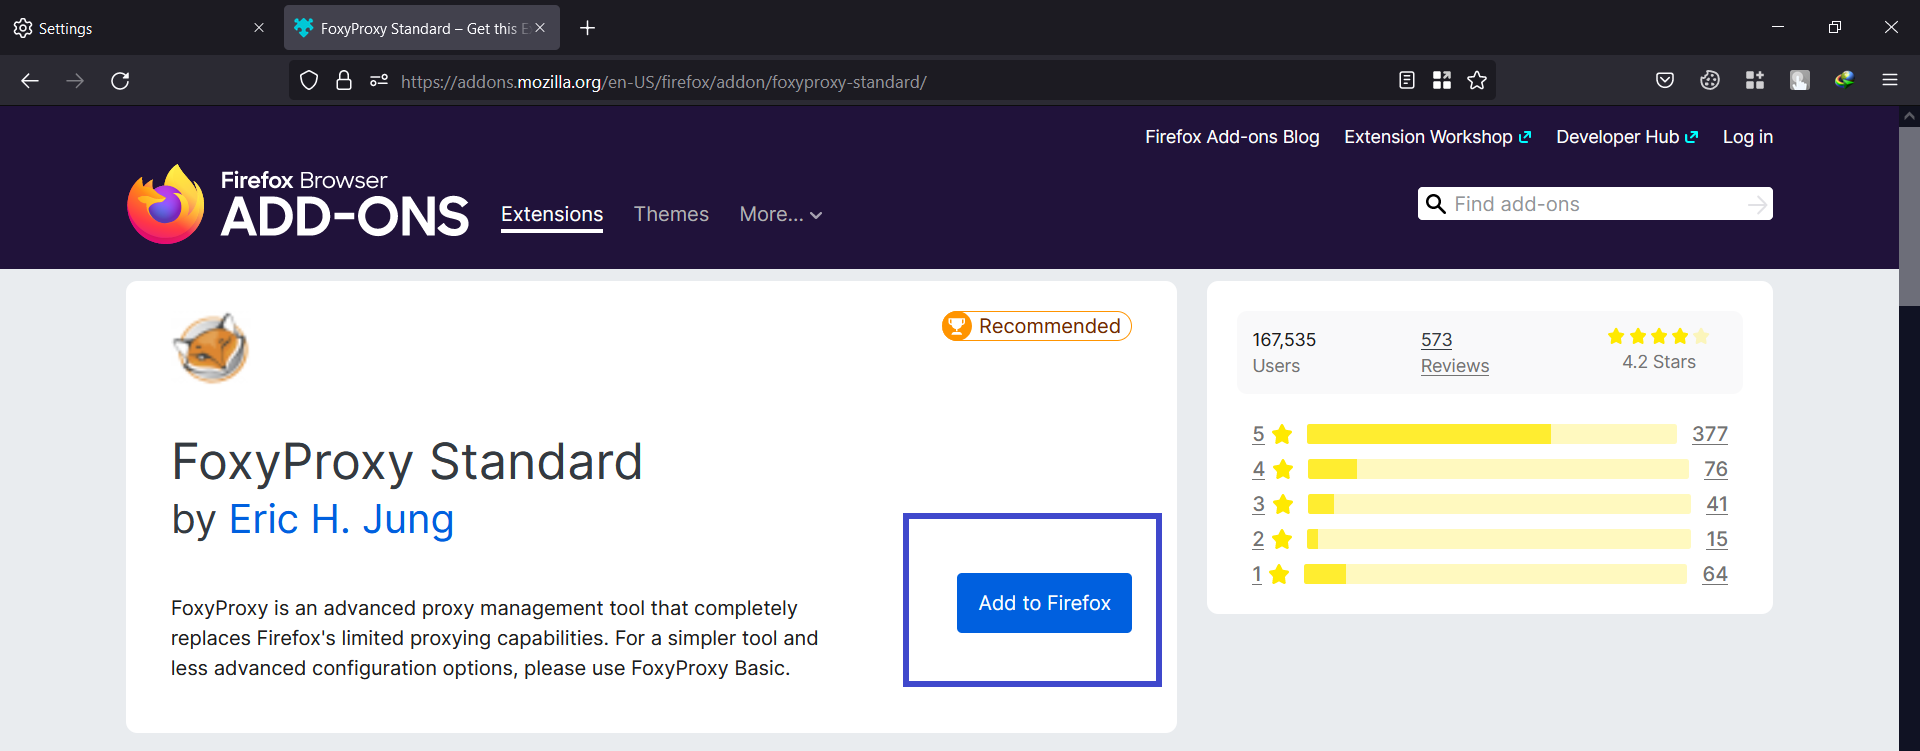
Setting up FoxyProxy for Burp Suite(Optional)
FoxyProxy is an extension for managing all of your proxies with ease without changing the browser configurations. It is an Alternative step for those wanting an easy-to-navigate GUI.
Step 1: Go to the FoxyProxy addon store, click on Add to Firefox.
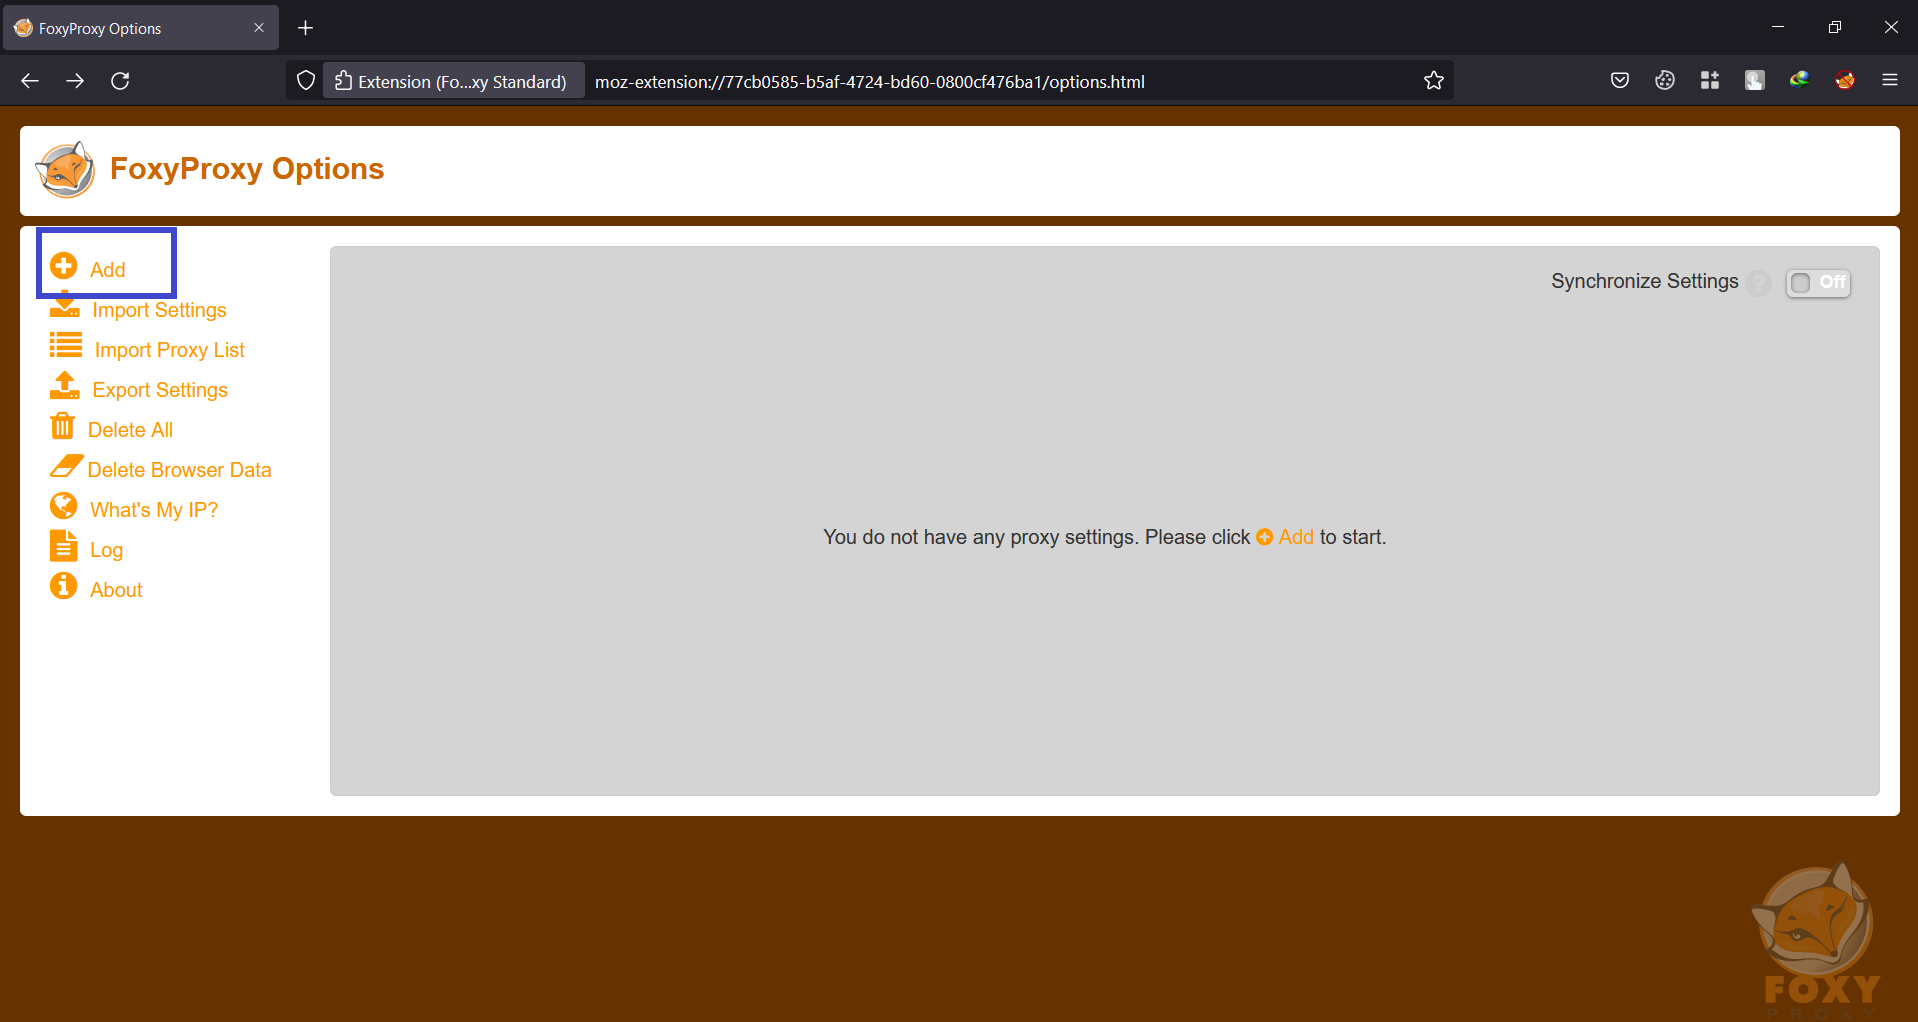
Step 2: Notice the FoxyProxy icon on the top right corner of your browser. Click on the FoxyProxy icon and then click on Options.

Step 3: A new tab will open, click on the add button.
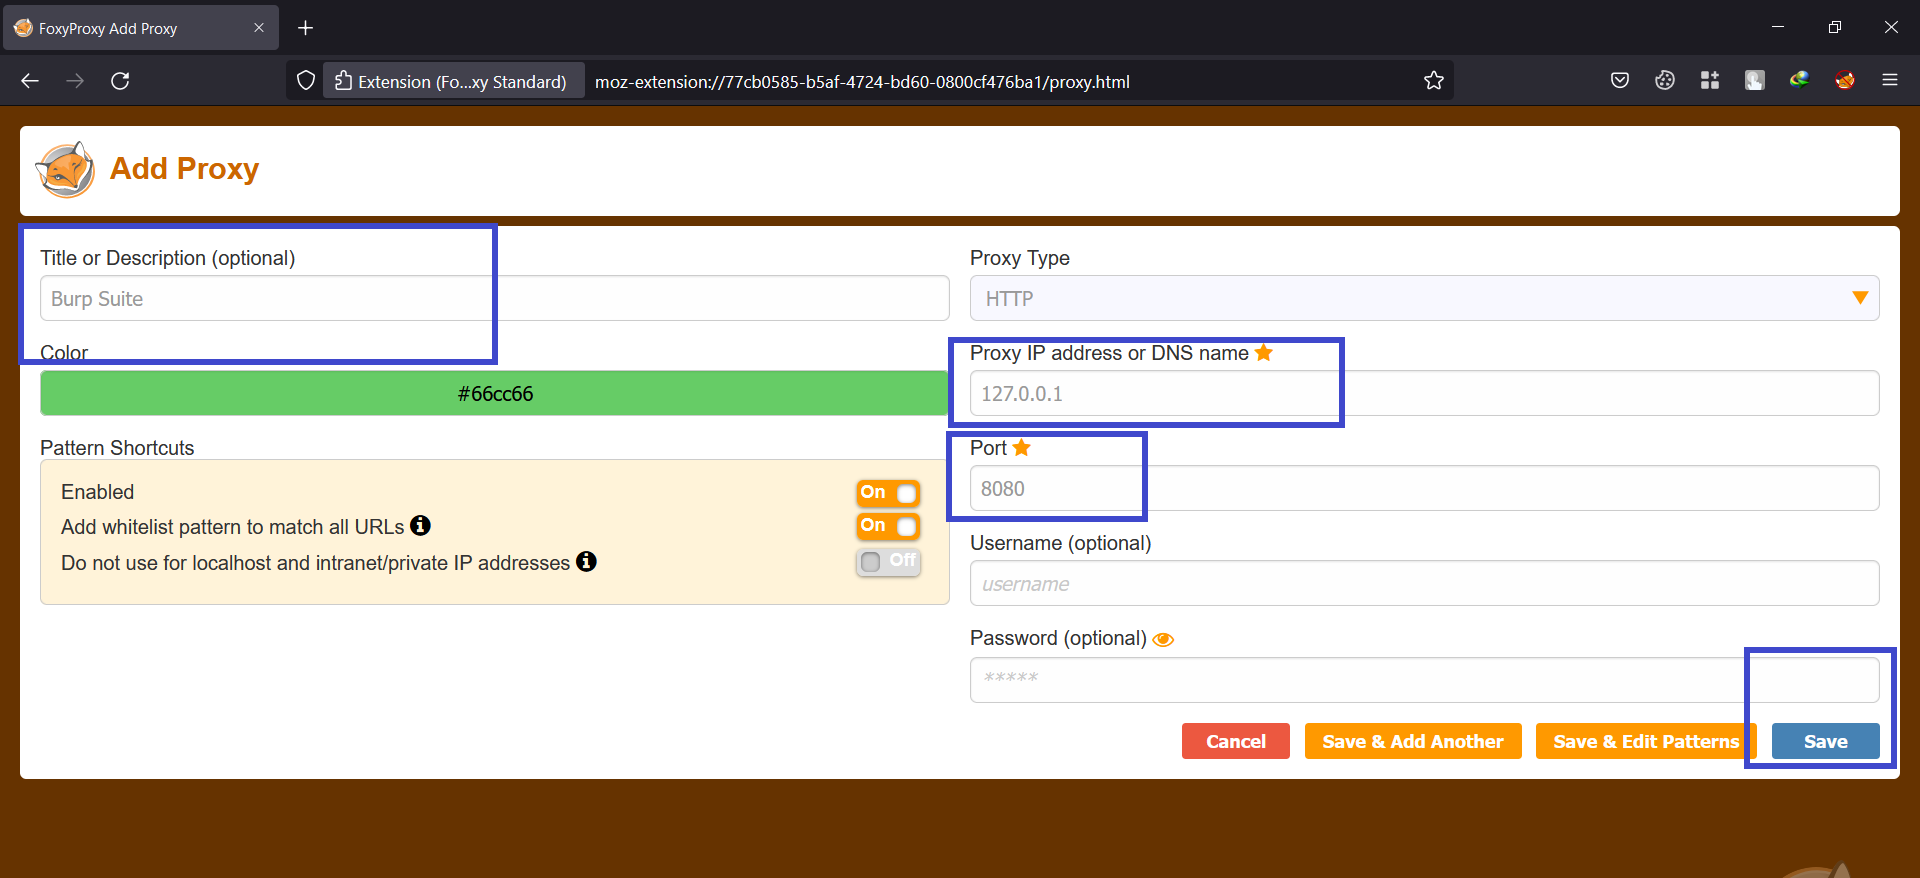
Step 4: Add a Title, IP address, and Port values as shown below. and click on Save.
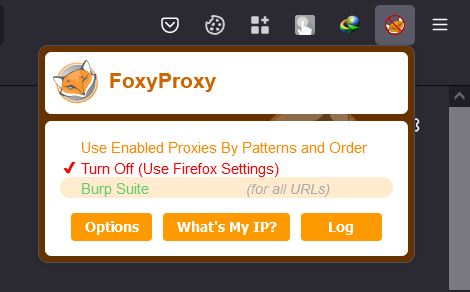
Step 5: Now if you click on the FoxyProxy icon you can use the burp proxy settings with just one click.
How to use Burp Suite?
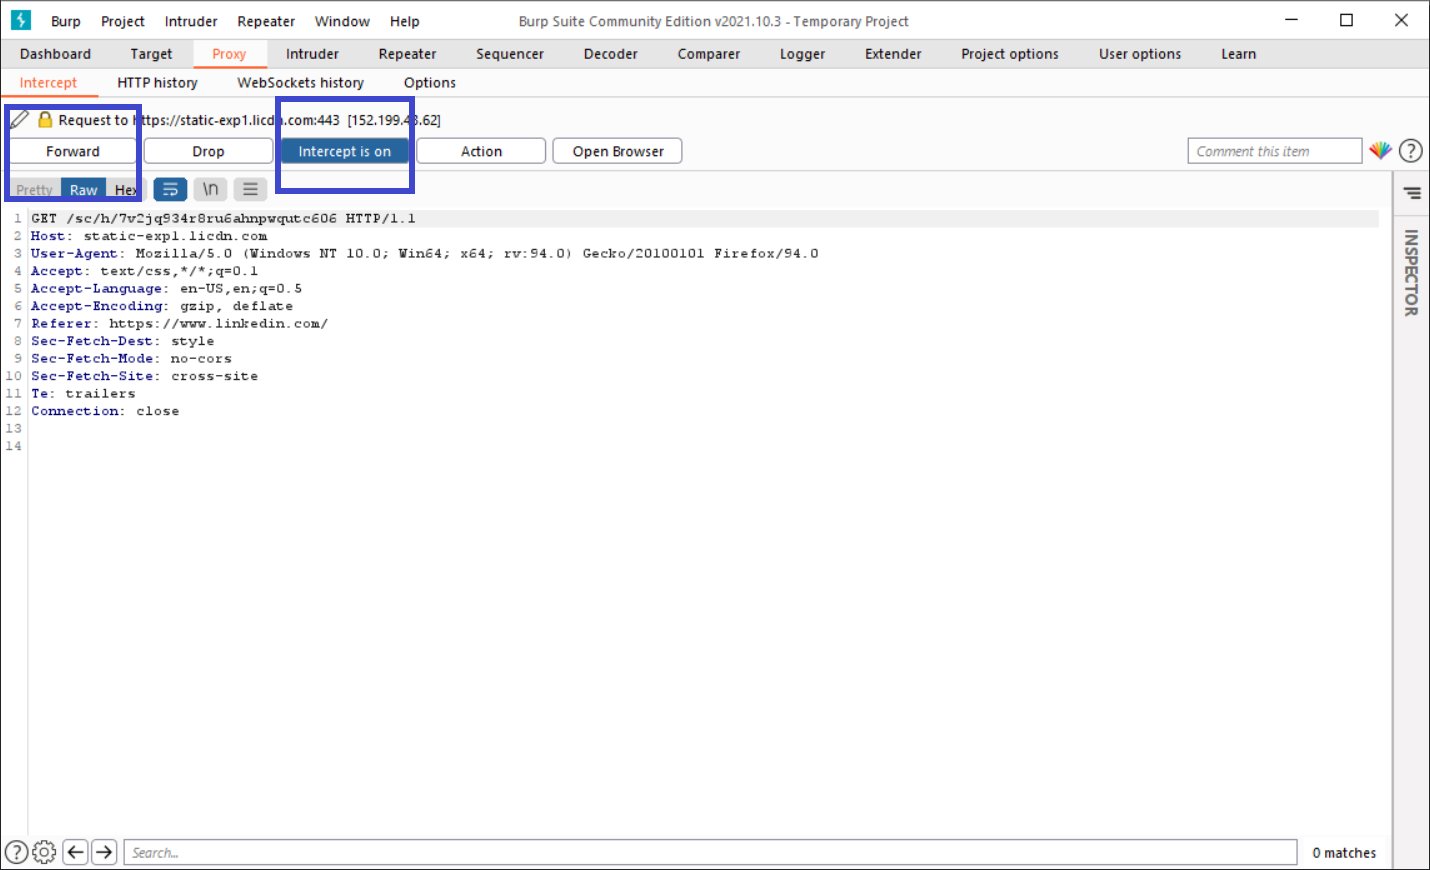
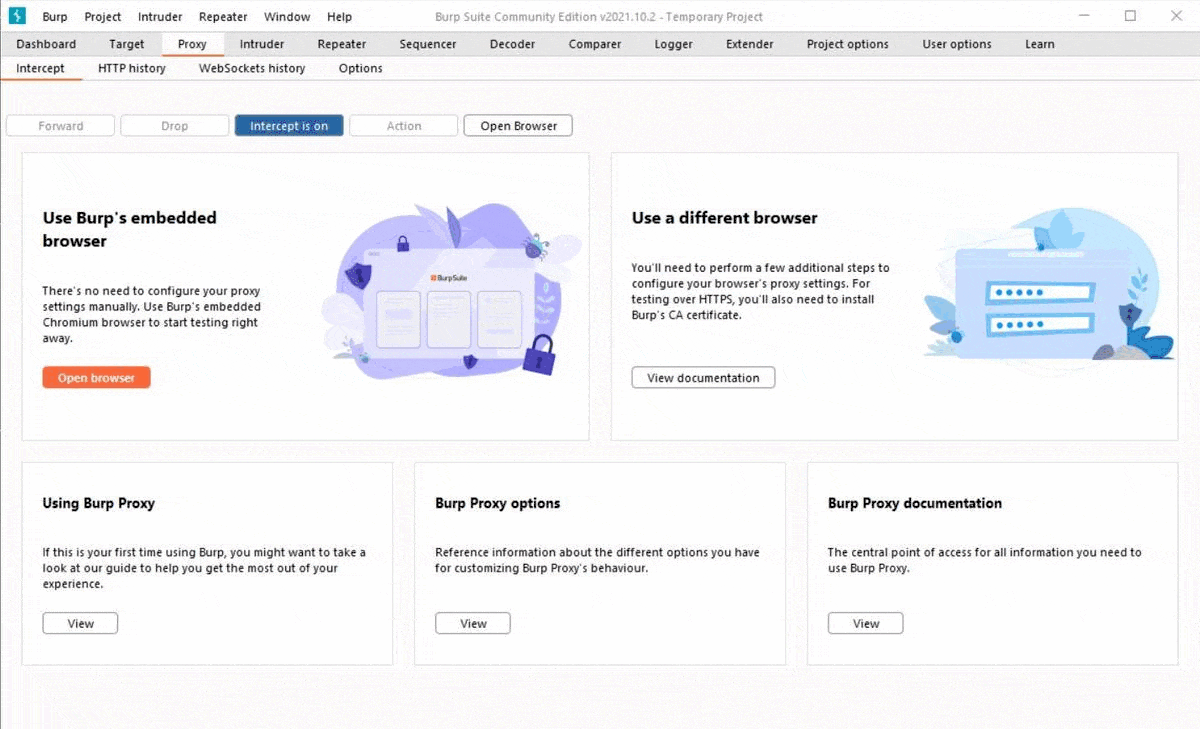
- The Intercept tab shows each HTTP request performed by your browser.
- Each message can be seen and edited if necessary.
- When you're finished editing the request, click the Forward button to transmit it to the destination web server.
- If there are any pending intercepted messages, you must forward them all in order for your browser to finish loading the pages it is waiting for.
- If you need to, you can toggle the Intercept is on/off button to surf normally without any interception.
Interface and Options
- Target - This program provides precise information about your target applications and allows you to control the vulnerability testing process.
- Proxy - A proxy server acts as a man-in-the-middle, intercepting/scanning traffic between the end browser and the target internet application. Both incoming and outgoing traffic can be intercepted, inspected, and changed with it.
- Intruder - This is a great tool for automating and customizing attacks on web applications. It is extremely flexible and may be used to execute a wide range of operations to speed up and improve the efficiency of your testing.
- Repeater - It is a tool for manually changing and reissuing individual HTTP requests, as well as assessing the application's responses. Allows for multiple requests.
- Sequencer - This is a sophisticated tool for evaluating the unpredictability quality of an application's session tokens or other essential data items that are meant to be unpredictable.
- Decoder - This is a great tool for decoding and encoding application data manually or intelligently.
- Comparer - This is a useful tool for visually comparing any two pieces of data, such as pairs of comparable HTTP messages.
- Extender - This allows you to load Burp extensions, which you can use to enhance the capabilities of Burp using your own or third-party code.
Burp Suite Proxy tab
Burp Proxy is the central component of Burp's user-driven workflow, allowing you to intercept, examine, and change all requests and replies flowing between your browser and destination web servers.
- Intercept: Individual HTTP requests and responses intercepted by Burp Proxy are displayed on the Intercept tab for review and modification.
- HTTP/WebSockets history: Even if the interception is switched off, the Proxy history keeps you up-to-date on your application's activity. Each table contains information about the messages that have traveled through the Proxy.
- Options: Burp Proxy settings for proxy listeners, intercepting HTTP requests and responses, intercepting WebSocket messages, response modification, match and replace, TLS pass through, and other options may be found on this tab.
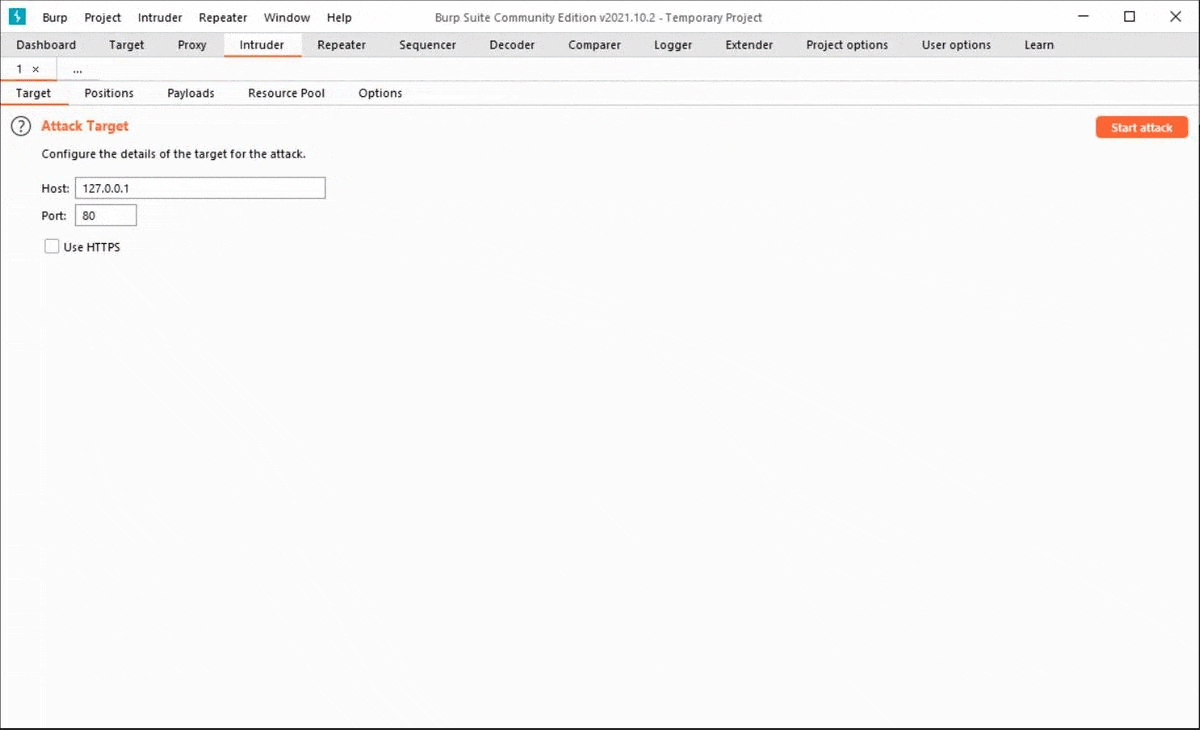
Burp Suite Intruder Tab
Burp Intruder is a strong tool for automating custom web application attacks. It can be used to automate a variety of tasks that arise during the course of your testing.
- Target: This tab is used to set up the specifics of the attack's target server. The following choices are required: host, IP, and HTTPS.
- Positions: This tab is used to set up the payload markers(§) in the attack's request template and the attack type (which determines the way in which payloads are assigned to payload positions).
- Payloads: This tab allows you to set up one or more payload sets. The attack type chosen in the Positions tab determines the number of payload sets. Only a single payload set is required for many typical operations, such as fuzzing parameters, brute force guessing a user's password, or cycling multiple times over page identifiers.
- Resource Pool: A resource pool is a collection of jobs that share a resource quota. Each resource pool has its own throttling parameters, which govern the number of requests that can be made at the same time, the frequency at which they can be made, or both.
- Options: Save options, request headers, error handling, attack results, grep match, grep extract, grep payloads, and redirections are all found on this tab. Before initiating an attack, you can alter these choices in the main Intruder UI, and most settings can also be changed in the attack window while the attack is already ongoing.
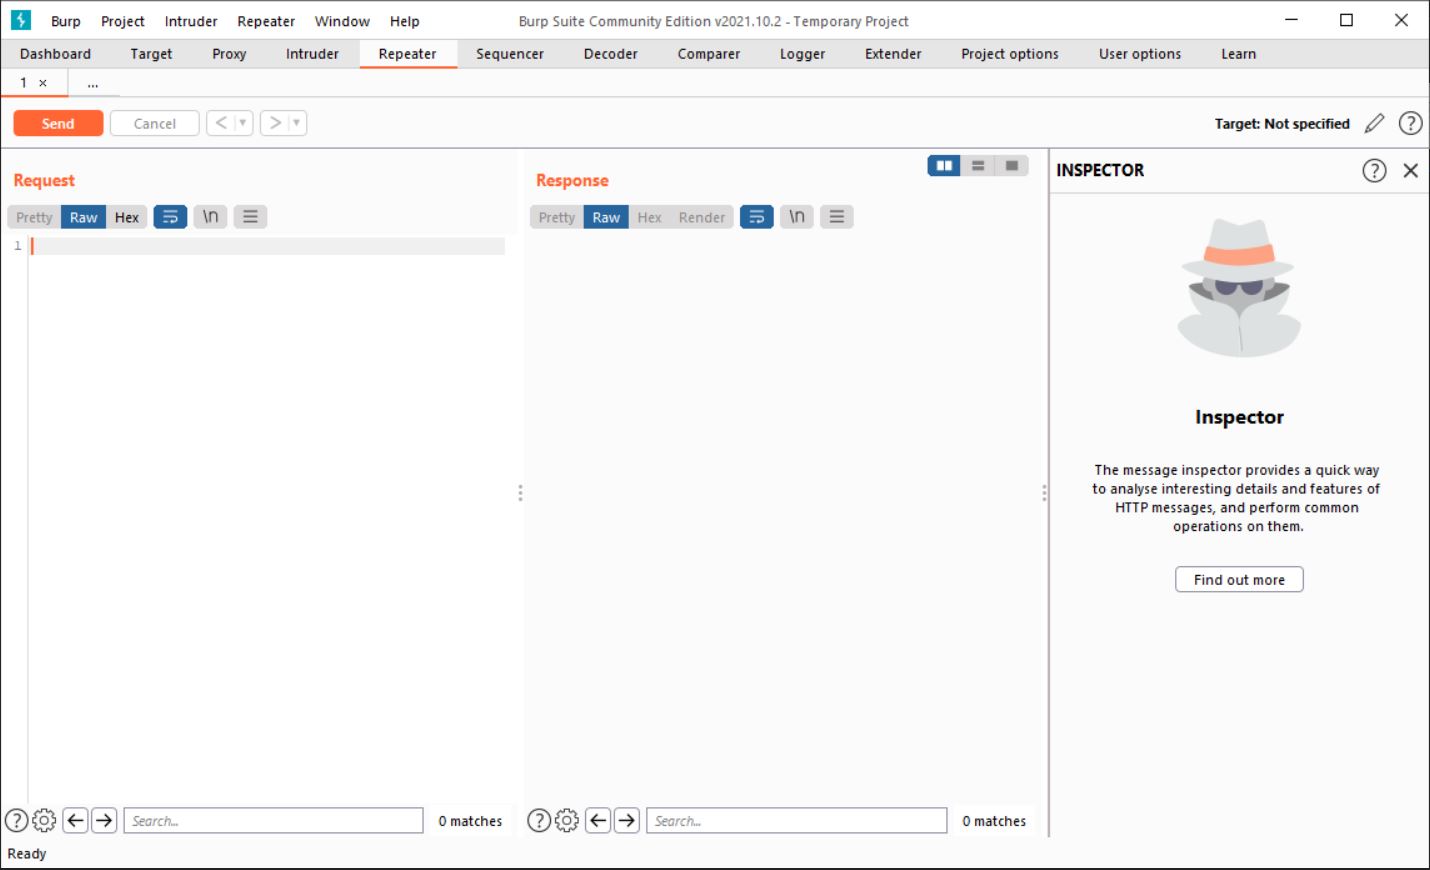
Burp Suite Repeater Tab
Burp Repeater is a simple tool for manually modifying and reissuing individual HTTP requests, as well as evaluating service responses. From anywhere in Burp, you can send a request to relays, change it, and issue it over and over again.
Burp Suite Tutorial
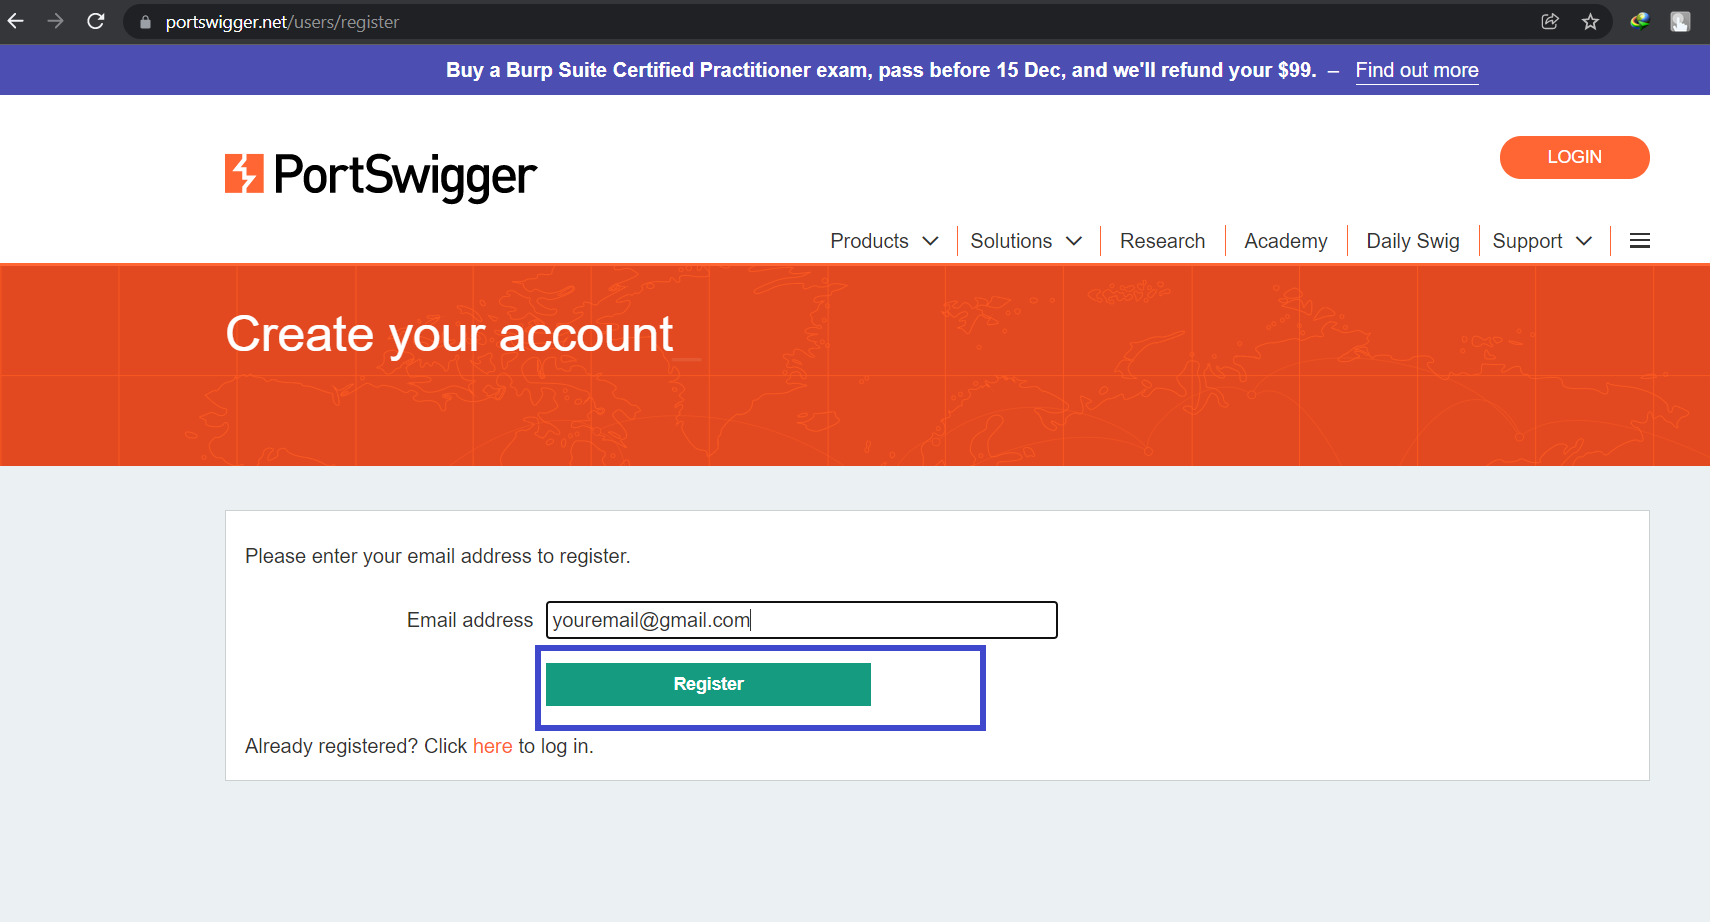
For the Burp Suite Tutorial let's solve a lab from Portswigger academy. Before jumping to solving the lab let's create a Portswigger account to access the Portswigger academy.
Step 1: Create a Portswigger account, click here to go to the registration page. Click on Register after entering your email address.
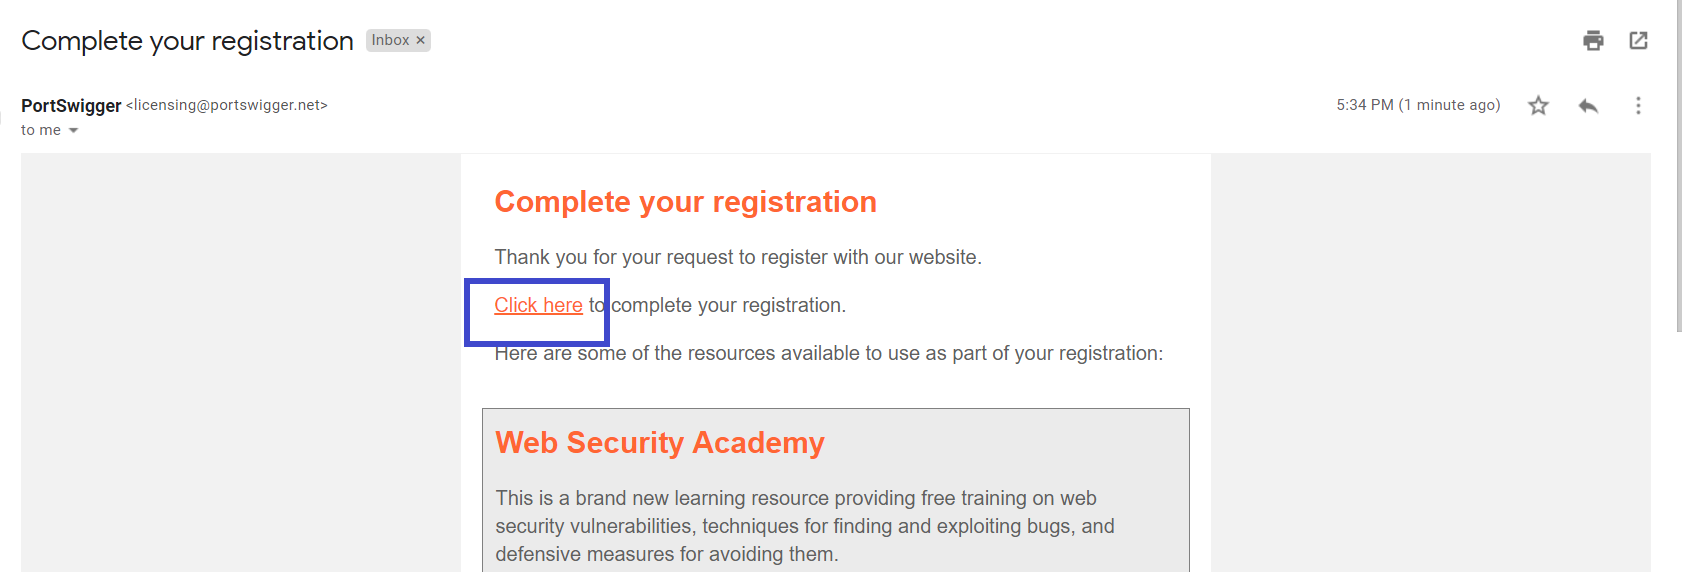
Step 2: Check your email, you will receive an email from Portswigger for further instructions. and click on Click here as shown below.
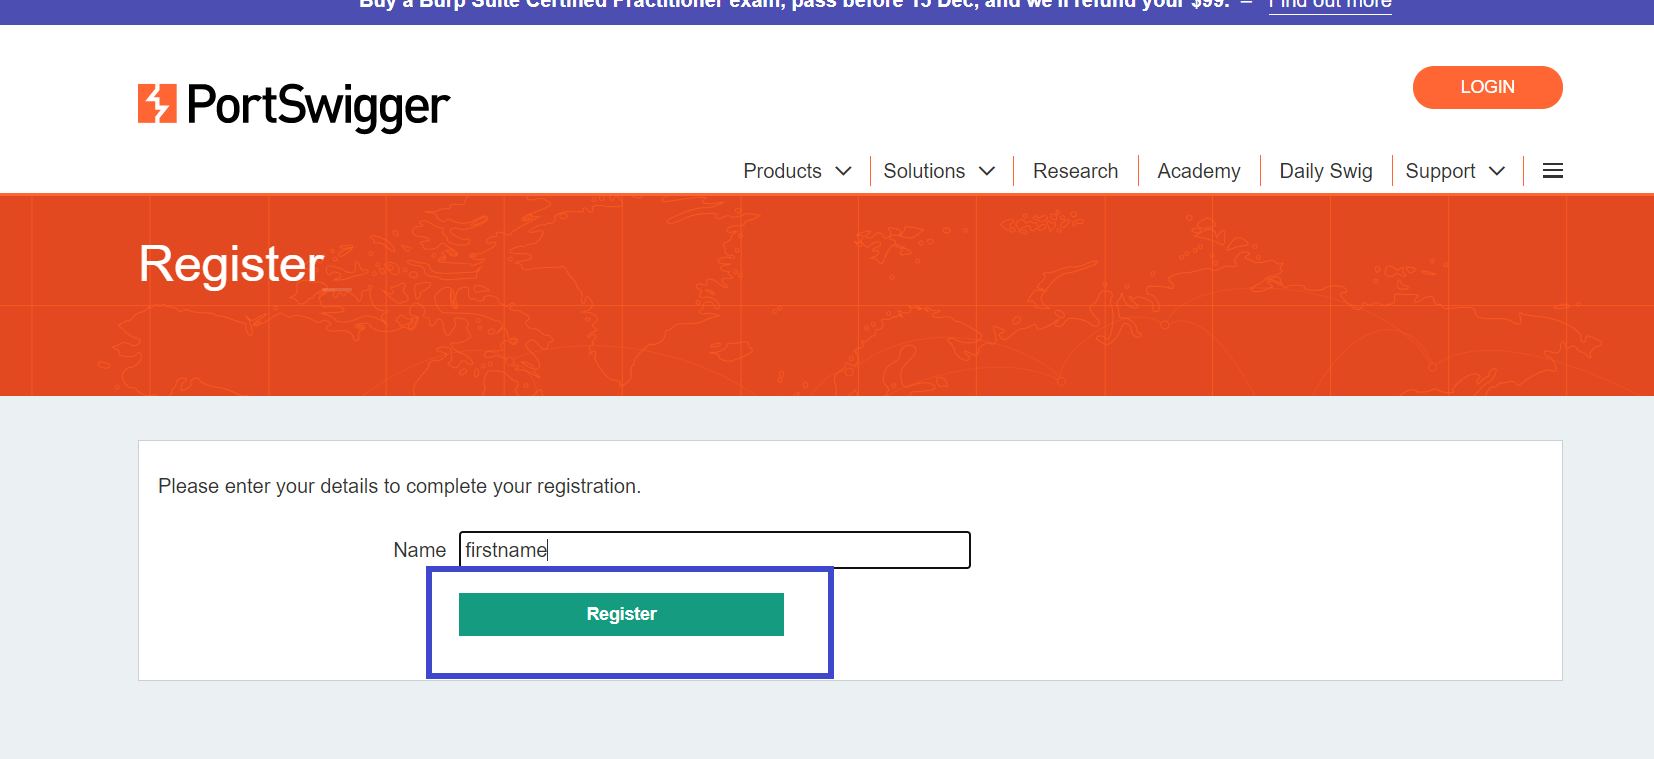
Step 3: A new tab will open, enter your name and click on Register.
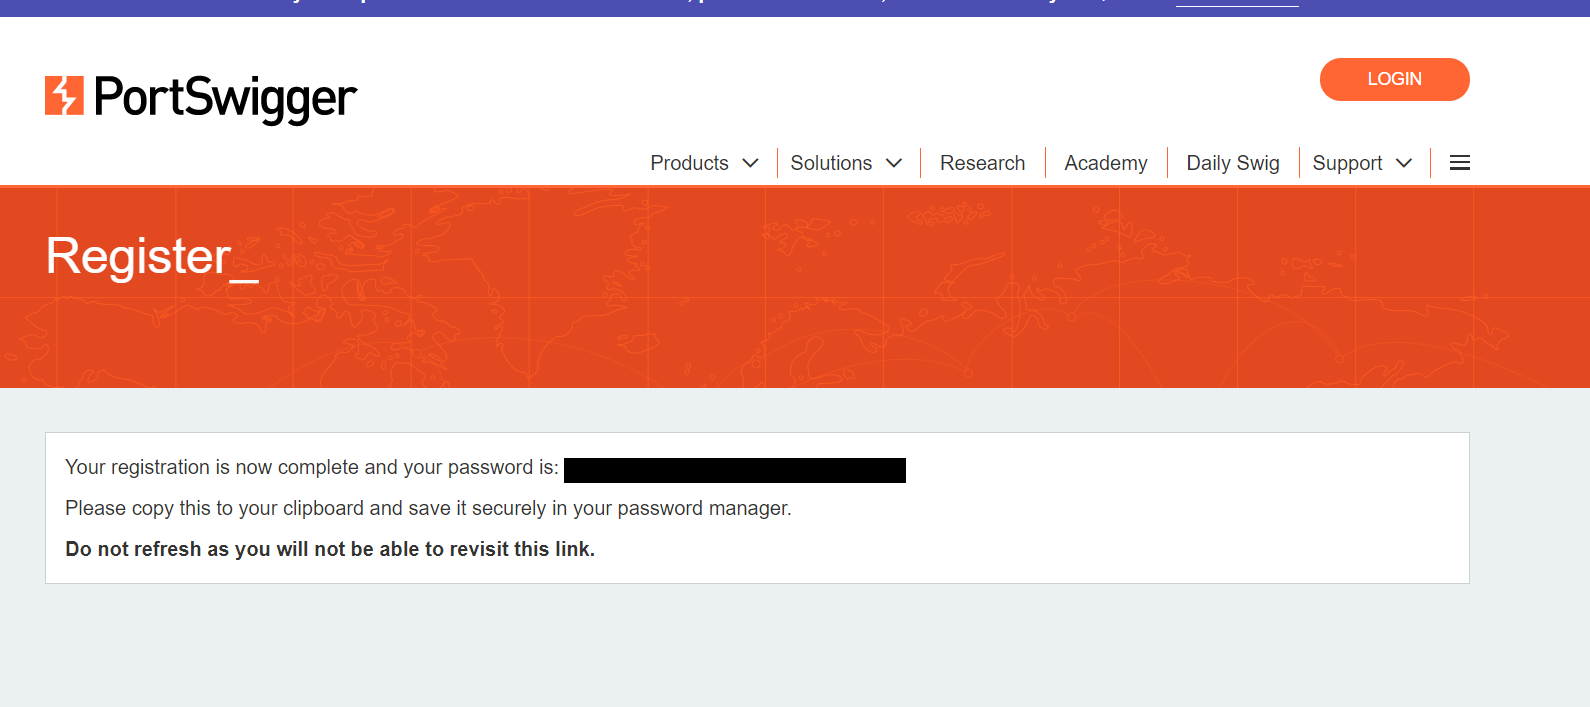
Step 4: Copy the password provided to you and save it in a safe place. and login with your account to access the Portswigger academy.
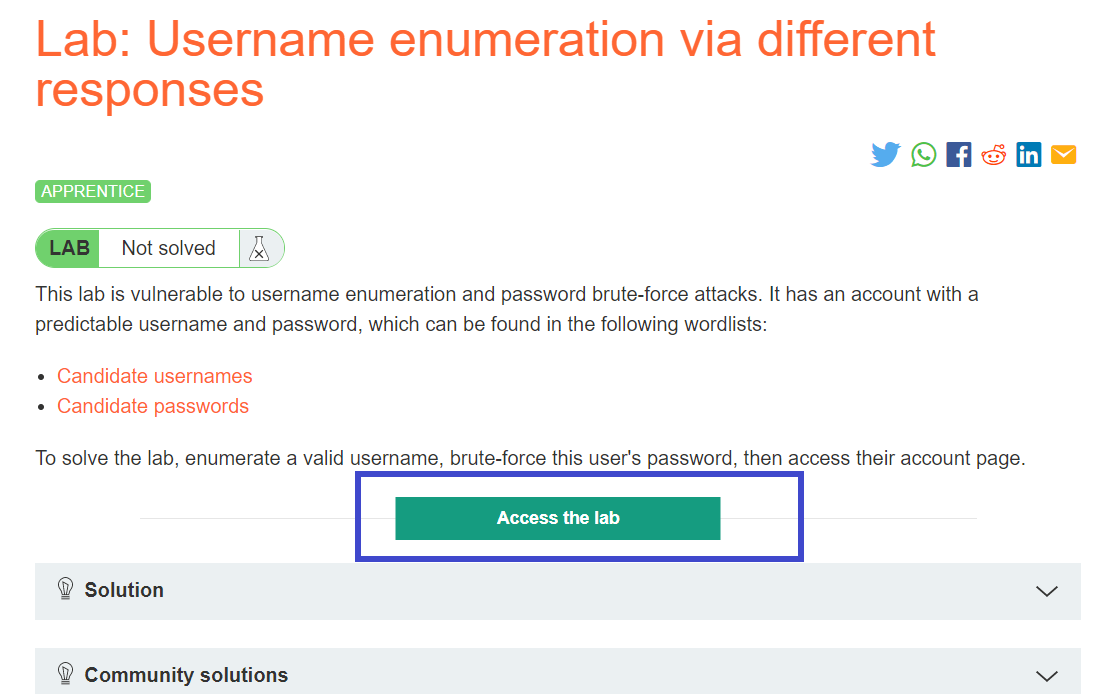
For this Burp Suite Tutorial, I will solve the Username enumeration via different responses Lab by Portswigger.
Step 1: Make two files username.txt and password.txt and copy the contents of candidate usernames and candidate passwords. After that click on Access the lab.
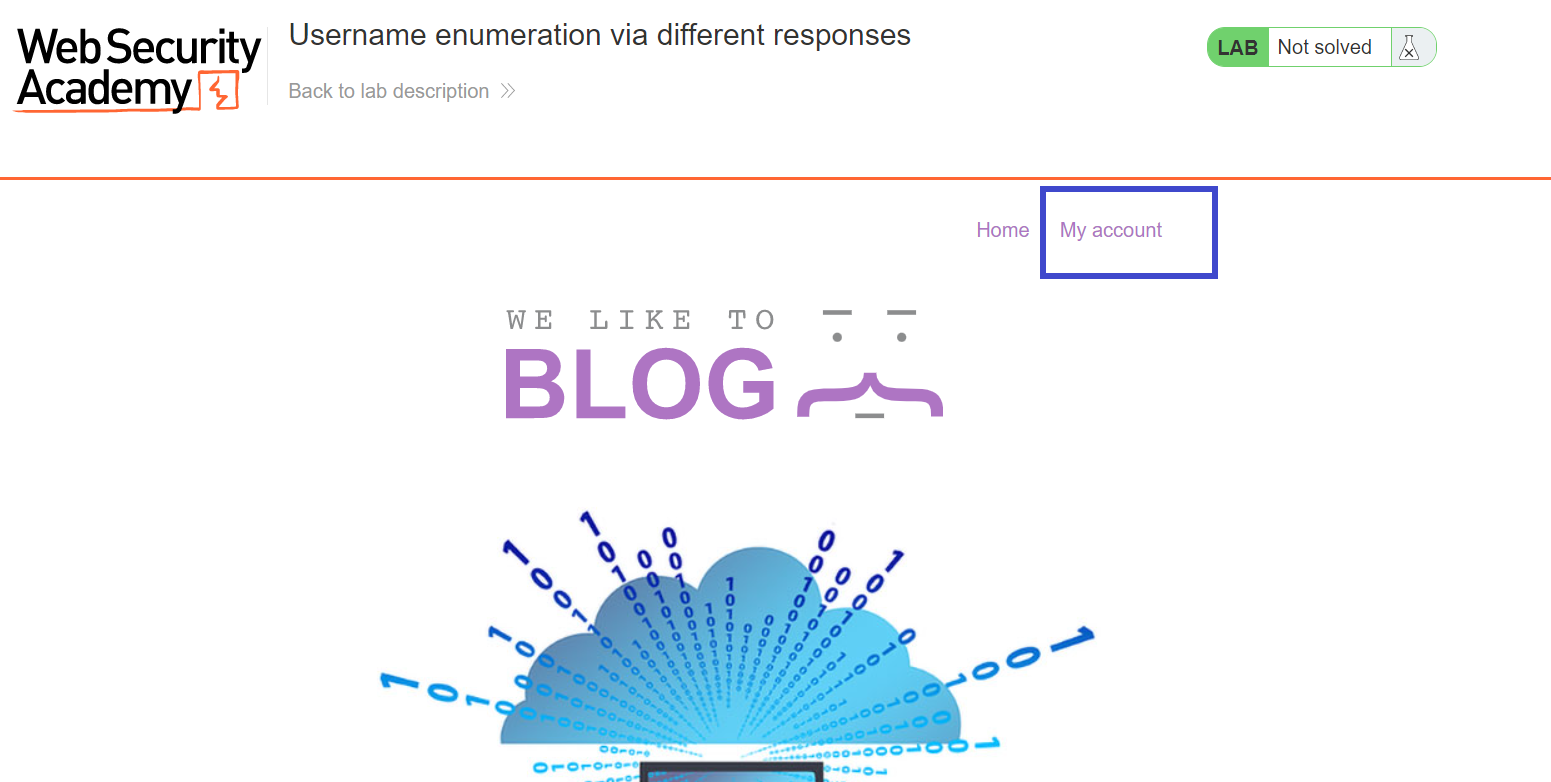
Step 2: Click on My account to access the login page.
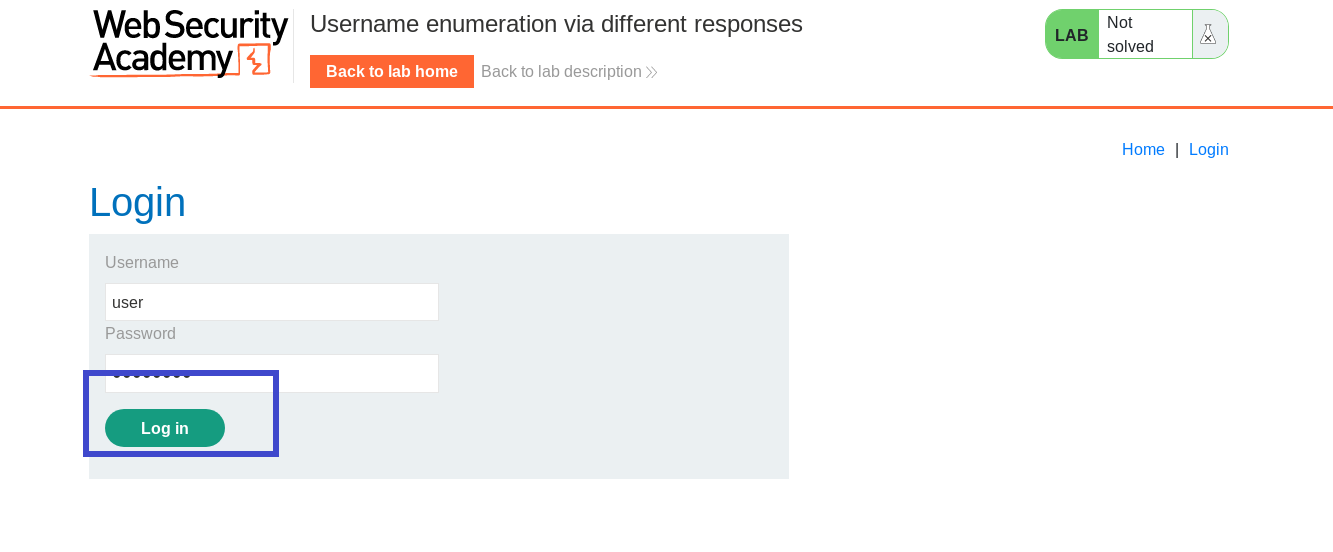
Step 3: After going to the Login page when you first start the lab and input any username and password. In this situation, I used user as the username and password as the password. and click on login.
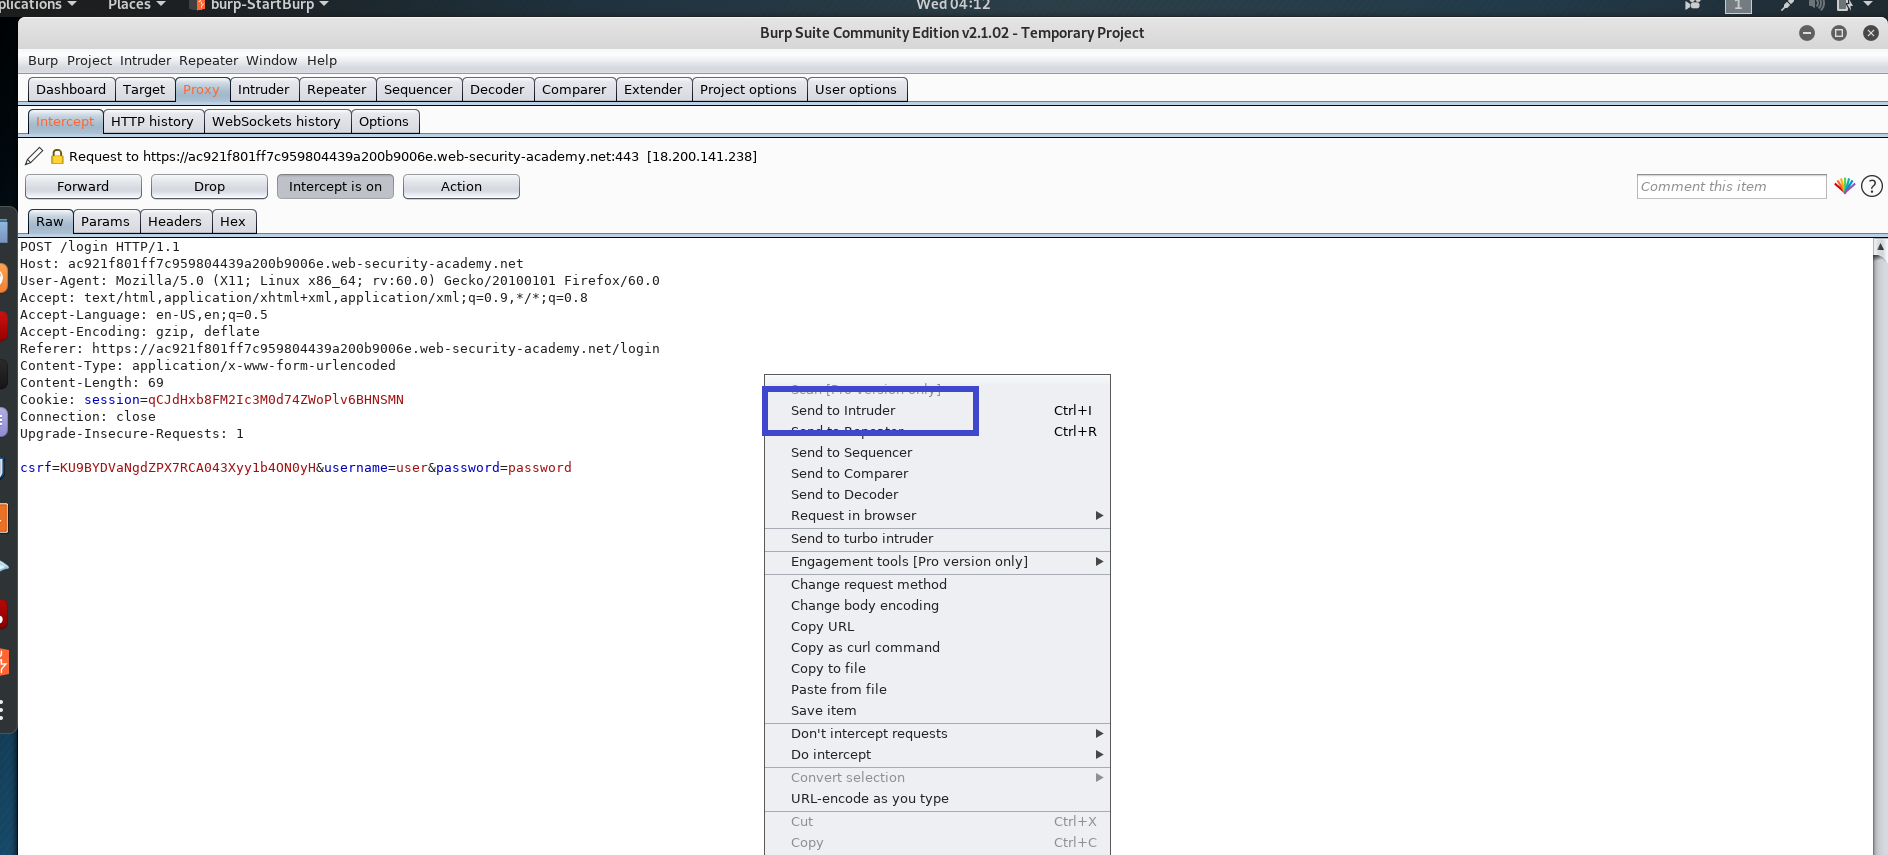
Note: Make sure the Burp Suite and your browser are properly configured to intercept requests.
Step 4: This intercept must be sent to the intruder so that we can plan our attack. Right-click and select Send to Intruder.
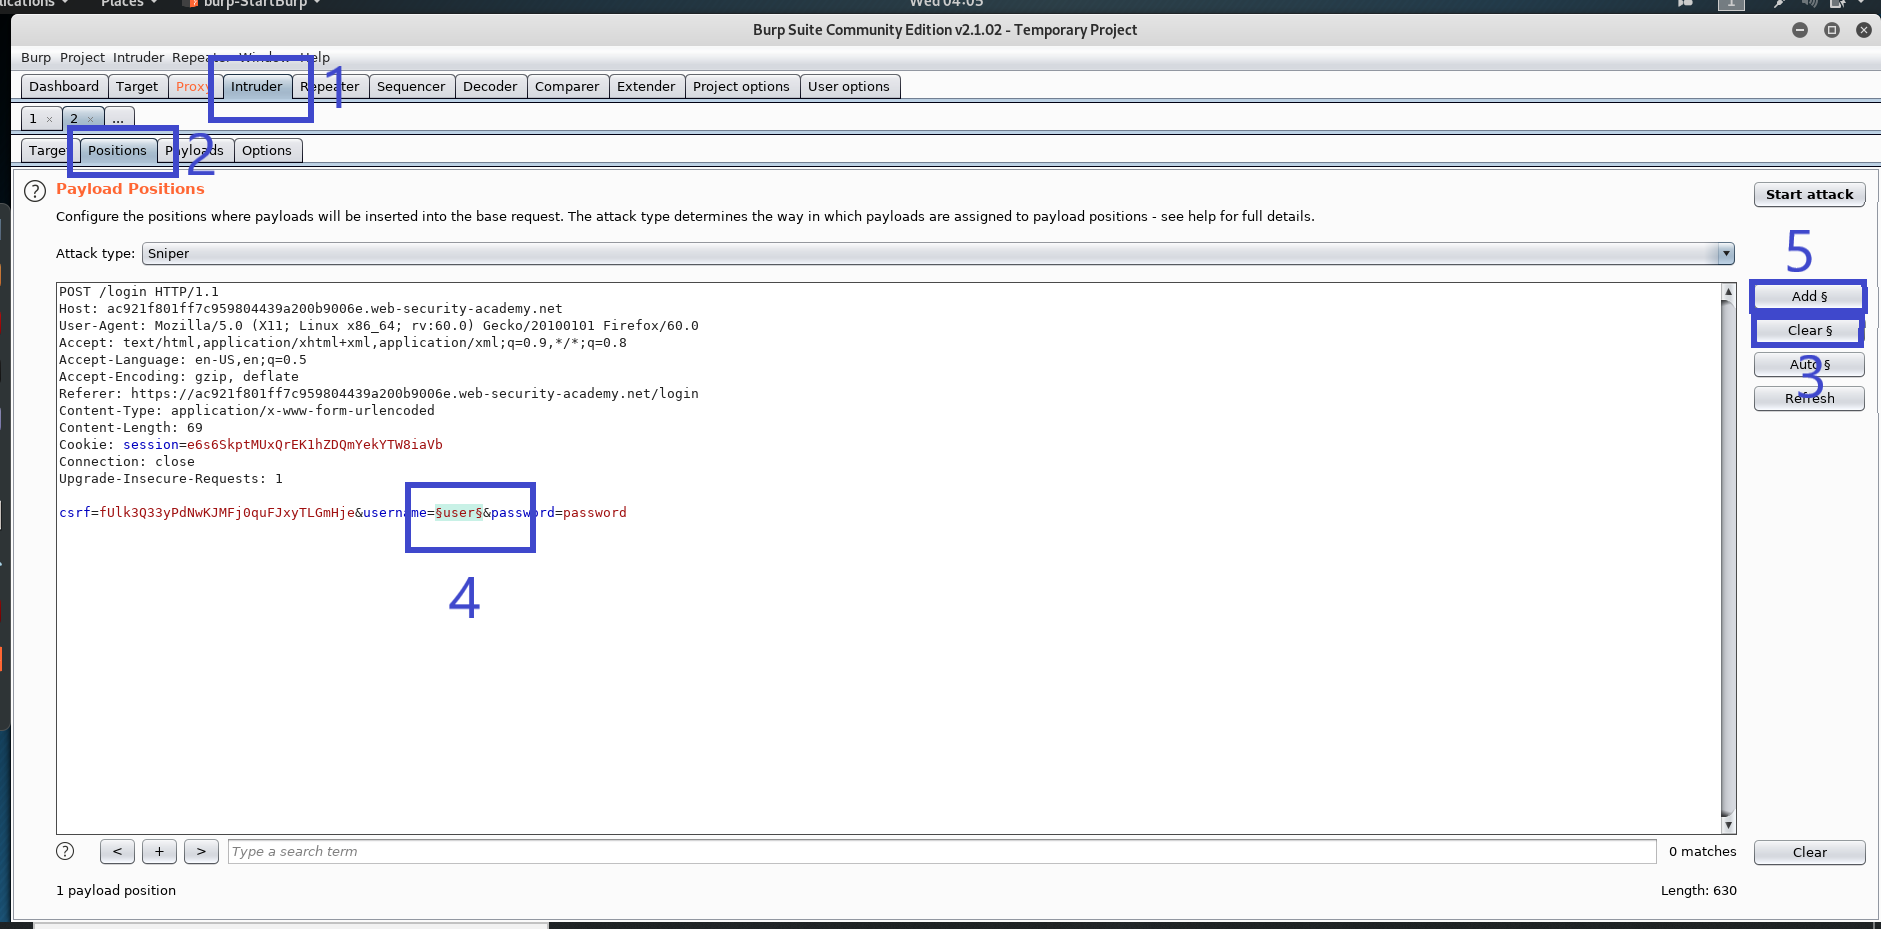
Step 5: Navigate to the Intruder tab > Positions. We set the attack type to sniper as the attack type, which means we only attack one parameter. To clear any default highlights created by the Burp Suite, click the Clear button on the right. Now select the parameter that we wish to attack, which is the username in this case. After highlighting the parameter for the assault, click the add button to choose it.
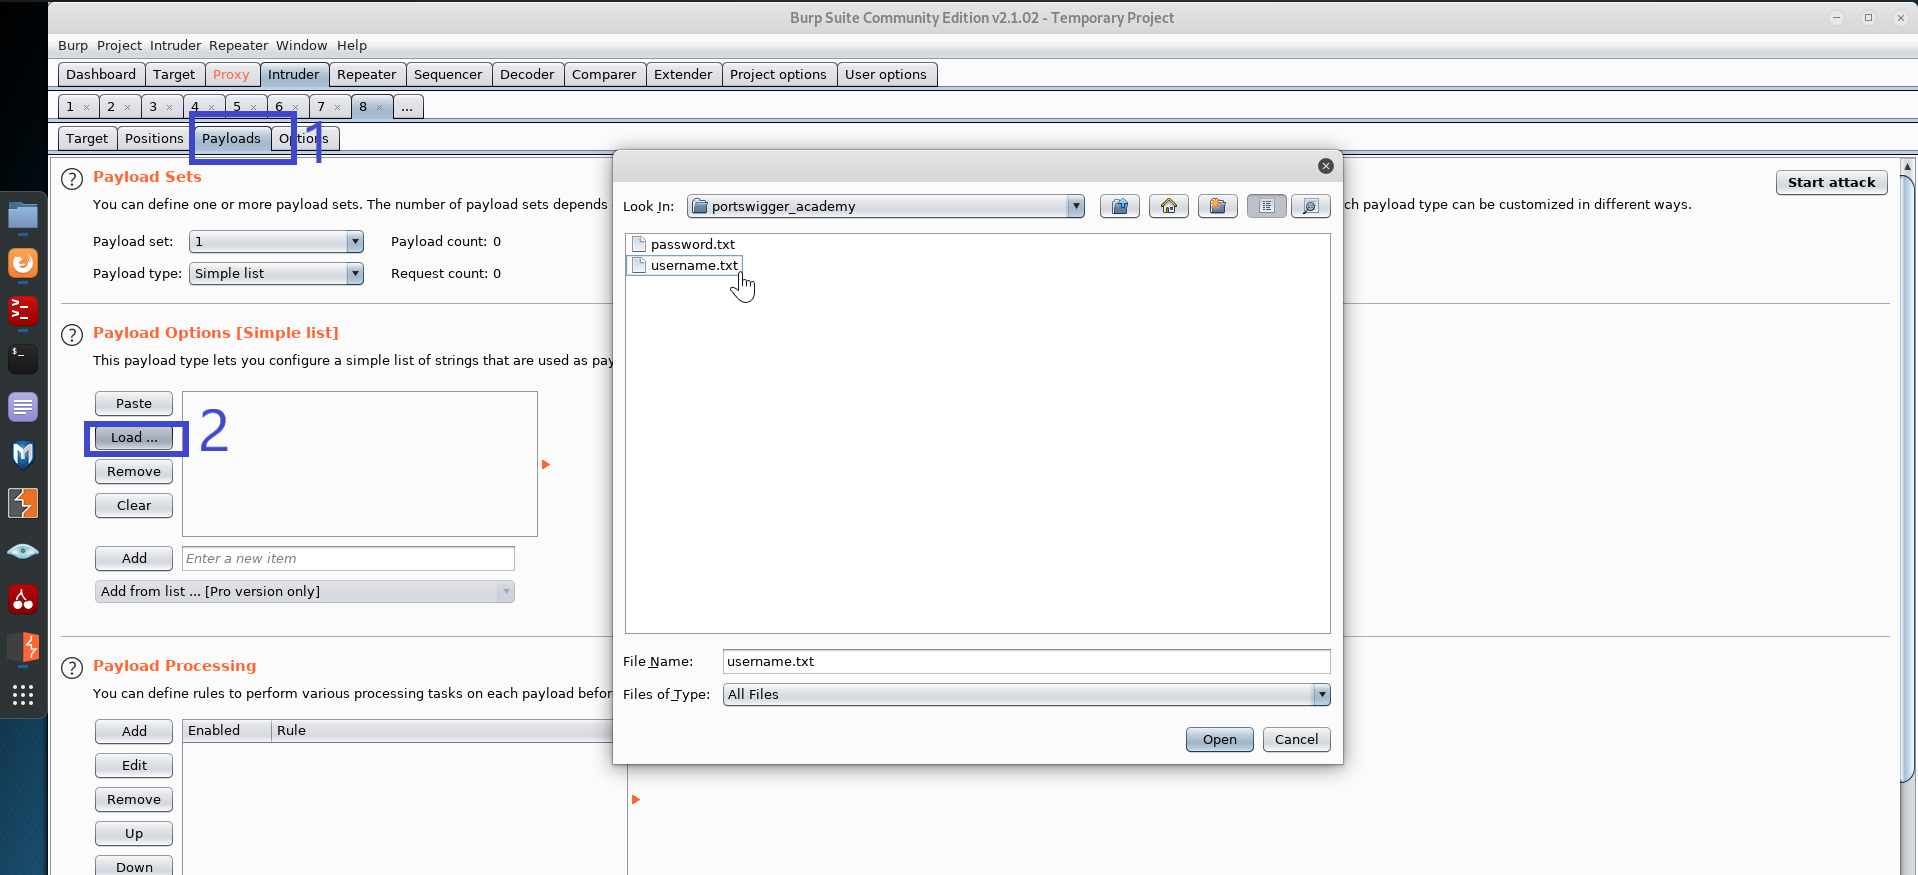
Step 6: Then, under Intruder, go to payloads and click the load button to select the username list from the payload options (for this lab the username and password list are given).
Step 7: Return to the positions tab and click attack when finished.

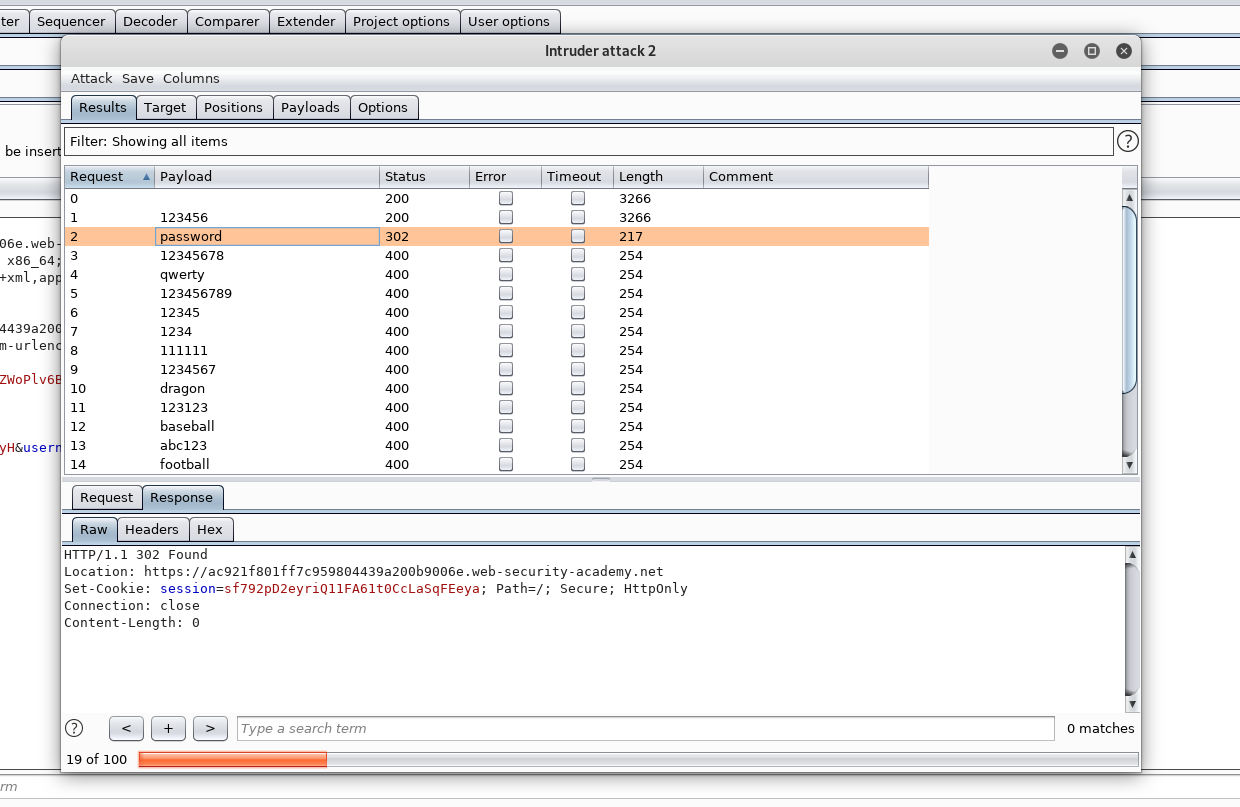
Step 8: When the attack is finished, go through the list and seek a request with the status "302," which is different from the others. This suggests that this could be a possible username.
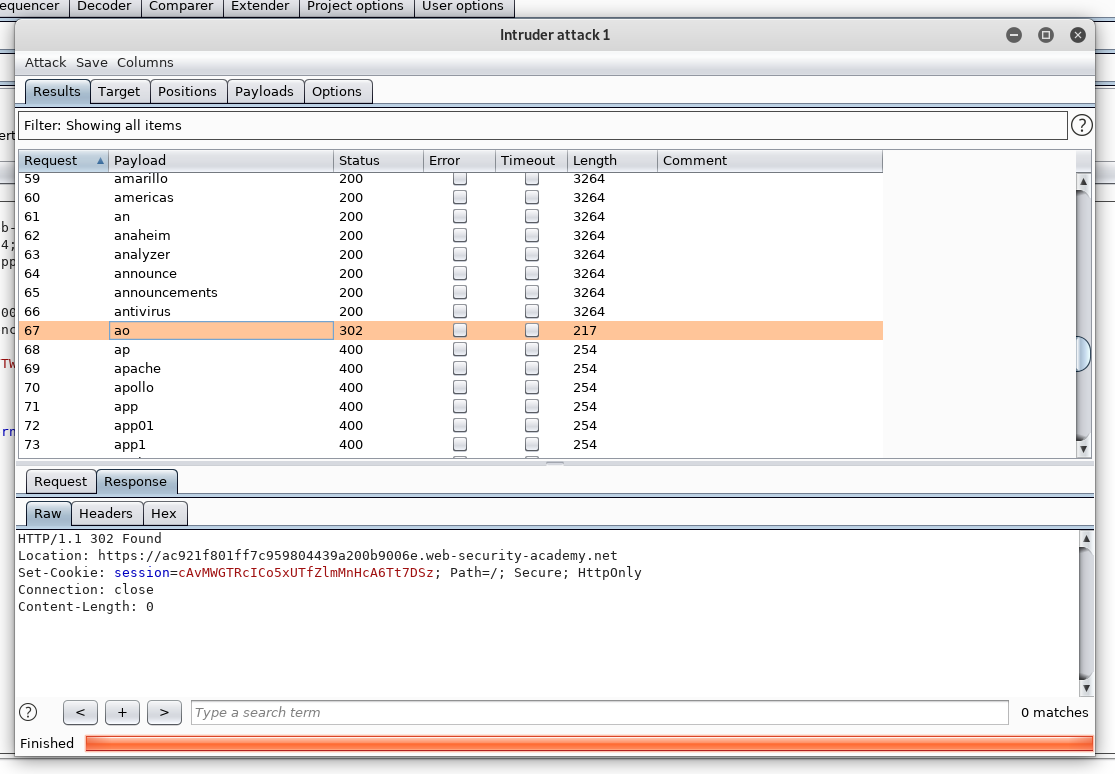
Let's go back to the login page and try ao:<somePassword> this time.
Instead of the error message "Invalid username," this time the message is "Incorrect password." As a result, we know that the username we just typed is correct. After that, we can merely focus on the password parameter and perform a brute force attack on it.
Let's use sniper mode to intercept the login page's post request and send it to the intruder.
The password is the next parameter we'll look at.
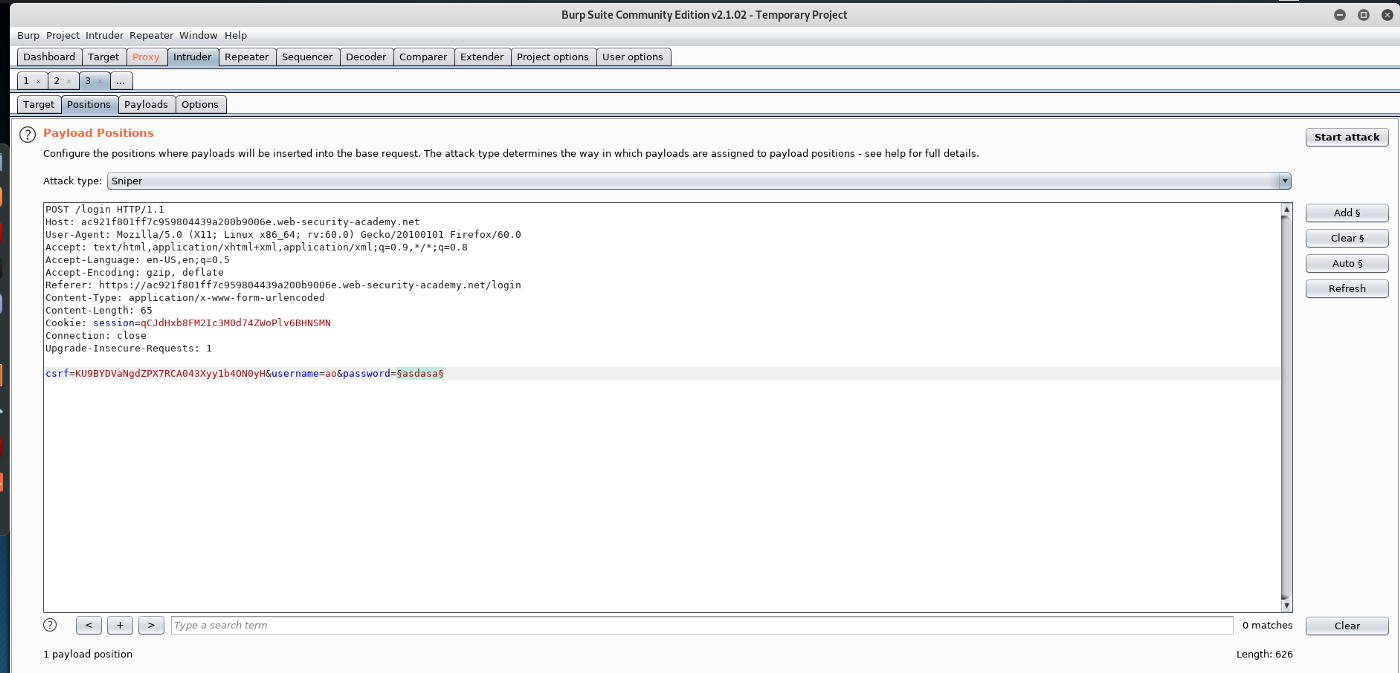
Step 9: We must load up our payload in the same way as previously, but this time using the password.txt list. Let's get started with the attack now that that's all loaded up.
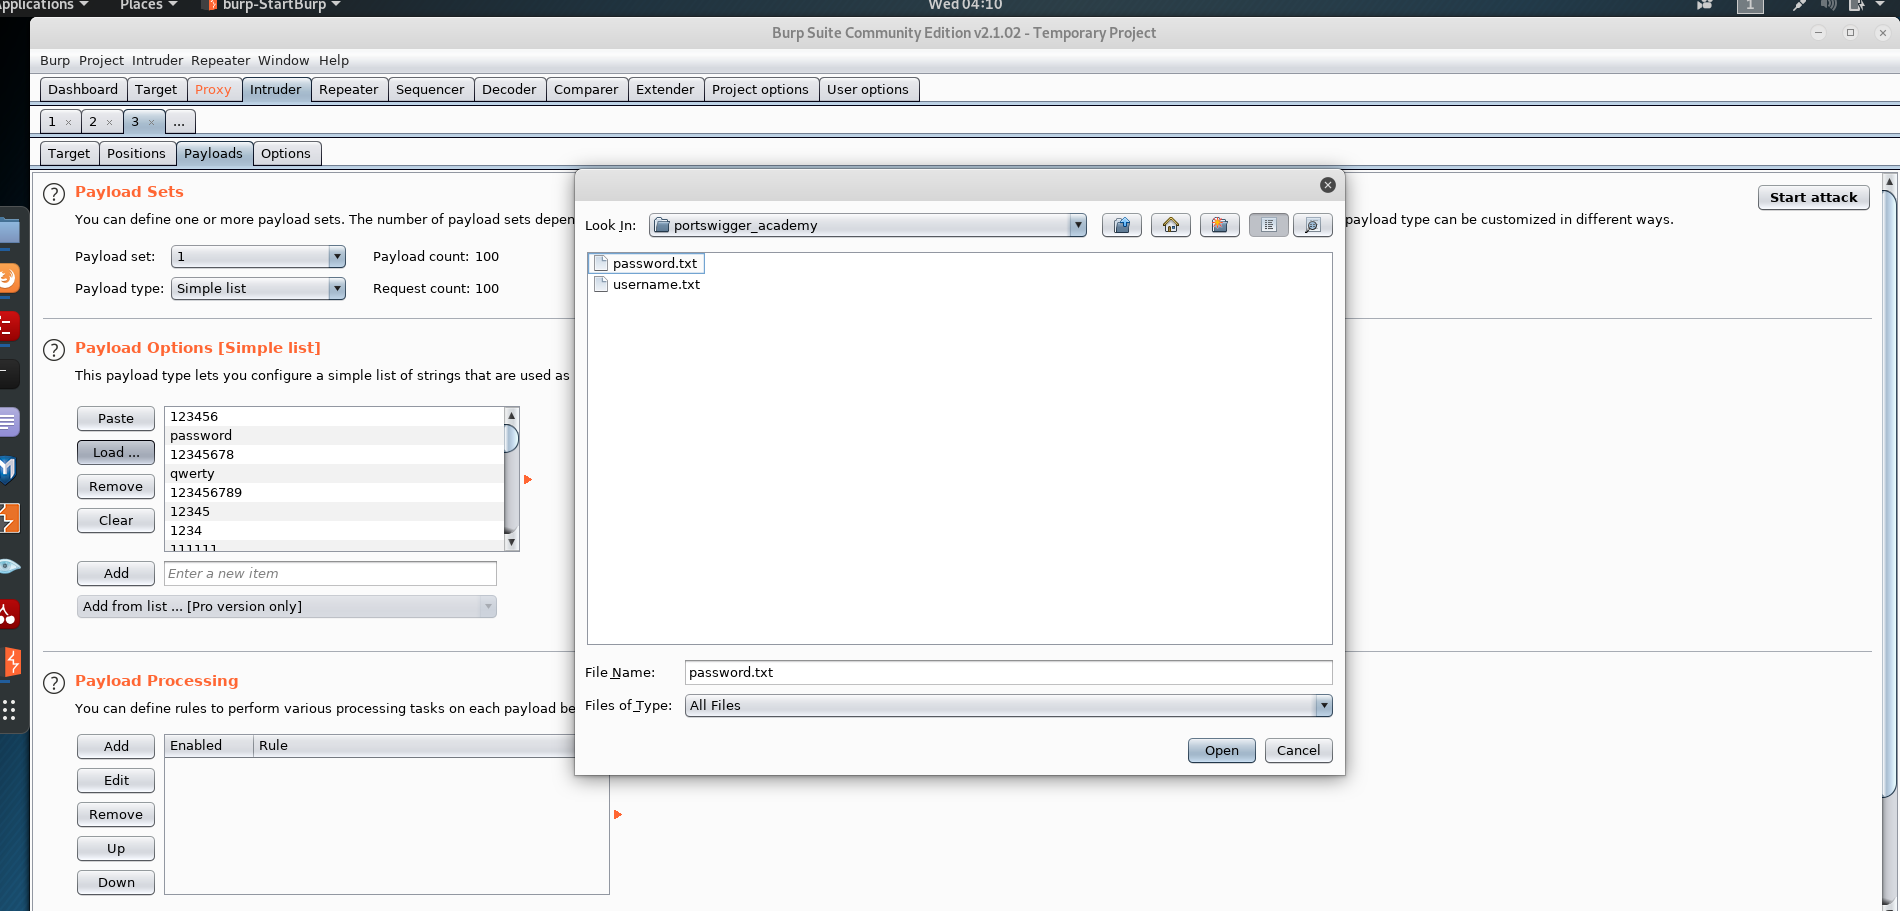
Step 10: We can observe that the password has a status of 302, which is not the same as the others. In this situation, we know that the user's password is password.
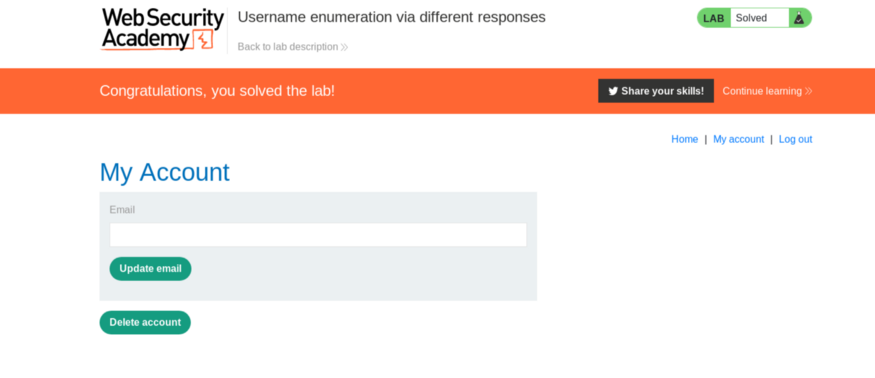
Step 11: We can successfully log in and navigate to the My account page to complete this lab using the credential [ao:password].
Keep in mind that the username and password for each lab session are different.
Conclusion
This article covered What is Burp Suite, How to Download and Install Burp Suite, How to Configure a Proxy on Our Favorite Browser or Using an External Proxy Extension, and How to Install a Certificate Authority.
We've also spoken about how to use other tools/components in the Burp Suite, such as an intruder, repeater, and target, to complete our security objective. After that, we completed a Portswigger lab as part of a follow-along instruction.
There is a Burp Suite edition for everyone no matter the level, whether you are a beginner or an expert in web application testing.