In this "How To Install Arch Linux" blog we will cover how to build Arch Linux, what are prerequisites for Arch Linux setup and also at the end we have answered the commonly asked questions
This operating system (OS) installation steps includes Arch Linux server download, Arch Linux install, how to make bootable pen drive, how to create a partition in Linux step by step, configuration, Arch desktop install. I also made a video for your ease of "How To Install Arch Linux 2021 [Installation Guide] " Click on the below video to watch the live installation.
- What is Arch Linux
- Arch Linux System Requirements
- Arch Linux Download
- How to Create Bootable Pendrive
- UEFI vs Legacy
- How to Boot Arch Linux
- Install Arch Linux
- Connectivity Checks
- How to partition Arch Linux
- Mounting Filesystem in Linux
- Configure Linux
- Generating fstab file in Linux
- Generating and Editing Locale File In Linux
- Configuring NTP in Linux
- Setting Up Hardware Clock in Linux
- Editing hostname in Linux
- Editing Hosts file in Linux
- Downloading and Installing GRUB in Linux
- Configuring GRUB Bootloader in Linux
- Installing and Enabling Network Manager in Linux
- Installing GUI Mode in Linux
- Commonly Asked Questions
What Is Arch Linux?
In simple words, Arch Linux is a light weighted & flexible distribution among other existing distributions. Its main motive is to provide simplicity, truly open-source and up-to-date OS. This distribution follows a rolling release model i.e, your kernel and software will always be up to date whenever available. It provides faster updates as compared to other versions of Linux. Updating Arch is quick, just run a single command and your Arch will be updated as a new Arch you don’t require to move from one version to another. By default, Arch is installed as minimal (An installation process without GUI) which called Arch minimal installation
Arch Linux System Requirements
- A 64 bit supported machine
- Required at least 1 GB of RAM (Our recommendation is 2 GB of RAM)
- At least 18 GB of free disk space ( Our recommended is 30 GB for basic usage with a GUI environment)
- Internet connection (Fast internet will speed up installation process)
- A USB drive with a minimum of 4 GB of storage capacity
Arch Linux Download
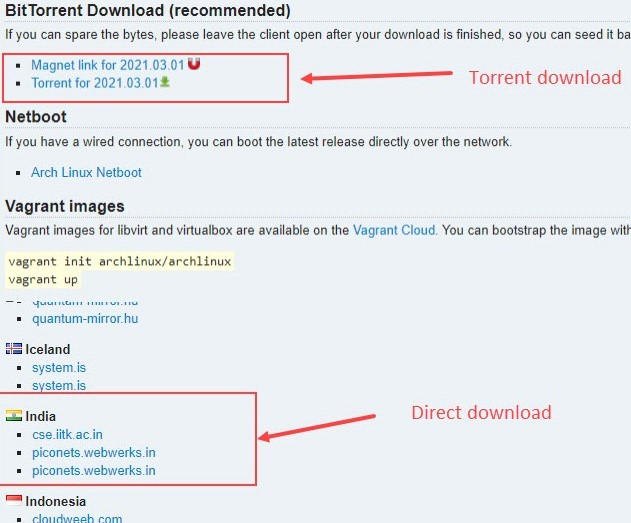
You can download archiso from the official website in two ways either you can choose torrent or you can go with direct. Here is the official link to Arch Linux.
Scroll down after opening the website and choose mirrors according to your country. In the below picture, I have chosen India.
How To Create Bootable Pendrive
If you are done with downloading Archiso our next step is to make a boot device. If you have a Windows platform you can easily do that by using the Rufus tool and If you are a Linux user then you can do it with a single command. Other mediums are available, like DVD and Network but they are not in much use.
dd if=<file> of=<device> bs=4M; sync; eject <device>
So here the file = the downloaded archiso file which will be in your downloads directory, the device is referring to your USB Flash drive name which will be shown like /dev/sdx, where "x" denotes your disk name depending on the system it may vary, and the rest of the command will be the same. below you can take reference of how exactly it looks like:
To know the full step-by-step process of how to make a bootable USB Flash drive with Windows and Linux you can click on How to Create Bootable USB | Linux Bootable USB | Windows Bootable USB
UEFI vs Legacy
So, these (operating system) OS installation steps vary at some points depending upon your system, which might be UEFI or a Legacy boot system. To look over which is your type, you can easily examine. so if you are using windows then type "System Information" in the search bar and it will open an application with details of your system then you just have to navigate for "BIOS Mode". The easiest method to find your type is UEFI or BIOS (Legacy) just look for a directory /sys/firmware/efi. The directory will be missing if your system is using BIOS. and if you can see it means you are using UEFI.
How To Boot Arch Linux?
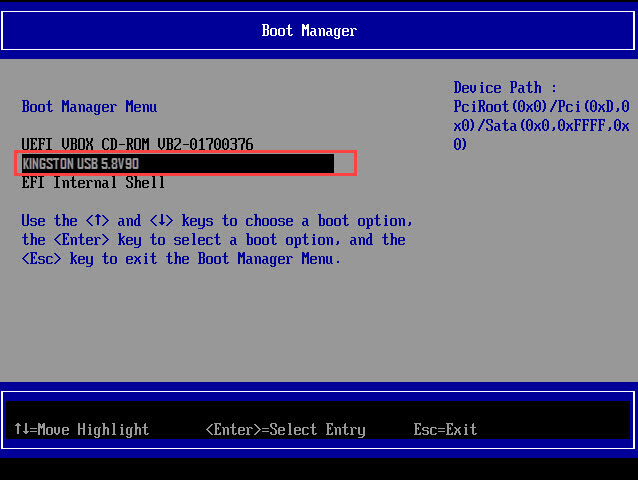
After making a bootable device now just attach your Pendrive to the system, restart your Laptop/PC and keep pressing the F2, F10 or F12 key from your keyboard to open the boot menu which looks like the below picture. Now just select your boot device and boot Arch. In my case, it is Kingston USB.
Note: Boot options keys may vary so click on Boot Menu Option Keys For All Computers and Laptops to know which one is for your laptop or computer.
Note: You can also use the installer (zen installer) to install Arch in GUI Mode, but according to my experience it is not stable right now. Hence I recommended going with the manual installation process instead of an installer.
Install Arch Linux
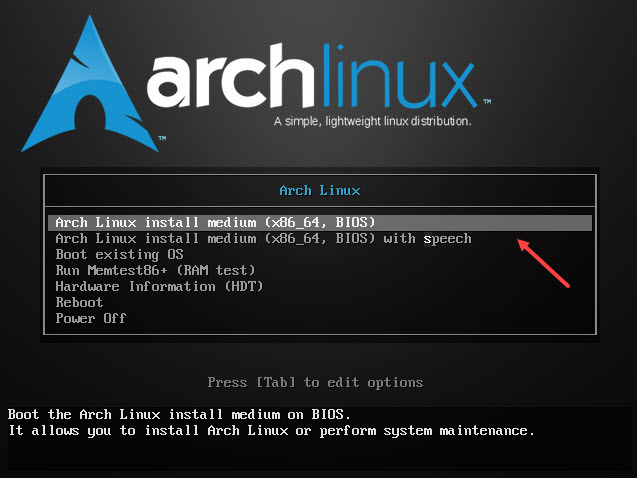
Step 1: Once you boot your device from the boot menu, then the below screen will appear from which you have to select the first option “Arch Linux install medium (x86_64, BIOS)” and then hit Enter key from your keyboard.
Connectivity Checks
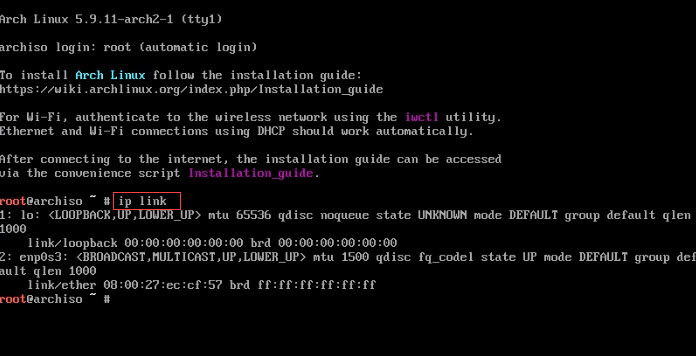
Step 2: Now you will see some arch boot log and system checks. So, within a few seconds, after examining, Arch will boot and logging you into a root prompt. Here we will insert the “IP link” command to test the availability of network adapters.
ip link
You can verify your output by matching it with the below picture to ensure that your command runs perfectly.
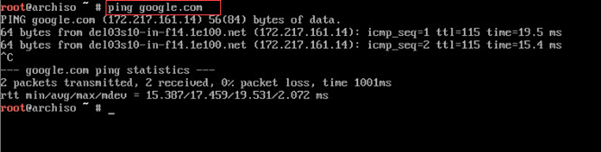
Step 3: We will load and install the package but before that, it is good to examine your internet connection by inserting the “ping” command.
ping google.com
In the below picture, you can observe the output of a ping, where packets are coming in sequence, so it means the Internet is working. In case you get “host unreachable” then please check your internet connection or router.
Step 4: Now after completing connectivity checks, we can move ahead to our installation. Here we will add mirrors to our “mirrorlist” file so that our packages will download at maximum speed from the nearest server, but this step is optional you can completely skip that if you have a fast internet connection.
reflector -–verbose -c “India” --sort rate > /etc/pacman.d/mirrorlist
Here reflector is used to find the nearest mirror and the sort rate is used to sort the nearest mirror from your nearest server, you can choose the server according to your location In my case it’s India.:

Step 5: After adding a mirror our database also requires a fresh updated mirror list. Let’s sync the Pacman repository so that you can download and install the software.
pacman -Syy
Note: In some cases, Caps lock does not work when you want to use upper case, so if this is your case then use the shift key instead of caps lock e.g., Shift + A will type capital A.
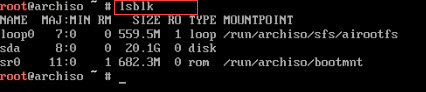
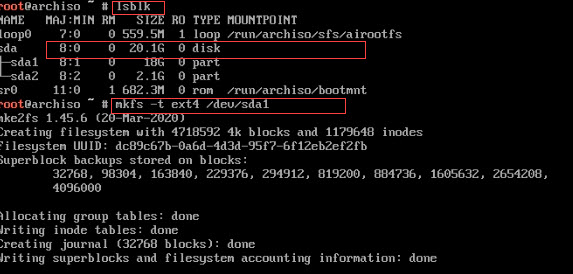
Step 6: Now we have completed all the pre-settings and checking. So, we can now begin with the installation process of our operating system. So, let’s insert “lsblk” command into a list of devices currently active with your system.
lsblk
Here our main focus is on our disk where we want to install Arch. So, In my case, its name is“sda” of 20.1GB size. Your case size might be varied, but the device label “sda” is mostly the same if you are using a fresh disk.
So from this step, you will not only get to know how to install Arch OS on your disk you will also learn how to create partitions on a disk using a command line with fdisk utility.
How To Partition Arch Linux?
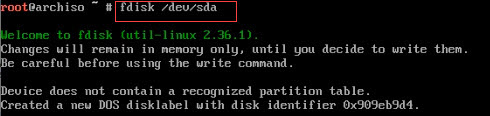
Step 7: Now we will begin with partitioning our disk by using fdisk utility (It is a pre-defined command-line utility that helps to customize partitions of disks). You can also go for cfdisk if you want GUI utility. So, type fdisk and your device name next to fdisk.
fdisk /dev/sda
change “sda” with your device name (In my case the device name is "sda") and the rest of the part will be the same for you.
Step 8: Now we are in fdisk utility where we will run a few commands to create partitions. So, here we need to create two partitions one for “root” and one for “swap”.
Enter "p" to check the partition table

Enter "n" to create a new partition
In the below picture, I have first-run “p” command and got nothing, which means I have currently no partition and then I have run the “n” command to begin with a new partition. (If you are using a fresh disk you will see the same)
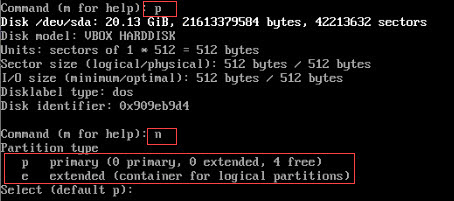
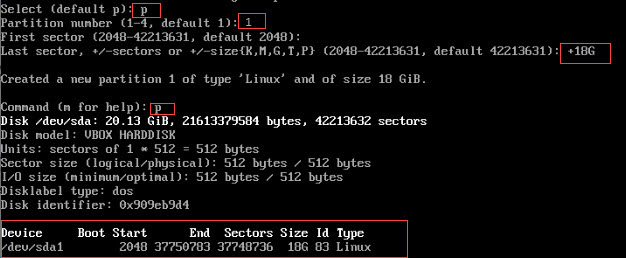
Step 9: After that, it will ask you to choose partition type so we will choose primary by typing “p” again
Follow the below sequence of steps carefully.
- Now it will ask for a partition number so we will go with default by entering “1”
- Next, it will ask for sectors, so here just we will hit “enter” to go with the default
- Now it will ask you for the size of the partition. So here I have chosen 18GB by entering “+18G” you can choose any size but make sure it is more than 15 GB
- Now we have created one partition which you can examine again by typing the “p” and now you will able to see one new row. It means we have created one primary partition which we will use for root.
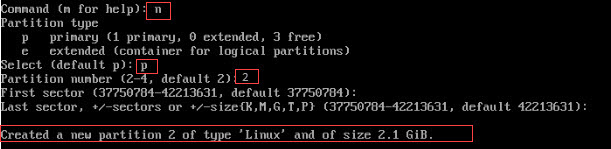
Step 10: Here we will repeat our above step [8] & [9] to create one more partition for swap. Hereafter pressing “n” you can blindly press “Enter ” from your keyboard three times to create a partition with the remaining disk size. I have done the same in the below picture.
Step 11: Now we have also created our second partition, but to convert this partition into swap, we need to change the type of this partition from Linux to Swap. So, to do this follow the below sequence of steps:
- Type “t” and press “Enter Key”
- Now choose your partition number which will be 2 so just type “2” and then again hit "Enter"
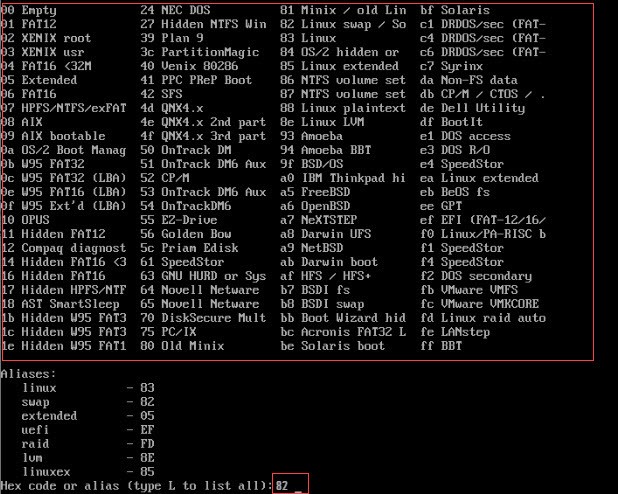
- Now it will ask you to type a value so that you can convert it into your desired type so to know the code you just have to type “l” and hit "Enter"

Step 12: Now it will show you a list of types. So here just navigate to “82 Linux swap /Solaris” and then just type “82” and press “Enter”
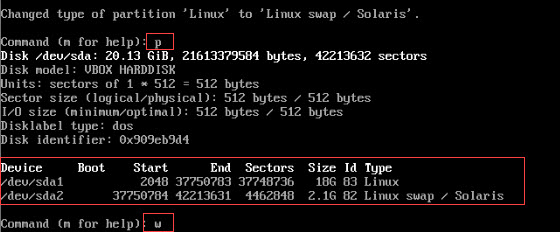
Step 13: Now we have changed our type which you can examine by typing “p”. So, we are done with partitioning, now we can save it by entering “w”. So, it will update the changes.
Mounting Filesystem In Linux
Step 14: Now is the time to clean our newly build partitions and make them available for our use, for that first type “lsblk” again to check the device name. Now, as you can see below the picture it is showing sda1 and sda2 which we have currently created. So, I will clean the first sda1 for root. For that run “mkfs” with “ext4” to format it into ext4 format.
mkfs -t ext4 /dev/sda1
change device name with yours if you have a different in my case it is sda1.
Step 15: Now after formatting root, we will format our swap device also, for that run “mkswap” command and choose your second partition, In my case, it is "sda2"
mkswap /dev/sda2 (for formatting swap)
Now we will mount the root partition to the mnt directory.
mount /dev/sda1 /mnt (For mounting root)
So let’s enable our swap partition with the below code.
swapon /dev/sda2 (for enabling swap)

Step 16: Now we will run “lsblk” command to check our mounted filesystems. So, in the below picture, you can see that both partitions which we have mounted.
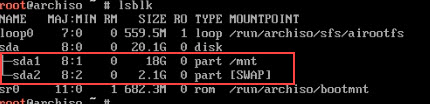
Now we have set up everything which is needed to install the package.
Note: So Now you have learned how to create partitions. So, like that, you can also create one more partition which you can use later for your personal files storage, but this is also optional.
Let’s install the package in our newly created partitions.
Configure Linux
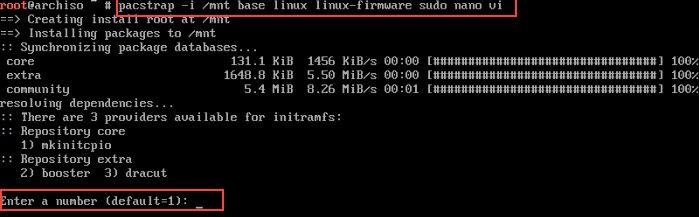
Step 17: Now we will move ahead to setting up Linux. So, we will now install Arch Linux base, firmware and other important utilities with the Arch package to our root filesystem by running the below-mentioned Arch Linux install command.
pacstrap -i /mnt base linux linux-firmware sudo nano vi
After entering the command, it will ask you a few times to enter 1 and Y so just do these same to go with defaults. It will take some time to install so just wait and give default inputs when it asks.
So, we are done with our installation. Now we can start configuring our system
Now you will get to know what things are required when any Linux installed. Basically, these steps are automatically performed in the backend when installing any other Linux like Ubuntu, Fedora, Mint, etc. So, let’s begin with the configuration of Arch and update our brains with this new knowledge.
Generating fstab File in Linux
Step 18: Now we need to generate "fstab" file for defining a permanently mounted system. Basically, this file is a very important file in all Linux systems whose main motive is to store information on filesystems and their mount points so, run the below-mentioned code
genfstab -U -p /mnt >> /mnt/etc/fstab
(/etc/fstab is the location or path of a file) Now After that, we will change our root prompt into our installed Linux root prompt for internal configuration with the chroot.
arch-chroot /mnt

Generating And Editing Locale File in Linux
Now we will set our language by generating and editing the locale file
Step 19. Let’s set up now our system language, date, numbering and currency by editing the locale file. So first we will create it and then we will edit it So, follow the below line code.
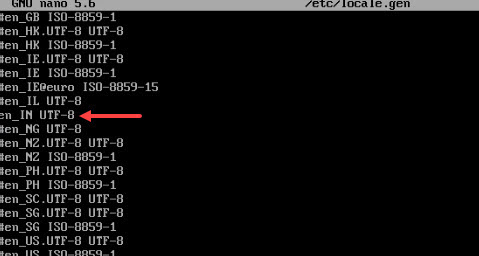
nano /etc/locale.gen

Step 20: Now we will edit our locale file, so navigate to your field according to your region. In my case it is India so I am choosing “en_IN UTF-8”. To allow it, just remove the “#” from that and save the file by using the shortcut key "Ctrl+o" and then exit from it by "Ctrl+x". (Take reference from the below image for removing #).
Step 21: Now we will generate locales by running the locale-gen command.
locale-gen
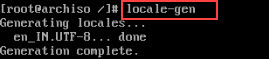
Now we are done with the change locale step. so we will set a date and time now.
Configuring NTP in Linux
Step 22: Now we will configure the locale.conf file set the timezone and enable NTP (network time protocol) so that it can update time according to the internet. So, follow the below line codes. and remember to replace “IN” with your region which you also have set on the step [20]. (Rest of the part will be the same for you)
echo “LANG=en_IN.UTF-8” > /etc/locale.conf
Now here again select a time zone according to your location, In my case, it is Asia, Kolkata. (Rest of the part will be the same for you)
ln -sf /usr/share/zoneinfo/Asia/Kolkata /etc/localtime
Let's set NTP so that it automatically set time with the internet, following the below-mentioned code.
timedatectl set-ntp true

Setting Up Hardware Clock in Linux
Step 23: Now let’s set the hardware clock in our system from system to hardware by following the below line code.
hwclock –systohc
You can verify changes by running the date command.
date

Editing Hostname in Linux
Step 24: Now we will move ahead and edit the hostname i.e., (your computer name basically) by following the below piece of code.
echo techofide > /etc/hostname
You can give a name of your own choice instead of "techofide". Now let's create the hosts' file to add the host.
nano /etc/hosts

Editing Host File in Linux
Step 25: Now we will add these lines inside our “hosts” file.
127.0.0.1         localhost

::1               localhost

127.0.1.1         techofide.localdomain       techofide
Give the hostname which you have previously chosen instead of "techofide". (rest of the content will be the same)
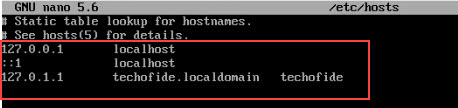
Now save the file by using the Shortcut key "Ctrl +o" and exit from that with "Ctrl +x".
Step 26: Now let’s set a password for our root user by following the below code.
passwd
After entering it will ask password so type the password of your choice. (In Linux whenever you type any credential it will work as silent i.e, during typing it will not reflect anything on your screen as acknowledgement, so type blindly your password)

Step 27: Let's create one user and add it to the wheel group so it can also perform root tasks. So, to do that just follow the below piece of code. (The "wheel" is just the name of the group where normal users get admin rights after adding)
useradd -m -G wheel -s /bin/bash kanav
At the end of the above code, you can choose your name instead of kanav

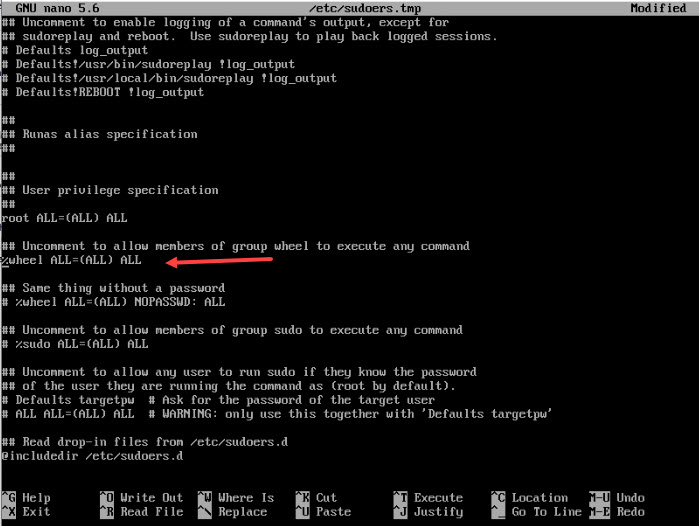
Step 28: Now we have to build a user and added it to the wheel group but still we need to allow the wheel group for that we will first open visudo file.
EDITOR=nano visudo

I have chosen a nano editor you can choose of your choice otherwise just go with the same.
Step 29: Now let’s edit the sudoers file which we have opened now. So we need to navigate the “wheel” and remove #. See the image for reference.
Downloading and Installing GRUB in Linux
Step 30: Now we come to almost the end of our configuration with a very important step where we will install GRUB Bootloader so that when we restart our system we have the option to choose and boot our system.
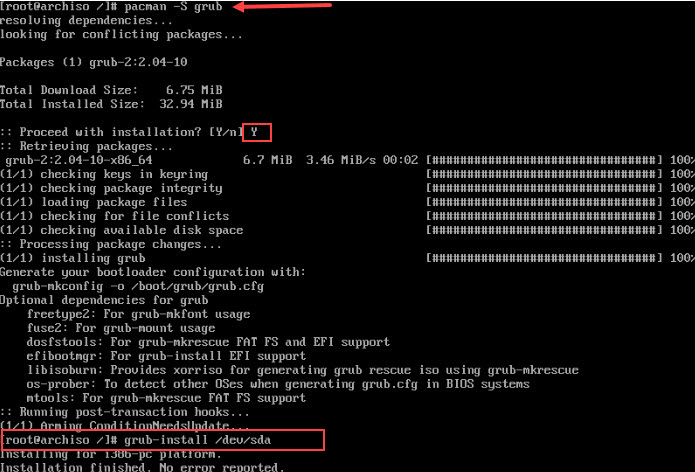
- Let’s download GRUB first by following the below code. (See the below image for reference)
pacman -S grub
- Now after download, we will install it into our disk by following the command. (look over the below image for reference)
grub-install /dev/sda
Remember if your disk name is different during the partition then choose the same one.
Configuring GRUB Bootloader In Linux
Step 31: Now we will create a configuration file of the grub with the help of “mkconfig” utility.
grub-mkconfig -o /boot/grub/grub.cfg

Installing And Enabling Network Manager In Linux
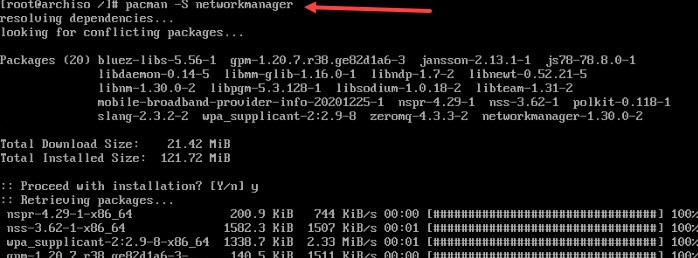
Step 32: Now we will install Network Manager, which will install wifi and other important network drivers in our newly installed Arch system.
pacman -S networkmanager
Step 33: After install now we will enable Network Manager.
systemctl enable NetworkManager

Step 34: Now we are done with installation so we will now exit from the terminal and unmount our root partition and restart our system, So follow the below sequence one by one.
exit

umount -R /mnt

reboot

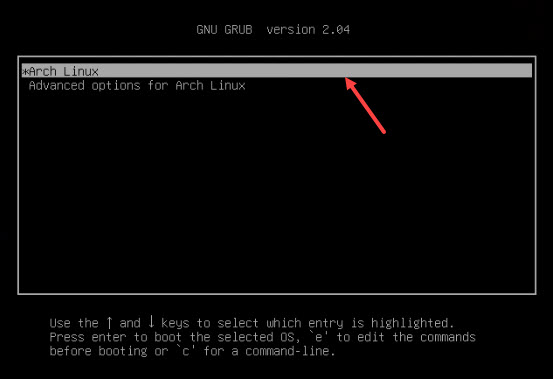
Step 35: Now during reboot, our grub will open where it asks you to boot your Arch Linux. So just press Enter.
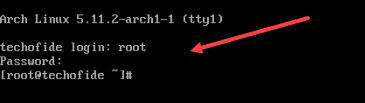
Step 36: Now after booting you will see an Arch. A login prompt open where you have to type your credentials. So just log in with your root id password which we have set.
Step 37: Now we will set a password for our user which we previously created. I have created kanav so I am setting a password for it by using passwd command.
passwd kanav

Now we have completed the Arch Linux installation guide.
How to Install GUI in Arch Linux
Now we know how to install Arch but if you want to use GUI Interface then follow the below piece of code
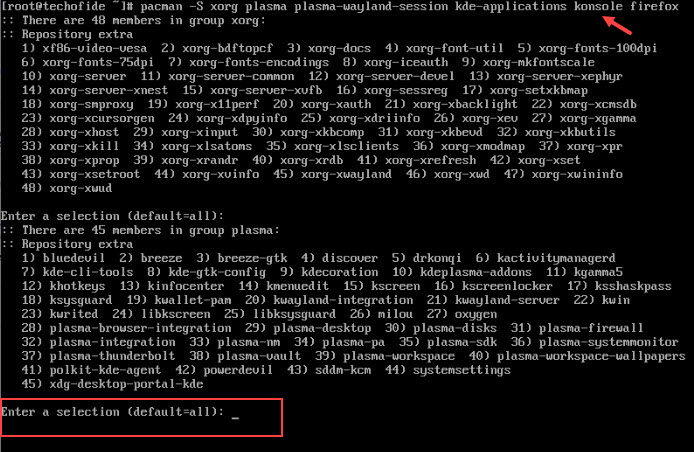
Step 38: Now we are in CLI (Command-line interface) so if you want GUI mode then we can download it. So let’s start with our Arch Linux desktop install process by below command
pacman -S xorg plasma plasma-wayland-session kde-applications console firefox
After executing this command it will ask you serval times for other inputs which you can just bypass by pressing "Enter"
It not only tells you how to install GUI in your system, but it also shows you how you can install applications in Arch. Here I have installed firefox and other pre-defined KDE applications also along with GUI.
Step 39: So, we have installed a GUI environment with KDE Plasma but you can also choose a desktop environment according to your choice like you can install gnome, Xorg etc.
Now let’s enable display drivers and reboot our system. So follow the below sequence of code one by one.
systemctl enable sddm

reboot

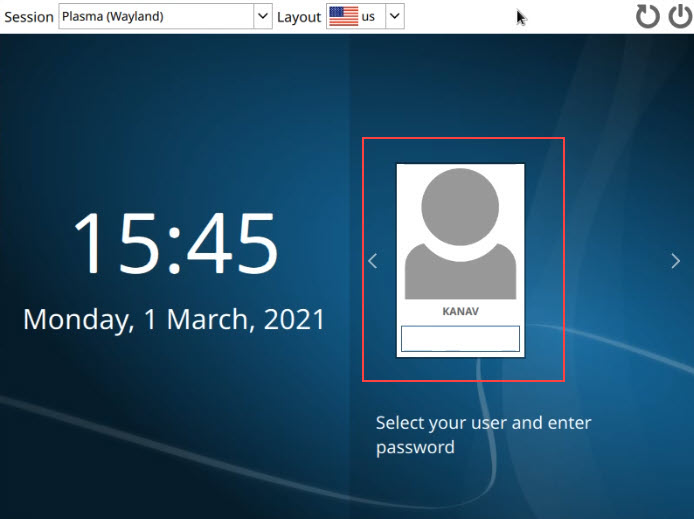
Step 40: Now see it asking for id passwd in GUI Mode so just fill up your credentials.
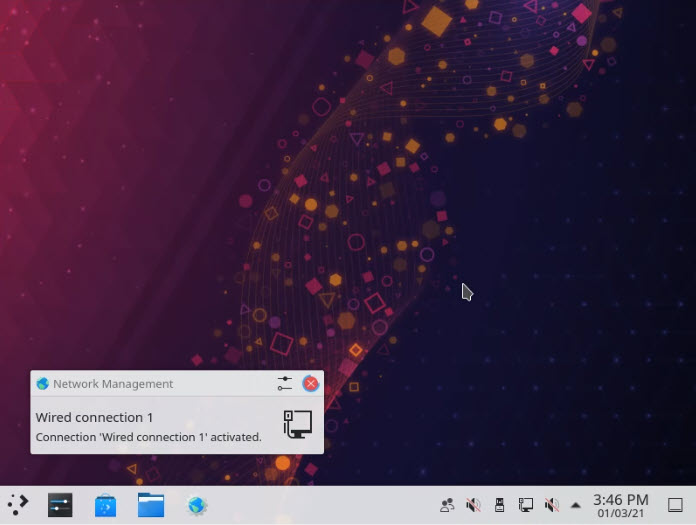
Step 41: Now after a few minutes you will see your desktop screen.
Hi, techies thanks for reading this blog. I know it was long but I have tried to cover all steps in brief and other additional things from scratch. I hope the steps I guided in this blog will be helpful. In case you are stuck in between any step or you need any other help you can leave a comment at end of this blog or you can directly contact me at kanav@techofide.com
Commonly Asked Questions
Q1. Is Arch hard to install?
Ans. No, it just looks lengthy for a new person to install but I have made it very easy just follow this blog. In case you feel any help is required I will always there for your help you can directly contact me at kanav@techofide.com or you can also ask on my WhatsApp group.
Q2. Why is Arch better?
Ans. In the terms of flexibility, freedom to user and light-weighted experience. I feel it is better compared to another operating system if you want to use a light and smooth operating system. But it doesn't mean it can replace other Linux operating systems.
Q3. How do you chroot in Arch?
Ans. It is very easy you just need to open a terminal and run "sudo arch-chroot" (use sudo if you are not in root) you can also view a demonstration by clicking on look onthe Demonstration
Q4. Can a beginner use Arch Linux?
Ans. Yes, even I think it is a great choice if you start because only installation will give you the whole overview of the Linux architecture and important configuration files. After using it you will feel like a pro and other distributions like Ubuntu, Fedora, CentOS will be much easier for you to use. In short, it will clear all your concepts from scratch.
Q5. Which is better Arch Linux or Kali Linux?
Ans. I think this a very unfair comparison because both are different and made for different motives. Arch has a motive of providing a flexible and light-weighted operating system where the user has full control over install and removal of all the components from scratch but on the other hand, Kali Linux is mostly used by hackers and Cyber Security experts. Kali came with many pre-installed hacking tools which also made Kali operating system heavy.
Q6. Can I install Arch Linux?
Ans. Yes, I have made it very easy for you just follow the above steps carefully. I am assuring you it will be very easy to install Arch Linux after following the above-mentioned steps. In case you feel any error or difficulty you can directly contact me at kanav@techofide.com or you can also ask on my WhatsApp group.
Q7. How to install GUI on Arch Linux?
Ans. You can go to Step [38] & [39] of this blog by clicking on Go to Answer
Q8. Is Arch Linux worth it?
Ans. Actually, it depends upon the user, If you are a beginner and want to start learning then it absolutely worth it, but if you are a user who likes to use GUI based system then you might not like it. Most of the users who know about Linux servers are switching to Arch Linux.
Q9. How to install an application on Arch Linux?
Ans. It is easy to install an application on it, you can go with the pre-defined Pacman manager or you can allow snap to install any application or you can go for yourt for example if you want to install gedit with "snap" just run "sudo snap install gedit" or if you want to go with pre-defined Pacman manager then it will be like "sudo pacman -S PACKAGENAME" You can also go for Yaourt (Yet Another User Repository Tool) is an advanced shell tool for install in packages on Arch.
It is used to search, install and upgrade packages from AUR interactively, supp
Q10. Does Arch Linux have GUI?
Ans. No, it's not coming by pre-defined but you can easily install it by running 2-3 commands, If you want to know that commands, you can go to Step [38] & [39] of this blog by clicking on Go to Answer
Related Blogs
- How to Create Bootable USB | Linux Bootable USB | Windows Bootable USB
- How to Become an Ethical Hacker | Techofide
- What is Computer Network | Basics of Networking [With Practical Examples]
- Boot Menu Option Keys For All Computers and Laptops | [Updated List 2021]
- What is Metasploit Framework | What is Penetration Testing | How to use Metasploit
- How to Install Metasploit on Windows and Linux | [Step by Step Guide]
Related Videos
Also Read
- What is Graph in Data Structures? | Techofide
- What is Keyword | What is Keyword Research | Techofide